 ">
">
How To Plan an Appalachian Trail Thru Hike as a Canadian
Top down planning
First thing is first, you have to determine how you’re going to plan this thing. In my opinion, top down is the only way to approach it. This means, you’ll start with the big ideas and slowly work more detail into the plan. Overall, it allows you to break down the process into more manageable chunks.
Chunk 1: Resource Gathering
This seems like a no-brainer, but its really important to obtain a vast and varied amount of resources to inform big decisions about your trip. This includes, but is not limited to, guidebooks, apps, blogs, youtube videos, and government webpages.
Guidebooks
In your searches, you are likely to stumble upon AWOL. Unforunately, this book isn’t sold in Canada. However, we found Whiteblaze, by Rick “ATtroll” Towle, to be the best alternative. You can purchase a physical copy that is updated annually, and it also comes with a PDF version so you don’t have to carry the hard copy on trail.


Apps/sites
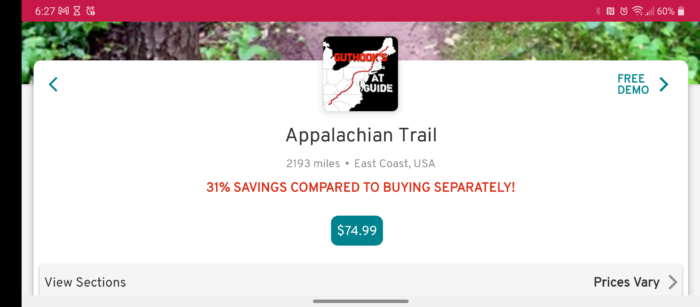
Get Farout! Not surprisingly, Farout (previously Guthook) is the bread and butter of information about the trail. Its a GPS for your location on trail, and a real-time update from users about significant information (like water source reliability, and a map). Obviously, its going to cost some money, $75 CA, but it will likely be the best investment you make.
Another indispensable tool is Reddit… Specifically, r/Appalachian Trail. If you have a question, someone has likely asked it on Reddit, and its been answered. If not, ask it, and people will answer. More to the point, Reddit users provide you with honest and quick feedback, anecdotal evidence, and even some real-time trail information from hikers.

Second to last, you will want to visit the CDC webpage, your airline webpage, as well as the Canadian Government Covid Page. These sites will keep you apprised of all requirements to get into the country, stay there, and get you home.
Last, but not least, appalachiantrail.org. is the official site for the Appalachian Trail. It has an interactive map, information about specific sections of the trail, registration, and much more. Undoubtedly, this site is a must-have on your list of resources.
Blogs and Stuff
Much like Reddit, blogs provide qualitative, anecdotes and first hand experiences that may help you plan the hike you want. Unsurprisingly, The Trek was my primary blog resource. However, to round your palette, you might want to check out these other sites: Greenbelly, OutdoorGearLab SwitchbackHiker, and CleverHiker. Admittedly, some of these are more gear oriented than others, but I would be lying if I said there wasn’t other important information there.
Youtubers
It goes without saying that there are TONS of Youtube videos relevant for planning- notably, Jessica “Dixie” Mills (A.K.A Homemade Wanderlust), and Darwin on the Trails. They are informative, engaging to watch, and experienced. You can find anything from gear lists to documentaries on their channels, and I referenced them heavily for gear and inspiration.
Chunk 2: Dates, Routes, Timing
The next thing to do is figure out how the AT is going to fit into your life. Keep in mind, your trip cannot exceed 6 months, or else you will require a travel visa. Having said that, your research will likely yield 3 ranges of start date: late Febraury, late April, and June. These coincide with Northbound (NOBO), Flip-Flop, and Southbound (SOBO) itineraries. One of the most pivotal planning points to keep in mind is the Baxter State Park (Mt. Katahdin) closure in mid to late October. Keep this in mind when choosing your dates. After that, its time to break it down and figure out how much time it’s going to take (approximately). Having a timeline helps you budget, but also assists you with border crossing. Its not unlikely that you will be asked to provide return information, and proof of funds.
1. Divide the total amount of Appalachian Trail miles, by the average amount of miles per day you want to accomplish: 2200/18= 123ish days.
If you’re a student with a timeline, you can also do it the other way: 2200mi/x days including zeros= miles per day. Then you can see if this is doable for your level of fitness. Reasonable paces range from 12-18mi/day as a macro average. Again, this is average miles per day, over the entire trip. Somedays, you might do 8; somedays, you might do 26!
2. Determine the amount of zeros you want to take and add them to the total days in step 1. For example, My husband and I want to take 15 zeros, so that brings our total up to 138 days.
3. Choose a start date and commit to it. Tell friends, and subscribe to airlines to find deals.
As my husband is a student, we planned the trip around the amount of days we have. Given that we have to start after exams, in late April, we concluded that a flip-flop would best suit our needs. Starting in the middle, at Harpers Ferry, we head North to Mt. Katahdin for an easy-on-the-legs start, and no time pressures to summit Katahdin. Then, we flip back to Harpers Ferry, and head South. Due to the uncertainty surrounding the trip and the miles we will actually achieve, we bought travel insurance to change flights in the event that we don’t hit our target. C’est la vie.
Things to Keep in Mind
1. The more flexibility, the better
2. More zeros = more expensive: extra hostel costs, eating in towns, shuttles, hitches.
3. Generally, the more flexibility and time you allot, the more enjoyable the experience should be, but it comes at a price.
4. The most common reasons why people quit: overuse injuries (too much, too fast), and running out of money.
Chunk 3: Resupply
In order to budget, it’s important to determine how many resupply boxes you will need. To inform your decision, take into account the following: most prescription medications can’t be mailed, so you have to take your supply with you; seeds, fats, oils, and meats cannot be mailed; if you have specific gear to replace, you can’t guarantee availability… Like size 5W women’s trail runners. With that in mind, consider these options: no resupply, full resupply, hybrid.
No boxes
Pros: Arguably the cheapest and most flexible option. Luckily, the trail runs through/near towns often so you’re usually never farther than 3-4 days from somewhere that food can be purchased.
Cons: A constant diet of “hiker food” is often high in sodium. This case study suggests that the amount of dietary salt is not adequately mediated by the exercise you’re getting. Ultimately, it COULD (I am not a nutritionist!) have negative health impacts. Next, some places have very limited products, meaning you might be stuck with gas station goods. Last, you can’t control availability of products for specific dietary needs.
All Boxes
Pros: the most control over your diet. You can Spread the cost over a year of buying extra food. you can also control the sodium content, and cater to dietary restrictions. This can also save you money depending on the food. if you dehydrate your own meals (like vegetarian chili) you save yourself about 10$ per meal as opposed to buying the pre-made freeze dried meals, which run you about 15$ per dinner.
Cons: its expensive to mail food boxes over borders. If you aren’t making your own food and dehydrating it yourself, its just not worth it. Contrary to what your research might suggest, flat rate boxes are not an option, as they are a domestic only product. Mailing boxes is also rigid: you have to have friends send boxes in specific intervals, and stop at specific places in specific time frames. This also takes lots of planning.
Hybrid
Pros and con: really you get the best of both worlds. Some hikers suggest to mail a box to yourself for resupply at given towns with limited resupply options, such as Monson near the 100 mile wilderness.
Chunk 4: Travel Insurance/ Documentation/ Other
Here is a list of all the documents you currently need to fly to the US in COVID times:
– Passport
– Covid fully vaccinated attestation form
– Negative Covid test within 24 hrs of your flight or a 90 day covid recovery note.
– 2 pieces of government issued photo ID. I suggest your health card and your passport
– US credit card and cash: most banks have the option to sell you a US credit card. Getting one will allow you to forgo the exchange rate and fee that comes with using a CA card abroad. Carry about $200 cash for hitches and other cash only purchases.
– Travel insurance: I recommend BlueCross. They have affordable plans and extensive coverage (including covid coverage). You will need to carry their “card” they issue with the emergency number to call, and your policy number.
– Consider the following when saving: house and pet sitter, bills while you are gone, cancelling memberships, allowing acclimation time for your return to society.
Chunk 5: Gear
After sifting through all those resources mentioned above, you’ll find that A LOT of gear is specific to the US. Fortunately, most will ship to Canada. Unfortunately, import fees are significant. If you are looking to save money, I recommend buying straight from MEC online. They often carry decent gear, and shipping to your door is now free. Plus, they have a bougie rock-solid guarantee. Another gear site to checkout is Valhalla Pure Outfitters; if MEC doesn’t have the item you want, VPO may, and sometimes they do special ordering. Also of note, local gear stores often carry other great items that MEC and VPO don’t supply. However, If you are absolutely certain that you want to shell out for the name brands, I can confirm that Gossamer Gear, Zpacks, and Enlightened Equipment sell to Canada. Do note that the import fees on things like tents can be up to 30% of the cost of the product.
Bonus Goat Thought: responsibilities suck. If I could do it again, I would do this in a gap year, when I don’t own stuff or pets.
Happy planning!
-a Nameless Mountain Goat

This website contains affiliate links, which means The Trek may receive a percentage of any product or service you purchase using the links in the articles or advertisements. The buyer pays the same price as they would otherwise, and your purchase helps to support The Trek's ongoing goal to serve you quality backpacking advice and information. Thanks for your support!
To learn more, please visit the About This Site page.
