 ">
">
Raider’s Gear Review And Other Stories
My fellow hiker trash, welcome! What lies before you is all the hiking gear I used to finish my 2017 thru-hike of the Appalachian Trail. I’ve included, sizes, weights and links. You’re welcome.
About me: I am a 32-year-old lady who embarked the trail solo, with the exception of my 8-year-old Golden Retriever, Indy. He carried most of his own stuff, so no need to include it here. But, if you are interested in thru-hiking with your pooch, check out my advice here.
I am a big believer that in order for anything to work, you have to love it.
Hiking gear is something that needs to have multiple functions, be comfortable, and hold a dear place in your heart. When backpacking, your life is literally whatever you can carry, so you want to make the most out of it.

It feels just like yesterday that I was intensely trolling the internet. I was desperate to get advice on what worked for people, and it’s my goal to give back, especially for our tiny forgotten demographic of women hikers. Can I get an amen?
Disclaimer: I started with a hammock, and ended with a tent due to the colder weather. Toward the end, I only used lean-tos. I am not a big fan of my hammock or tent, so I am going to leave the shelter opinion out of this one, although I will admit I much prefer hammocking. Check out The Trek’s survey from this year for a good idea of the most popular shelters!
As mentioned above, my hiking gear motto was if I didn’t love it, it had to go. In my five months, I went through four different packs. Packs are the most terrifying thing to switch out, It’s like getting a new phone; it takes you a hot minute to figure out how to work it, and drives you crazy when you can’t find where your apps went. In switching constantly, not only was I risking all of my prized possessions fitting inside, but figuring out how to pack it becomes an anxiety-ridden endeavor. You’ll quickly learn on trail the importance of a consistent packing method. An example of my brain in the morning: stuff sleeping bag in the bottom, then sleeping pad, then… uh oh, where are my camp shoes? You create this routine so everything fits in like clockwork, and you minimize leaving your beloved Crocs behind. OK, backstory over, let’s get into this beloved crap carrier.
Exped Lightning 45 With Flash Pocket (45L + 10L) {40.6 oz + 2.8 oz}

I had never heard of Exped before. The packs I previously carried were ULA, Gossamer Gear, Deuter, and Kelty, all really well-known pack brands, but just didn’t work for me. Skin rubbing off, pack sitting on my back wrong, pack brain butting me in the head, it was almost as hopeless as finding prince charming (insert solo violin). But I digress…
One fateful day in the middle of nowhere Virginia I saw this terracotta bag gleaming in the fluorescent lights. Once I plucked it from the metal hanger, I knew. My arm flung back immediately, it was the lightest bag I had ever lifted. One of the guys working sauntered over. “I’ll give it to you half off,” he offered. I felt the words leave my lips. “Sold!” I figured if it was uncomfortable like all the others, I could possibly resell it for my money back. Once I figured out how to fit my stuff inside the dauntingly small 45 liters, I never looked back.
The straps and waist belt have this magical foam padding that finally didn’t rub my skin off. It has a round foam pad that perches on the small of your back, creating this freedom to have your back untouched. With nothing but one external metal bar to the pack, the max weight is over 50 pounds. The fabric is water-treated rip-stop nylon, however I did get a rain pack cover for it (see below). When it started to rain out of nowhere, it bought me time before digging the rain cover out. The pack also comes with a five-year warranty.

Add on the additional 10 liters with the purchase of the flash pocket. It fit my Big Agnes UL2, Luci solar light, and two Honey Buns (not that I eat those). It has a mesh fabric side along with a waterproof nylon side. Having that tent exposed to air flow was a big plus. Also the elastic straps were perfect to shove Indy’s Therm-a-Rest ZLite through.
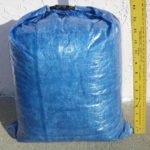
Granite Gear Pack Cover Small (Fits 41-54L) {3.4 oz}

The first half of my SOBO journey had no rain cover. I was trying to use the bare minimum, and that was dumb. This thing is lighter than the weight added to your pack for getting wet. I was extremely happy with this cove; it stretched enough to cover all the stuff hanging on the outside of my pack, and repelled even the stubbornest of rain and snow. If it could repel bugs I would have worn it like a dress in the 100 Mile Wilderness. #goals

Me after two days of cold rain.
While on the topic of rain, this seems like a good segue to all the other things I used to keep my stuff dry. A lot of stuff you read online is very anti-stuff sacks for your bag. Most of us on the trail did have stuff sacks. We all got burned, or shall I say, soaked, at one point, and never wanted to risk it again.
Trash Compactor Bag/Bag Liner
This had two purposes for me (multifunctional, hooray!). The first, seemingly obvious, was to protect my belongings from any rain that fought its way into my bag. The second purpose was a scent blocker for the critters of the woods. Having that extra-thick plastic layer helped to keep animals from attempting to chew through my bag. Put your hiking socks in between your bag and the compactor bag and you may have a fighting chance to save your food. I never hung my food, but I also had my dog to help protect the goods.
Sea To Summit eVAC Dry Sack (20L) {3 oz)

The first leg of my hike I used only a trash compactor bag to protect my sleep system. Until one fateful day in a rainstorm, everything got soaked (not “The Notebook” summer rainstorm soaked, think “Jurassic Park” your vehicle got flipped by a T-Rex soaked). Turned out that pinholes had developed in the bag, so lesson learned, waterproof stuff sack time. The eVac only leaked once, and it was the worst rain I walked in the whole trail.
This fit my 20-degree bag, bag liner, a puffy, and sleeping pad repair kit.

When your liner has pinholes and your down is soaked.
REI Co-op Lightweight Compression Stuff Sack (10L) {3 oz}

This held my clothes and doubled as my pillow. It did manage to stave off droplets of water, but I wouldn’t trust it to be fully water repellent like it claims. Pro tip: put a dryer sheet in it to keep your nose happy when you have to cuddle with your sweaty clothes. One dryer sheet lasted the whole trip. Second pro tip: Don’t let that dryer sheet go anywhere near your water bottles and filter. You’ll be tasting Bounty for weeks.
Sea To Summit Ultra-Sil Dry Sack (20L) {8 oz}
 Here lies my food bag (RIP). It survived pretty well, minus a few tiny holes from my spork stabbing it during those frantic “please fit in my bag” moments. Twenty liters was too large, mostly because I couldn’t grasp the concept of “too much food.” It did to retain smells, but was indeed waterproof, keeping spills inside. Overall, some good, some bad, but it made it the whole way.
For my next adventure I’ll switch to the Z Packs.
ZPacks Food Dry Bag (14L) {1.5 oz}
Almost everyone had it, and I only watched mice eat through two of them. Food for thought, pun totally intended.
Sea to Summit Mini Stuff Sack Set (3.85L) {.95 oz}

Truth be told, I felt silly buying these. I was using Ziplocs for most things, but these proved to be worth it. Completely waterproof, they kept spills from escaping, and rain from permeating inside. The large blue one fit all my personal items (hairbrush, toothbrush, toothpaste, eye drops, etc.); the purple one that I kept in my fanny pack held my money (just try to pay with wet money); and the green I used for Indy’s prescription bottle and skin glue. Having bags to organize what little you have helps save time when you’re looking for something, which is always.
The Fanny Pack

This fashion faux-pas from 1991 is back in full swing of fashion meets functional. Front weight technically negates the weight on your back, so win-win! I went for the clear rainbow shimmer since the plastic would hold up better against water, and more importantly I wanted to look cool. It was great to have easy access to my stuff (Raider’s list of fanny essentials can be found here ). Big plus to have a hands-free option in town, not to mention you will become the trendsetter hiker of the year. NBD.

Hiker chic playa.
REI Co-op Traverse Power Lock Cork Trekking Poles {1 lb 4 oz}

Obsessed with these poles. Also, a big you’re welcome to the lucky hiker who took my first pair from the base of Katahdin. Pro tip: don’t forget your poles.
These held up better than Lekis and Black Diamonds, for half the price. The cork handles are my favorite, keeping your hands warm, and drying quickly. They never bent once, and were great awning poles for my hammock tarp. The tips lasted over 1,600 miles, and if you find a good outfitter with Leki tips, they can be replaced. Overall, can’t beat them for the price, quality, and color. Color you say? Well, what if it’s before sunrise and your poles are in a giant can with a million other poles. and you slept in late and it looks like rain and the shuttle is leaving with or without you… breathe… sorry, you get the idea. Great color.
Therm-A-Rest Z Lite Sol – Regular {14 oz}

I cut four panels off of this so it would fold up less bulky. It was used primarily for Indy (my Golden retriever) to sleep on, but I also used it as a sit pad. The reflective side works wonders to keep bodies warm. In my hammocking days, it worked as a sleep pad for me when I had to overnight in shelters, but be warned – they don’t call it the suffering pad for nothing.

Actual footage of me waking up.
Sleeping Pad: Therm-A-Rest NeoAir Xlite – Regular {12 oz}

One of the most popular on the trail for good reason. Extremely comfortable, and keeps your heat on your body. I slept on many rocks and roots and never knew it. The crinkling goes away after some time, and while a pricey option, this one is worth it. Be warned; you will never come to appreciate the sound of deflation in the morning. Never.
REI Igneo Sleeping Bag – Regular Left (19F) {2 lbs}

This served as my cold weather bag. For the warmer weather I was a huge fan of my top quilt Therm-A-Rest Vela HD Quilt.
Reminder: when shopping for sleeping bags, women run 15 degrees cooler. So this bag served as a 30F bag. I quickly realized I needed extra warmth (hello, Smokies). With the added bag liner (listed below) I stayed cozy warm. I always hated mummy-style bags, but this proved to be roomy enough, allowing me to change spandex pants and thong in there. Added bonus: vents on the sides kept me from saturating myself with sweat when I got a fever from giardia. Thanks Badger Sponsorship 2017 for this one!
Sea to Summit Reactor Thermolite Sleeping Bag Liner (14F) {9 oz}

I was surprised how much warmth a thin piece of polyester fabric added, but it certainly did. It also added the magic of a soft fabric I could sleep with (ah, luxuries). It was just enough warmth for me, and the coldest it got was around 15-20F at night (that was average; coldest was single digits.) To be safe, I would recommend moving a few degree levels down in the Reactor series; this is the lightest of the group. You get more ounces with the warmer liner, but I always preferred being hot in a sleeping bag than cold. You can also use the liner in the summer (by itself).
Platypus GravityWorks Water Filter (4L) {11.5 oz)

I was the odd lady out using the GravityWorks. Ninety-five percent of my fellow thru-hikers used the Sawyer Squeeze, and the other 5 percent didn’t filter at all. Plus sides: 4L capacity meant I could filter once a day and be set, great for stealth camping, laziness, and sufficient hydration for my camel of a dog. It was also great for sitting there and eating snacks while watching fellow hikers squeeze water into bottles while freezing their hands. Downsides: I had some issues with it clogging even after backflushing. Fellow hikers would be done squeezing and there I was, sitting there, helplessly watching water drip (call it trail karma). Whole system is bulky and heavy compared to the Squeeze. Overall, happy to have had it the whole trip. I used the clean bag as my camel back and taught my dog to drink from the bite valve. For me it was important to have a straw system, or else I wouldn’t drink enough water during the day.
LIFEWTR Bottle

Sometimes things catch on fire, like your water bottle.

So simple, yet so useful. When I started, everyone preached to have a Smartwater bottle handy, well lucky for us, LIFEWTR adapted the same cap as Smartwater, which is the perfect size for backflushing your filter. To top it off, LIFEWTR is sold almost everywhere, including your soon-to-be favorite resupply store, Dollar General. Hikers agree, LIFEWTR bottles are more durable, and the different artwork helps you know which crinkled plastic vessel is actually yours at camp. This bottle survived boiling water thrown in the sleeping bag, retained functionality after a close encounter with a fire, many merciless squeezing sessions, and constant freezing and unfreezing. Basically, this water bottle is a better hiker than me.
Jetboil Flash Lite (2 cup max.) {12 oz}

I love Jetboil. I am no gourmet chef, so the ability to have boiling water quickly was perfect for me. This system was very lightweight, all the components fit inside, and the coozy doubled as a famous hiker autograph book for me (thank you Odie and Grey Beard). Trail survey says the best fuel is the Snow Peak Giga Power, but I could never find it in town. I had the best luck with JetBoil and MSR, and the worst luck with Licamp. The smallest fuel canister is not cost-effective, but it fits inside the system. If it’s not too cold, you could have enough for dinners for around a month easy with this size. Don’t listen to what anyone says; you honestly only need to bring one. When I was low, I could always count on finding some left behind in a shelter.
Sea to Summit X Cup (1 cup) {1.6 oz}

This cup lasted the whole trip. It worked great for my jasmine tea I enjoyed nightly, and doubled as a scoop for when puddles are your only water source. Its measuring lines on the inside were great when you get a 2.5-serving dehydrated meal and can’t fathom what 1 3/4 cups looks like. No problems with boiling water, or stuck on hot chocolate. Also, when collapsed it fits right inside my Jetboil.
Luci EMRG Inflatable Solar Lantern (2-3hrs) {2.5 oz}

This was my luxury item. I noted above that it will stay lit for about three hours on a charge. Being in the woods, even with no leaves on the trees, I could never get a full solar charge. I still recommend this mainly for having it at shelters. Shelters are very dark, your headlamp can only illuminate so much, and this was a big help once the sun starting going down at 5:20 p.m. It’s so light, easy to cram into any crevice, and only costs around $15. Pro tip: use it as romantic dinner lighting while you share a 2.5 serving of Beef Strognaoff Mountain House with your hiking mate, or your dog.
That’s a wrap! If you liked this list, be sure to check out my other lists of prized possessions.
Raider’s Fanny Pack including electronics & toiletries
My best piece of advice (which is congratulations to you for making it to the end of this list) is this:
You can scour the internet, chat with past hikers, watch all the YouTube, but the only way you will figure out what you need is by getting out there and trying it. That is the one huge thing I wish I had known before I started.
Don’t stress, the only way to figure it out is to get in that woods and see how it goes. It won’t be the end of the world, and it will all work out. There are so many amazing people out there who will help you. This is your mantra: breathe, repeat, and get on that trail. Raider loves you.

Hope we helped. Now get out there!

This website contains affiliate links, which means The Trek may receive a percentage of any product or service you purchase using the links in the articles or advertisements. The buyer pays the same price as they would otherwise, and your purchase helps to support The Trek's ongoing goal to serve you quality backpacking advice and information. Thanks for your support!
To learn more, please visit the About This Site page.
