 ">
">
You Be the Chef: Dehydrating Food and Storing It for Your Thru-Hike
So, I’m no Bobby Flay and you don’t have to be either. I just like to make things easier on myself so I can focus on the big picture.
Below is a mish-mash of ideas I’ve had over the past few months in order to contend with the chore of acquiring food during my A.T. thru-hike.
Perhaps they’ll get you thinking.
Related: The Best Meals for Backpacking
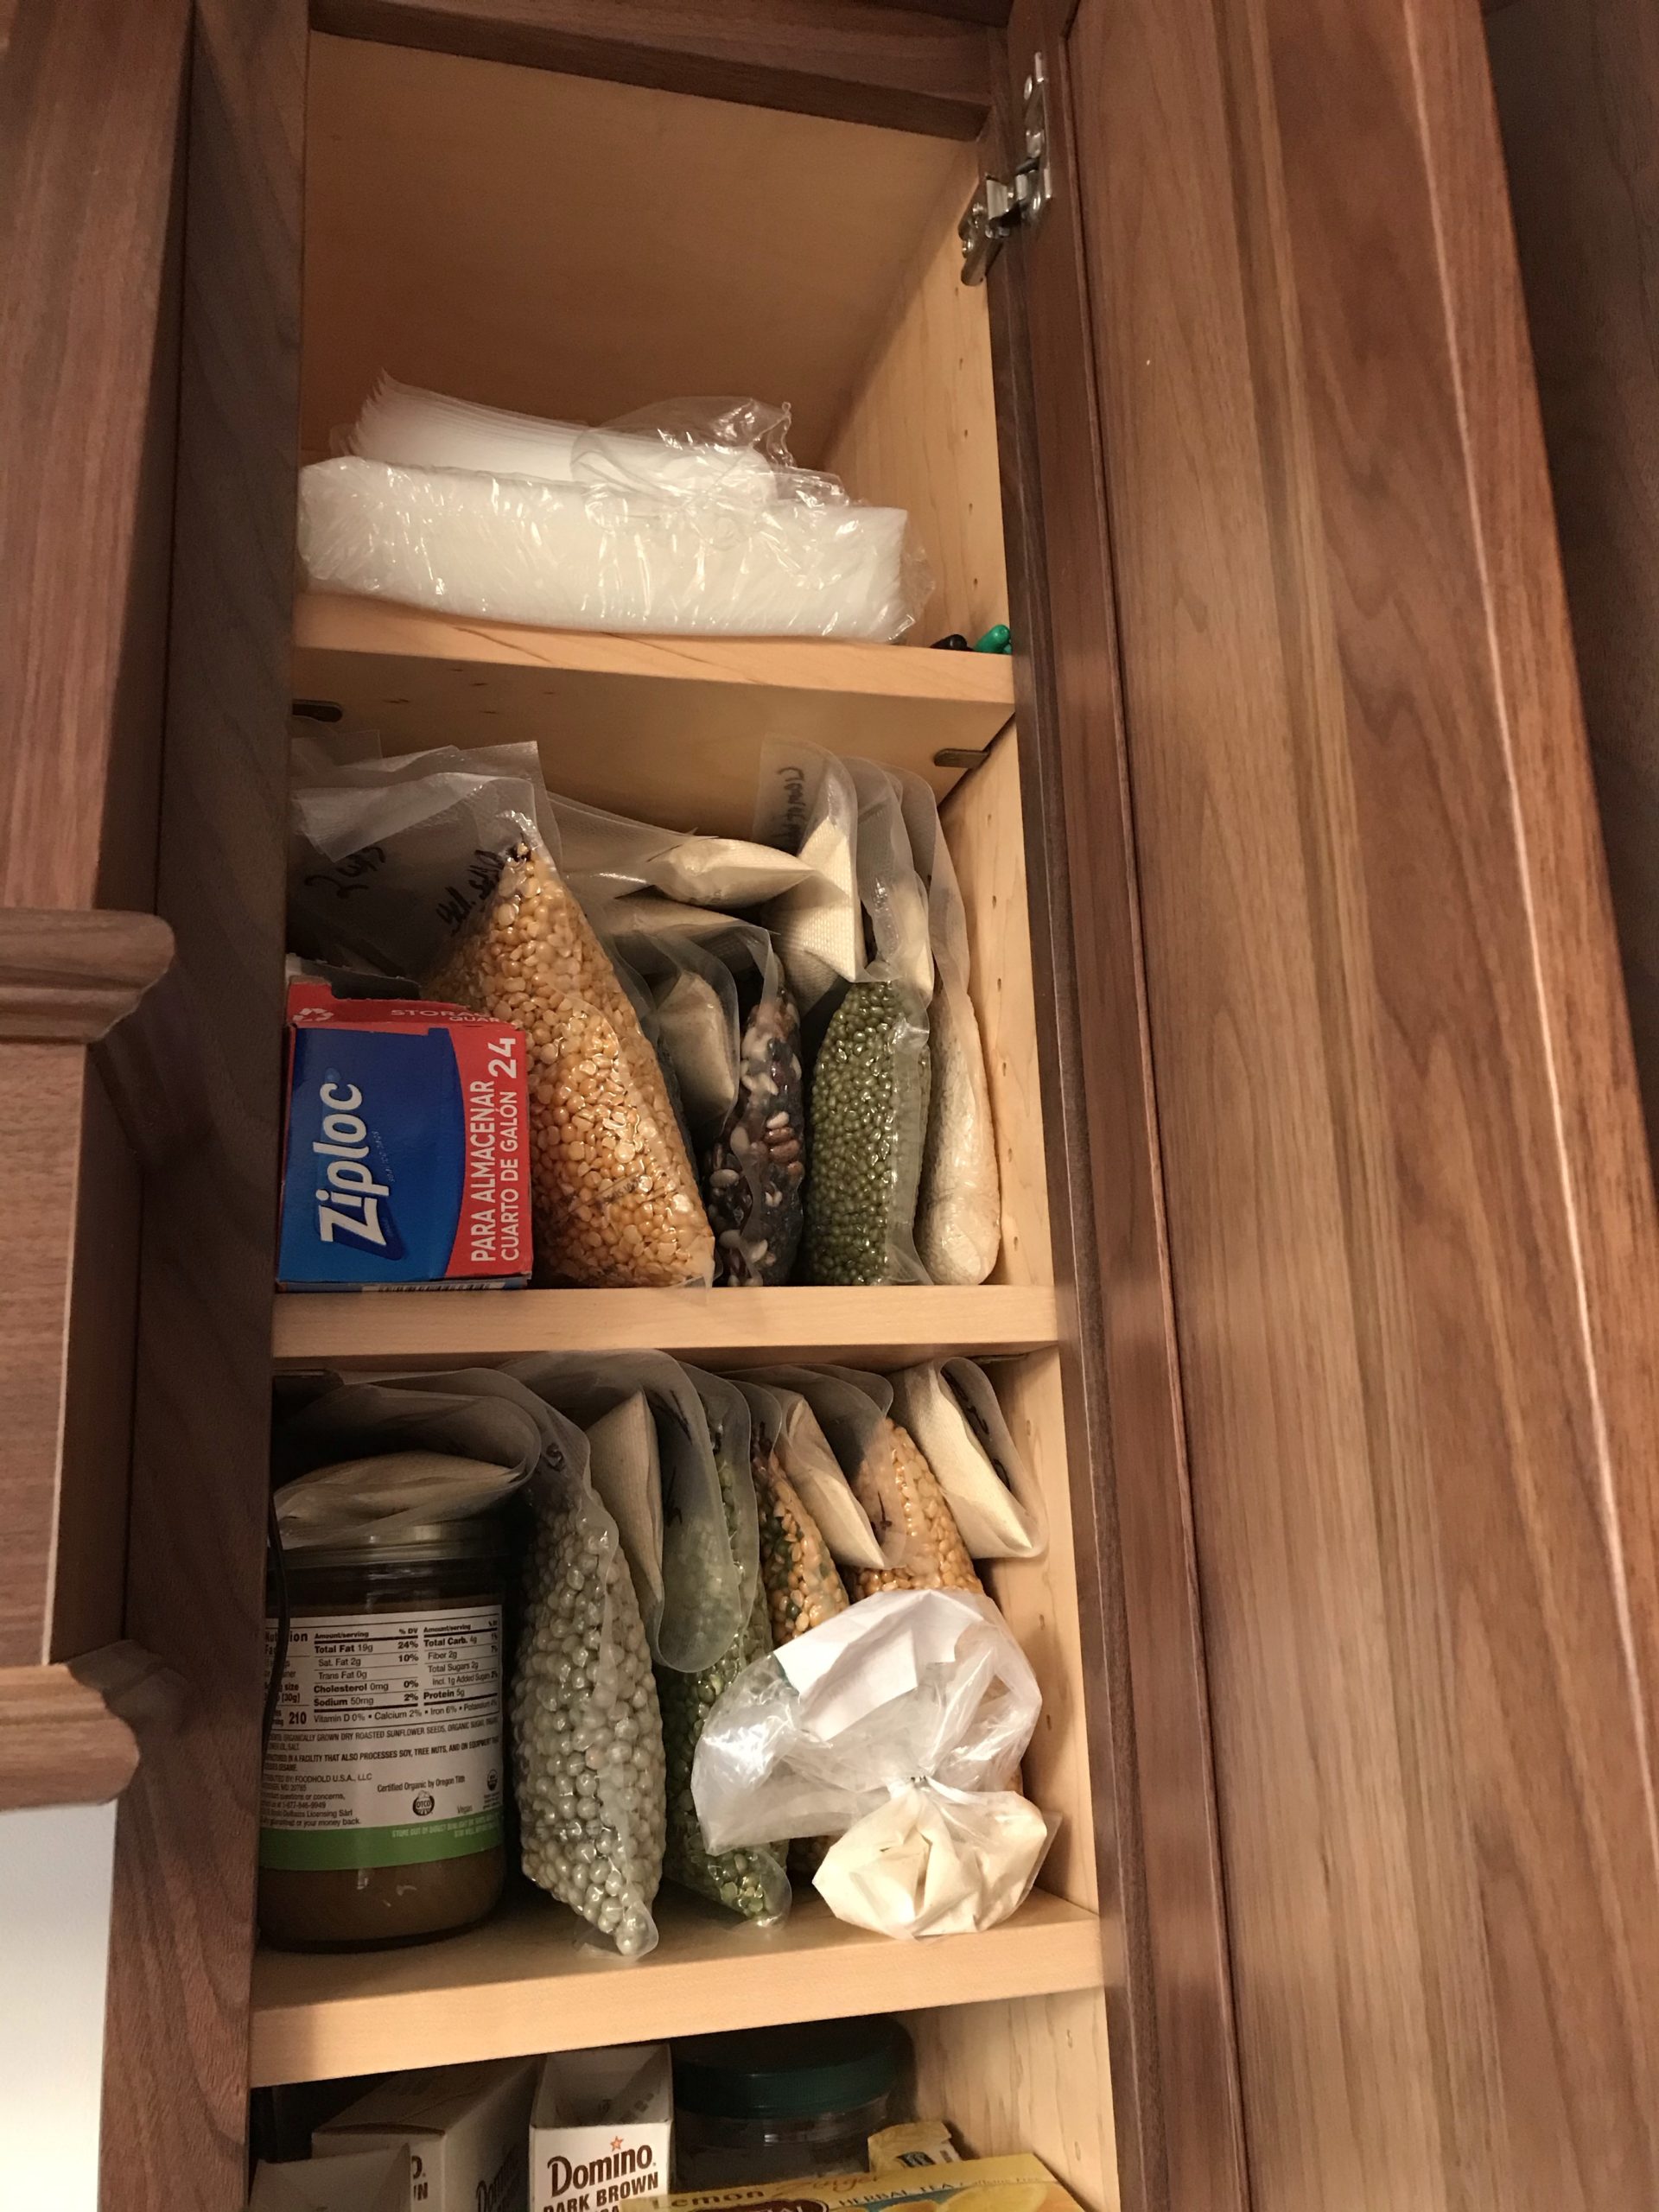
What You Will Need:
The most important thing in food preservation is to cut out all of the extraneous variables that could make said meal go rancid.
To state the obvious, the first thing you will need to dehydrate food is… a food dehydrator. Normally I would provide you with advice on buying one, but the one I am using happens to be one my parents got as a wedding present.
I’m in the stone ages, therefore I can be of no service to you in that regard.
However! The second thing you will need is a vacuum sealer and some vacuum bags. Some come with bags, some don’t. Here are what I use:
The Geryon Vacuum Sealer –

I have used this thing for several hours at a time, close to every night for months now. It hasn’t quit on me yet and it’s easy to use. You can start there, or look around for one that suits you better.
WeVac Vacuum Sealer Bags –

You can buy rolls of vacuum plastic in order to make your own custom-sized bags. The rolls of plastic are annoying and pretty expensive. You want money for gear, not vacuum bags. Lame.
Alternatively, you can just buy these guys. These bags pretty cheap for a pack of 100, there are very few duds in each pack, they have lines to label everything right on the front, and they make several sizes of bags. They also come with protective patches to place in the bags in case you are vacuum sealing sharp foods, like dehydrated meat.
Food –
You also need food, preferably dehydrated.
Before we get into it:
If you look hard enough, you can sometimes find a dry goods store near you. For those of you who live in Pennsylvania, there is a great one in Fleetwood called Echo Hill which is run by a Mennonite family. If you can dry it, they sell it and their prices are decent as well.
Just know that dehydrating takes a lot of time and you will pay for either someone else’s time or your own. It’s your choice but I would recommend buying as much as you can.
Breakfast Ideas:
There are a lot of breakfast options. You can buy powdered eggs, dry-cure slab bacon, cold cereals, hot cereals, dehydrated berries, etcetera.
Here is an oatmeal recipe I came up with earlier in the week –
1 Cup Quaker Oats
2 Tbsp. Chia Seeds (white or black, doesn’t matter)
2/3 Cup Dried Cranberries
2 Tsp. Brown Sugar (light or dark, your preference)
Pack that sucker into a vacuum bag, seal it up, and all you have to do is add around 1 and 3/4 Cups of boiling water when you’re out in the field, stir it up a little, and you are ready to rock.
This recipe is also easy to play with and change around. I’ve done it with dates, pineapple, grated orange peel, and a whole manner of other things. You can even make it sugarless.
Again, you be the chef.
Be sure to test your recipes out before packaging them for the trail!
Lunch Ideas:
Some dry goods stores (Echo Hill) dehydrate soups. You can always buy soup mixes online as well. Other than that, just dehydrate some good, heavy Italian bread to go with it (it’s quite possible), and a handful of nuts and you have yourself a lunch.
You can steam dehydrated bread to re-soften it if you want.
Dinner Ideas:
Meat –
This is where things can get tricky. My goal is to focus on heavy protein consumption and, in the winter, mild fat consumption as well. Because of that, I have been dehydrating a lot of meats. But meat isn’t very easy to deal with when it comes to dehydrating because any excess fat at all will go rancid, even in a vacuum bag. I find sticking to low fat ground meat is the best bet. Ground bison, though expensive (around $10/Lb.), is an extremely low fat meat and dehydrates wonderfully. You can get your fats (which will keep you warm on trail) elsewhere.
Beef is harder. You have to cook it up (as with most other things you dehydrate) and make sure it is well done. After that, you have to drain the fat, which is fairly simple. The third step involves washing the cooked, ground meat several times with very hot to boiling water, straining it, and repeating the process two or three times. After that, you can dehydrate it.
I find the sweet spot for dehydrating meat seems to be about 140-145 degrees for about 10 hours. Your meat should feel rock solid.
Other Foods –
I have to admit, I haven’t been blending any ingredients for dinner. I figure I’ll burn that bridge when I get there (I can’t remember where I got that turn of phrase, but it’s awesome). That being said, I think it is perfectly adequate to bring several different kinds of ingredients and blend them in your pot on the trail. I recommend dried beans, dried peas, dried carrots, and anything that will really pack a nutritional punch.
A Brief Note on Beans:
Before cooking beans, you have to soak them overnight or for a similar amount of time or you’ll be crunching your way through dinner. Wish your teeth good luck!
In Summation –
If you follow this advice and expound upon it, through experimentation, you will be able to have access to some relatively lightweight, healthy food all along the trail. Just make sure you have someone reliable to mail it to you throughout your journey.
Get going and pretty soon your cabinets will be bursting with dried meals, dry goods, and dried spices!
(I’m not kidding.)


Check out more of my work for theTrek at: https://thetrek.co/author/paul-madigosky/

This website contains affiliate links, which means The Trek may receive a percentage of any product or service you purchase using the links in the articles or advertisements. The buyer pays the same price as they would otherwise, and your purchase helps to support The Trek's ongoing goal to serve you quality backpacking advice and information. Thanks for your support!
To learn more, please visit the About This Site page.

Comments 2
Hi Paul–Nice work dehydrating your foods! I’ve done a bit of it and have it WAY better than buying and very tasty. Have you tried breadcrumbs with your ground beef? Helps with the rehydration and keeps things moist. Just mix them in when dehydrating. Also, I’ve actually found canned beans dry better and you don’t need to worry about the cooking part. But they are a bit more expensive. I haven’t had the need to use my vacuum sealer to the same extent, but I’ve been thinking about sealing for my next trip. I’ll get those bags!
Keep cookin’
Thank you! What other kinds of things do you do food-wise? And I’ve heard of doing that, but I’ve also heard that breadcrumbs lessen the longevity of the meat, even when vacuum sealed. I’ve not tried it yet because, when I first began doing meats, I was 6 months out from my hike (I didn’t want to do any more than that so that I could be sure it would all keep well) I think the amount of time you have before it goes bad with breadcrumbs is something like 3-4 months if I remember correctly. I will probably be using that trick when I’m closer to a month or two away from leaving.
I would definitely start vacuum sealing if I were you. Even for fresh meats you are going to freeze for use in your “real” life. The meats never get freezer burn and taste fresh even after a year in the freezer. They are pretty amazing tools. And dry foods (save for meats) keep seemingly forever.
Anyway, thanks for the info and happy trekking!
– Paul