 ">
">
I’ve Thru-Hiked Over 8,700 Miles. This Is the Gear I Brought on My 99-Day CDT Thru-Hike
I‘ve thru-hiked almost 9,000 miles in the last six years, including not just the likes of the North America Triple Crown, but also shorter trips like the Arizona, Wonderland, and Tahoe Rim trails, among others. Between thru-hikes, I’ve also spent time professionally as a backcountry guide. Long story short: I’ve learned a thing or two about what kind of gear I require for my outdoor pursuits.
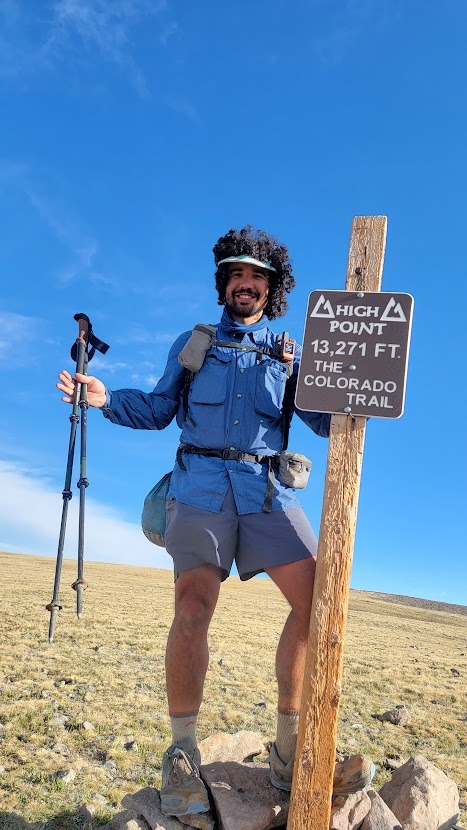
Most recently, I completed a 99-day thru-hike of the Continental Divide Trail. I began my hike at Crazy Cook on 5/10/22 and ended it at Chief Mountain on 8/16/22, averaging 25.7 miles per day over 2,550+ miles. (I was unable to complete the section between Cuba, NM, and Cumbres Pass, CO, due to fire closure. The rest remains a continuous footpath.) I intentionally started my hike later than most, accepting the late spring heat of New Mexico in exchange for more favorable conditions in Colorado and beyond.

Day 99 – Chief Mountain.
In this article, I will review the gear I used on my 99-day CDT thru-hike. I’ll be referencing my original gear article, where I introduced my set-up, as well as my LighterPack account. You can read about my entire CDT thru-hike here.
I’d like to remind readers that your gear list should be catered toward your style of hiking. I hiked the CDT quicker than many, but my overall base weight is heavy compared to FKT setters and fastpackers. For my specific hiking style and timeframe, I am very pleased with how things turned out. Here’s everything I brought.
READ NEXT – The Ultimate Ultralight Backpacking Gear List
99-Day CDT Thru-Hike Gear List
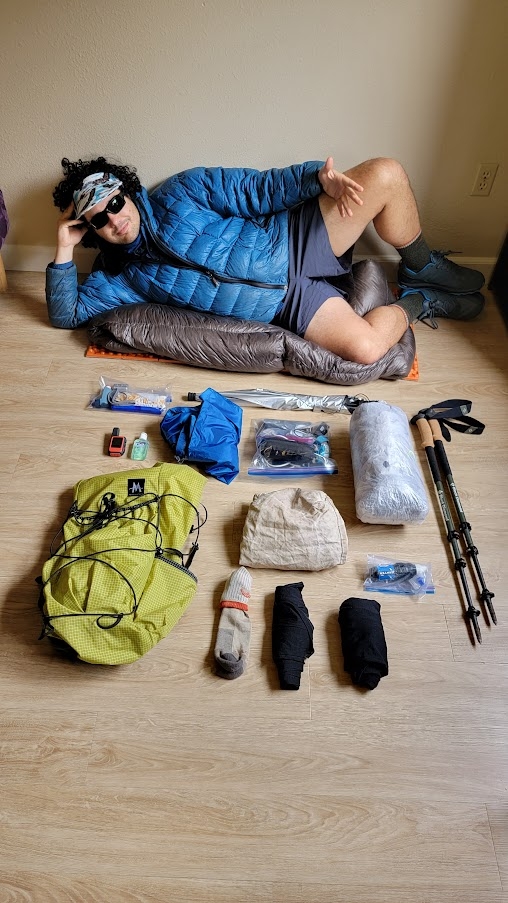
Gear for my CDT thru-hike.
Backpack: Mountain Laurel Designs Burn 38l
Prior Experience: new for CDT
Pros: Incredibly lightweight. Very durable. Just big enough for my kit.
Cons: Not much. Most discomforts came from carrying too heavy of a load. Long shipping timeline.
Consensus
The MLD Burn has been a popular choice for ultralight backpackers for years, and it’s plain to see why. It rides lower on the back (in the typical “JanSport” school backpack style). The pack is intended for ultralight loads, so there are fewer suspension and comfort features that you might find with other brands and models. It comes with no pockets or additional straps.
I prefer a bit more utility on the front of my pack while hiking, so I opted for a hip belt (sanitizer, snacks, caffeine) as well as a shoulder pocket (headphones, spork, snacks). Once I arrived in grizzly country, I added a water bottle shoulder strap for bear spray. The pack held up incredibly well; my only tears in the fabric were on the back of the kangaroo pouch (from climbing under blowdowns with my pack on) and in the side pockets (barbed wired in New Mexico).
It was admittedly uncomfortable on long food carries, and space was very tight at times. With that said, my base weight was definitely on the heavy end for a frameless pack like this. I also carried a two-person tent (detailed below), which ate up much of my limited volume.
Grade: B+

MLD Burn 38l.
Sleep System
Quilt: Enlightened Equipment Enigma 20-Degree Quilt
Prior Experience: Hiked Wonderland and New England on the AT with Enlighted Equipment Enigma.
Pros: Lightweight and warm. Retains loft if allowed to fluff back up occasionally.
Cons: Bit too warm for most of the CDT. 20 degrees was a bit bulky in my backpack.
Consensus
My quilt was a bit more powerful than necessary: I could’ve gotten away with a 30- or 40-degree alternative. I love it otherwise for chillier nights, but I’m not sure I’d bring it on the CDT again.
Grade: B-
Sleeping Pad (New Mexico): NEMO Switchback (foam)
Prior Experience: Hiked AZT and half of PCT with foam pads.
Pros: Perfect for sitting/laying on midday. Super durable. Cheap. No prep necessary.
Cons: Not as comfortable, especially for side sleeping. Cold at night. Wears down over time. Bulkier/heavier.
Consensus
I used this foam mattress from Crazy Cook to Pagosa Springs, and I was quite happy with it for taking siestas on hot desert days. After exchanging it for my NeoAir (see below), I still cut off a few segments and kept it with me as a sit pad.
Grade: B+
Sleeping Pad (Colorado onward): Therm-a-Rest NeoAir XLite (small)
Prior Experience: Hiked AT and Wonderland with NeoAir Xlite.
Pros: Compact and lightweight. Warm and comfortable for back and side sleeping.
Cons: Takes a bit of prep before bed. Must be careful to protect mattress from leaking air.
Consensus
I was really happy with my sleep set system. If anything, it was warmer than necessary for a vast majority of the hike. The NeoAir Xlite was great for keeping me warm and comfortable through Colorado and onward. Because I use the short option, which ends at about my knees, it isn’t as comfortable as other pads. Overall, I was only spending six or seven hours in my tent at a time, tops, so it was much more than enough.
Grade: A
Leftovers: I used a generic, lightweight stuff sack as my pillow. Every night I stuffed it with extra clothes.
READ NEXT – Therm-a-Rest Zlite Sol vs. NEMO Switchback: The Ultimate Comparison
Shelter: Zpacks Duplex
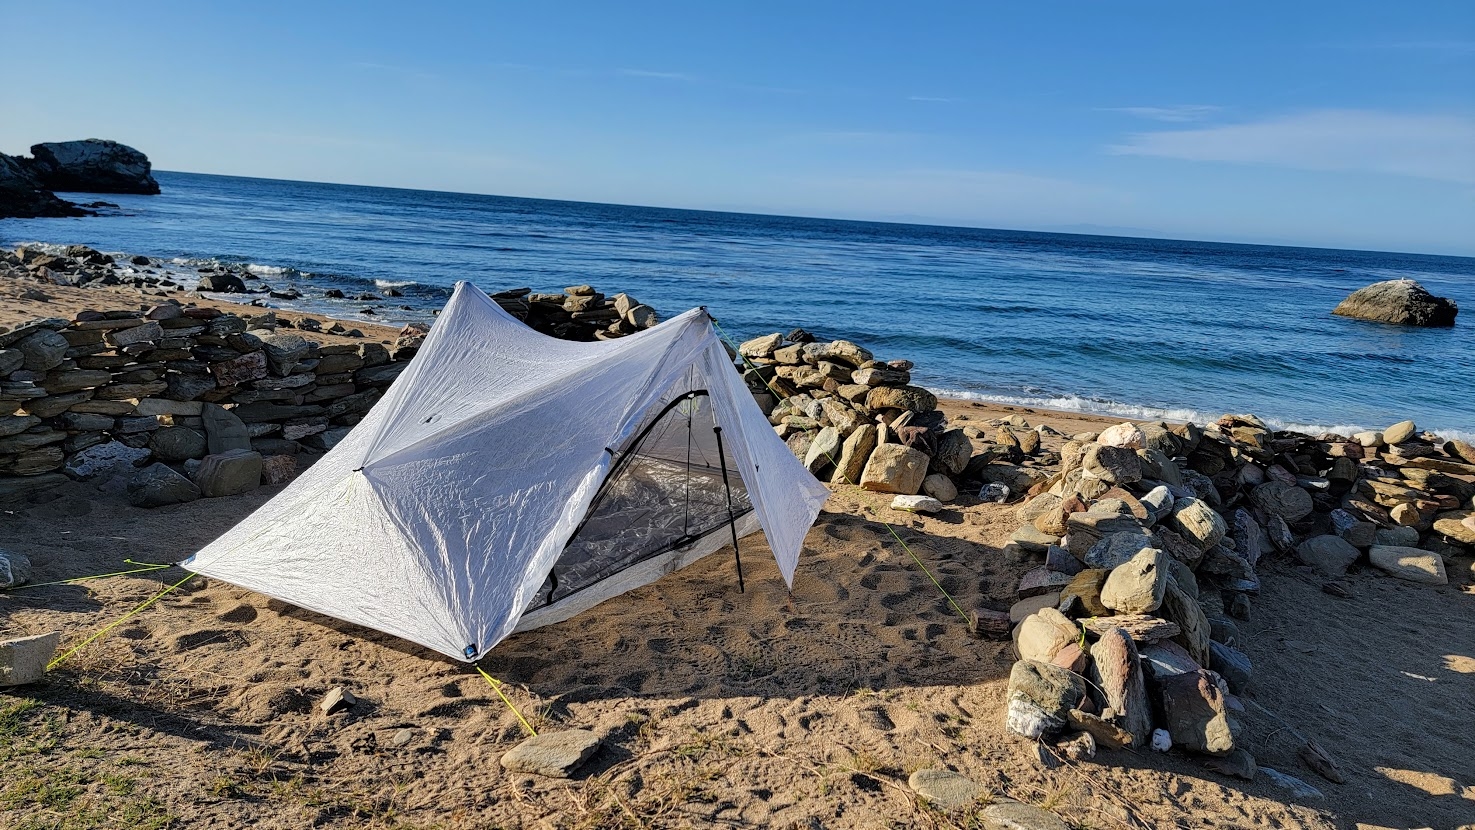
Maiden voyage of my Duplex on the Trans-Catalina Island Trail
Prior Experience: Trans-Catalina Island Trail (two nights).
Pros: Lightweight. Very spacious (especially for one hiker). Incredibly easy to set up. Short shipping time.
Cons: Very expensive. It was a bit more voluminous in my backpack than I had hoped. UL stakes very weak.
Consensus
Looking for your first intro to a single-wall, non-freestanding shelter? Look no further. The Zpacks site was easy to navigate. The tent itself has the easiest pitch I’ve ever seen from a single-wall shelter. It was incredibly comfortable and roomy on trail, holding up to powerful winds as well as large hail. I wish I had checked out Zpacks shelters earlier in my hiking career. Don’t overthink this one.
Grade: A+
Leftovers: I took with me some Zpacks ultralight stakes but ended up acquiring some heavier/stronger alternatives in Montana.
Cook Kit
MSR PocketRocket 2 Stove | Toaks 650ml Titanium Pot

Sometimes, cookies are easier.
Pros: Lightweight, affordable, relatively sturdy, easy to use.
Cons: Stove was very weak in windy conditions, especially at high altitude. Resupplying fuel was inconvenient.
Consensus
I used this cook set-up from Pagosa Springs, CO, to Lima, MT. It was about 1/3 of the trail. While it was nice to have warm food in the Rockies, by the time I arrived in Wyoming, I was hardly cooking any of my meals. Additionally, it was inconvenient to carry or resupply fuel. I cold-soaked from Crazy Cook to Pagosa Springs, then from Lima to Chief Mountain. I think I’d prefer to go stoveless for the entirety of the thru next time around.
Grade: C
Food Bag: Ursack Major + Opsak
Pros: Never had any issues with animals attempting to get my food.
Cons: Heavier than necessary. Difficult to rummage through.
Consensus
Once I began to hang my food in Yellowstone, Bob Marshall Wilderness, and Glacier, a lighter food bag would have been fine. Most thru-hikers sleep with their food, so if you’re into that, you obviously don’t need something this sturdy. A typical dry sack would be better for hanging.
Grade: B
Leftovers: I carried a lighter for my stove, as well as a small spork and basic toiletries. From Dubois northward, I carried a light cord and a tiny stuff sack to help with my bear hang.
Technical Gear

Once I reached the Gila, I had enough shade to eliminate the umbrella from my CDT thru-hike gear.
GPS Device: Garmin inReach Mini
Pros: Lightweight. Durable. Long battery life. Two-way communication. GPS mapping. Cross-compatible with other Garmin devices (watch). Emergency personal locator beacon.
Cons: Expensive.
Consensus
GPS technology is fascinating. The inReach Mini allowed me to communicate with family for resupply, as well as another hiker’s partner during an emergency situation. I used its weather feature often, especially in WY and CO, where storms are prevalent. The device itself is expensive, but the subscription plan paired with it can be reasonably affordable. The benefits of the inReach are so great that I don’t think I’ll hike another thru without it.
Grade: A+
Smart Watch: Garmin fenix 6x Pro Solar
Pros: Incredibly durable. Able to record full days (17 hours or more) of activity. Reasonable battery life via solar feature (charged every 3rd night). Useful GPS feature. Links with inReach Mini.
Cons: Very expensive. Excessively large watch face.
Consensus
A smartwatch of this quality is not necessary for a thru hike. The solar technology still leaves something to be desired, but all things considered, I was impressed with the battery life. I linked my watch to my Strava account and recorded every single day. If you’re into tracking stats like I am, you might prefer a more affordable option.
Grade: B
Powerbank: Anker Powercore 20000
Pros: Stores a ton of juice. Charges devices very quickly.
Cons: Bit bulky/heavy.
Consensus
I actually brought an old Anker Powercore 10000 as well for the entirety of the hike since I had my phone, watch, inReach, and headphones to charge. This wasn’t necessary: the Powercore 20000 would have lasted me the entire trip for all of my electronics.
Grade: A
Umbrella: Gossamer Gear Lightrek Hiking (Chrome) Umbrella
Pros: Really took an edge off the heat and provided comforting shade.
Cons: Flimsy, very easy to break. Catches easily on light breeze.
Consensus
The umbrella was a valuable tool through the Boot Heel in southern New Mexico. By the time I had enough shade to go more than a few days without using the umbrella (near the Gila), I decided it was time to mail it home. It was not missed for the rest of the trip. Additionally, a spoke broke from a very weak breeze on a shakedown hike in Saguaro National Park.
Grade: D
Leftovers:
- I went through three Sawyer Squeezes for my water filtration (New Mexico destroyed one, and I broke the plastic of another in CO).
- I used a Petzl Tikka for my headlamp (weak lumens, but otherwise light enough).
- My first aid kit consisted of some New Skin, a few small bandages, a needle and thread, and a few antihistamines/painkillers.
- I also wear Oakley and Nike sunglasses and spectacles, respectively.
- I used Black Diamond Alpine Carbon Cork trekking poles and felt they were a nice blend of strength and weight. I prefer sturdy poles with cork handles, but this is an area you can skimp if you want to save some money.
Clothes
The ultimate summer kit (for me).
Headwear: Outer Rims Headwear Visor
Pros: Nice brim ratio. Ample shade. Very breathable. Comfortable headband fit for long hours. Tight velcro fastener. Incredibly fashionable.
Cons: Brim risks structural integrity if fully submerged in water.
Consensus
Through blistering winds, scorching deserts, 14ers, and lightning storms, I only needed one visor for the entire hike. It speaks for itself. If you have hair with volume or even just a big head, Outer Rims Headwear is a must.
Grade: A+
Shoes: Altra Lone Peak 5 and 6
Pros: Spacious. Comfortable. 600+ miles per pair.
Cons: Tread not great. Expensive. Hard to find at times on trail.
Consensus
I’ve been a happy Lone Peak wearer since 2018. I went through five pairs on the CDT: three Lone Peak 5s and two Lone Peak 6s. They aren’t as sturdy as they used to be, but overall I think the fit is the best it’s been in recent years. The Lone Peak 6s, in particular, feel good on my feet.
Grade: B+
Rain Jacket: OR Helium II
Pros: Lightweight. Relatively affordable. Solid color choices. Good packability. Good OR customer service.
Cons: No pockets. Not super water resistant.
Consensus
The Helium II is a very popular rain shell in the thru hiking community for good reason: while not the best in any individual facet, it provides a very solid value across the board. It maintains reasonable breathability, which for me, makes it the perfect layer in chillier temps.
Grade: B
Puffy: Western Mountaineering Hooded Flash Jacket
Pros: Very warm and comfy.
Cons: Very expensive. Probably overkill warmth for a summer thru-hike.
Consensus
Western Mountaineering is one of my favorite cottage brands, and the Flash Jacket is a big reason why. My jacket has lost much of its fluff, and I think I could’ve gotten away with something less powerful for the CDT.
Grade: C+
Leftovers:
- I rocked a Buff and an ExOfficio Sunshirt for the duration of the trip with no problem.
- I wore a pair of REI running shorts that lasted me about 1,000 miles (till Breckenridge, CO), then a pair of Patagonia shorts that lasted till Canada (barely).
- While I only carried two pairs at any time, I went through six pairs of Darn Tough socks over the duration of the thru: a new pair in Salida, CO, a new pair in Steamboat Springs, CO, and two new pairs in Helena, Montana.
- For underwear, I used three pairs of Icebreaker Anatomica Boxers, getting new boxers in Salida, CO, and Lima, MT.
- I began the hike with Icebreaker base layers but ditched the shirt in Steamboat Springs, CO and the leggings in Lima, MT.
Closing Thoughts

Morning in the San Juan Mountains.
I’ve never been much interested in joining the ultralight movement. For years, I relied on my physical ability and mental fortitude to propel me along the trail at a quick pace. Frankly, I still do, but after finally adopting more UL gear and a UL mindset on the CDT, I found the lighter load to be a huge asset on long-distance trails. My kit, while not perfect, still enabled me to average 25+ miles per day for 99 days in a row with relative comfort.
Probably my biggest gripe about my CDT thru-hike gear experience is that I went a bit too powerful in some cases: I could’ve used a smaller tent, gone stoveless the entire time, or even gotten a less warm quilt. Still, all of my gear appears to be in good shape and could likely handle another couple thousand miles. I’m quite pleased with how it turned out!
Overall CDT Thru-Hike Gear Grade: B+
Featured image: Photo by Joseph Gonzalez. Graphic design by Chris Helm.

This website contains affiliate links, which means The Trek may receive a percentage of any product or service you purchase using the links in the articles or advertisements. The buyer pays the same price as they would otherwise, and your purchase helps to support The Trek's ongoing goal to serve you quality backpacking advice and information. Thanks for your support!
To learn more, please visit the About This Site page.
Comments 6
Joe – which smaller tents are you looking at? I also use the Duplex for trips with my wife, but I’ve found it to be too big (especially the footprint, given how that restricts available campsites) for solo trips.
Thanks for the gear breakdown! Very helpful!
Hey Ryan,
Thanks for reading! In hindsight I think I would have been plenty comfortable in a Zpacks Plex Solo. My hiking companion used one for his entire thru with little complaints, although the pitch did seem a bit tougher than the Duplex. I was on the fence pre-hike, but ultimately felt the Duplex offered a better weight to volume value for me at the time.
Cheers!
Hi Joe ?
I’ve enjoyed following along on IG. I’m an intermediate backpacker and want to attempt a thru hike. Expand on your food / cold soaking routine. What type of foods are you soaking? How long ahead of time? It would be nice to not have to carry a fuel cannister but, no hot morning coffee?
Hi Sierra,
Thanks for reading, and thanks for the IG follow! Great questions all around.
I used a Talente (gelato) container initially for my coldsoak, but transitioned to a peanutbutter jar (more volume) later on. The soak time depends on the food.
For dinner I often ate Kraft Mac n Cheese, which I liked to soak for about 45-60 minutes – anything over that, and the noodle texture would get unpleasant. Make sure to empty the excess water before mixing in the dried cheese. Ramen is another easy, quick soak item. Instant Mashed Potatoes (Idahoan brand) mix incredibly quick (seconds or minutes) and don’t require hot water, so I ate plenty of those as well. You can combine the mashed potatoes and ramen to make the notorious “ramen bomb”.
Finally, I had about a dozen dehydrated big-brand backpacking meals (think Mountain House, Backpackers Pantry, PEAK Refuel). Some hikers complain about rehydrating these via cold soak, but I had no issues. Just ensure you soak them for 2-3 hours and the texture should be solid. Additionally, these meals are usually self-contained in their own packaging, so you might not even need to carry a coldsoak jar for this method.
I do not drink coffee, so no stove is no problem. Many coffee drinkers I know like to start their mornings with instant VIA/Starbucks coffee powders that don’t require heat. Combining these instant packets with a Carnation instant breakfast as well as a hot chocolate packet is a very popular breakfast on trail. As far as caffeine, I enjoyed plenty of MIO electrolyte/caffeine sports mix on trail (black cherry is very good). I hope this helps!
Curious about a bear can? What would be the benefit of the Ursak if it’s heavy and you hung your food? Thanks!
Hi Mary,
Great questions. Bear cans are truly the safest and best option, but are heavy and cumbersome. For this reason, most thru hikers only carry them in areas where they’re legally mandatory (the Sierra on the PCT is a good example of this). Bear cans aren’t legally required on the CDT, so most hikers prefer lighter alternatives for food storage.
On longer carries on the CDT I had my ursack and a separate food sack I acquired halfway through (generic granite gear dry sack). I’d hang the dry sack when in use; otherwise, the Ursack was tied lower to the ground in a much more convenient fashion the rest of the time.