 ">
">
MYOG: Make Your Own Ultralight Breathable Tarp Poncho
So you think you’re ultralight? Think again, hiker friend!
Up your game by making your own 7.9 ounce (including tent stakes!) cuben fiber tarp/poncho. This simplistic and crazy light piece of gear will function as your rain gear, your shelter, and your pack cover.

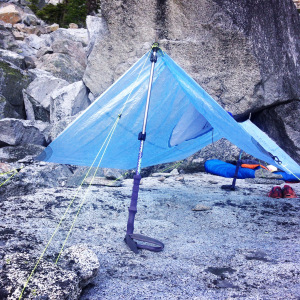
Breathable tarp/poncho. Set up as tarp with trekking poles
ULTRALIGHT BREATHABLE TARP PONCHO
I made this minimal item last season before hiking Washington’s Enchantments and Vermont’s Long Trail and have used it on clear nights as well as in the rain.
Poncho assessment: It functions quite well! Minimal but hits all the essentials: waterproof, breathable, and it even shields my legs from wet brush along the trail, making rain pants unnecessary (I carry Patagonia Houdini pants – water resistant – but not fully waterproof pants). The poncho also goes over my pack to work as a pack cover. Score!
Shelter assessment: It’s itty-bitty! But it’s all I need in the summer and/or if it’s not too rainy for many consecutive nights. I would not use in the winter, if it’s chilly (would prefer a double-walled shelter), or if it’s crazy rainy night after night. It fits me perfectly – but barely – the width is as narrow as can be and I set it up low to the ground to boot, which makes for somewhat awkward entry and exit…but worth it. The length also fits me perfectly (I’m 5’2″). (Caution: on really rainy nights, the breathable center portion may allow condensation to pass down to your sleeping bag.)
Downside:( you look kind of like a dorky hunchback. But who cares! (#HYOH) Also, the materials are not cheap…
Bonus:) mucho weight savings. My typical backpacking rain jacket weighs 7 oz (Patagonia M10 – which is a fairly lightweight rain jacket) and this tarp/poncho weighs only 0.9 oz more AND performs double duty as a shelter. Winner!
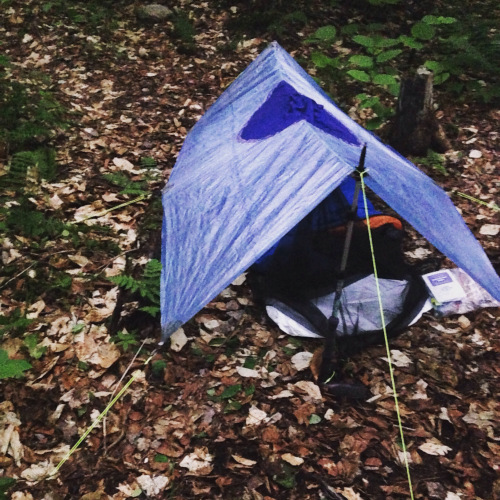
From inside – it’s cozy in there!
HOW TO!
(Note: basic to intermediate sewing skills required)
SUPPLIES:
- 3 yards of 0.51 oz/sqyd cuben fiber (ahem, “Dyneema Composites”) – for tarp poncho body
- 1 yard of 1.62 oz/sqyd “Challenger” Waterproof Breathable Cuben Fiber-eVent – for breathable center portion
- < 1 yard 3/32″ shock cord – for hood cinching
- <0.5 yard 1.0 oz/sqyd cuben fiber – for tie outs*
- ~3 yards single sided 1″ cuben fiber seam tape – for sealing center portion seam
- 1 roll double sided 1/2″ cuben fiber tape – for adhering tie outs* and breathable center portion to tarp poncho body
- 1 mini or tiny cord lock
- 8 3/4″ D-rings – for removable guy line hardware
- 8 mitten hooks – for removable guy line hardware
- ~15 yards (+/-) Zline 1.25mm spectra cord – for guy lines
- 8 line lock micro-guy adjusters – for guy lines**
- 8 6″ ultralight titanium tent stakes
- Thread (use polyester thread. If possible, use high strength polyester thread)
* The 1.0 oz/sqyd cuben did not adhere as planned with a hysol epoxy. To solve the problem, I wound up using double sided 3M cuben tape (cut strip by strip to match the shape of each of the 8 tie outs) – which was a huge pain. If I made this again, I would replace the 1.0 oz cuben/double sided tape with repair patches/reinforcement which Zpacks sells – made with 1.43 oz/sqyd cuben.
** Probably could get away without line locks. But I was feeling fancy so I splurged!
(SOURCES: Zpacks was my source for supplies with few hardware exceptions , which I picked up at Seattle Fabrics.)
(NOTES: I used fine head needles so that when sewing, puncture holes were small – though this is not critical if you are sealing seams. If I did this again, I might even use an industrial machine in order to use a higher strength thread… Worth testing. Also, I cut all fabric with an exacto knife and/or box cutter.)

Cinch that hood down when sleeping underneath! Feed trekking pole into D ring and guy line loop
INSTRUCTIONS:
- PREP CUBEN BODY:
- Trim the selvage/frayed edges of your cuben fiber. Adjust to desired length (for me at 64″, I chose 108″ long, giving me a sizeable buffer at my head and feet). The dimensions of my fabric body were 54″ x 108″. (54″ was the width of the fabric roll – which meant fewer seams, less weight, and less work, which would have been needed if I went with a wider tarp poncho body.)
- Cut hole in 0.5 cuben (I used a 23″ diameter and placed it in the center of the tarp poncho body).
- MAKE CENTER BREATHABLE PORTION/HOOD:
- Cut circle of hybrid cuben/eVent for center portion (I used a 24″ diameter – whatever you do just make sure it is larger than the hole you cut in the tarp body!)
- Construct hood following instructions on ThruHiker (instructions here!) and string the shock through cord channel. Feed through mini or tiny cord lock and knot ends.
- Cut hole in center portion for hood. (I centered mine toward the back of the breathable circle – with the assumption that I would want more breathability on the chest area that wasn’t already covered by a pack. The hole for the hood was more of an elipse with the long axis side to side and short axis front to back). Sew right sides together
- Seal seams on inside/wrong side of fabric of the hood and where the hood attaches to the circular breathable portion using single sided cuben tape.
- ATTACH CENTER CIRCLE TO SHELTER BODY
- Pin in place – breathable circle overlapping on top of tarp poncho circle. (It’s ok if you make pin holes – they will be covered with seam sealing tape later). Make sure it’s centered, and the hood is facing the right direction, which may require readjusting. May lead to stress and sweating – don’t worry it will work!
- Adhere center circle (hybrid) to shelter body (0.5 oz cuben) with double sided cuben tape. I cut into small strips (~3″ long each) and attached piecemeal-style.
- Sew over seam/taped area for additional strength.
- Tape over this seam again with single sided cuben tape for waterproofing. (Taping a round hole with a straight line of tape will lead to folds in the tape. Try to distribute the tape folds evenly and often.)
- MAKE AND ATTACH TIE OUTS:
- Cut tie outs – 4 for corners, 4 for sides (I laser cut mine, which was pretty awesome but may be unnecessary as long as you can make smooth-non jagged cuts by hand)
- Feed D rings into tie outs
- Adhere tie outs to tent body corners and middles of each 4 sides. (I tried to use an epoxy, but this didn’t work. I ended up cutting double sided cuben tape into strips and sticking the layers together that way…a long and tedious process. Next time: use repair patches with adhesive!)

Check out that tie out…wraps on top of and below fabric
- PREP AND ATTACH GUY LINE
- Cut to length (singe ends with lighter to prevent fraying)
- Center line = ~17′ . make loops for trekking poles to feed into at either end of the 9′ portion)
- Corners/sides = 4′ x 6.
- Attach line locks and mitten hooks. Each corner/side guy line needs a ladder lock to adjust length. The ends (where guy line will hook to tie out) each need a mitten hook – mitten hooks will hook to D rings.
- Cut to length (singe ends with lighter to prevent fraying)
- HIT THE TRAIL AND USE IT!
- Simply set up the shelter using two trekking poles as tent stakes! Poles go upside down and pointy ends will feed through loop in guy line and D-ring and – voila – stability and shelter! Stake out guy lines. Relax and enjoy!
- Use as a poncho! Remove guy lines when using as a poncho. I use the center guyline as a belt to keep in place while wearing.

From the interior…holds up against the rain!
WHAT I LOVED AND WOULD KEEP:
I loved the size, materials, functionality, and durability. An MYOG success!
This is just the right size for me, on my minimalist edge for sleeping. When sleeping in the rain I used a trekking umbrella over the head opening to avoid rain to the face. Also cinching the hood when using as a shelter is a must to prevent water dripping in.
I loved the breathability when using as a poncho but could have done without condensation on my bag in the morning after a night of rain…could I skip the breathable center portion altogether? Perhaps… It takes a bit of time to set up – it’s a bit high maintenance…another sacrifice for weight I suppose.
All in all: a keeper.
The breathability is a pro …and a con
WHAT I MIGHT OR COULD CHANGE:
- Could make it a bit wider for additional comfort
- Ditch the breathable center? But would it be too sweaty? There’s only one way to find out…
- Tarp sides – rather than straight lines – could have a catenary curve to minimize flapping (though to be honest, I never had a problem with excess flapping)
- Ditch the seams? I could eliminate the sewing altogether and rely on the strength of the adhesive…a risky move that could work but I’m just not quite sure about…
- Use stronger thread. Alternatively, I could use a stronger polyester thread and sew on an industrial machine. Downside: bigger holes left by the needle. Upside: could be a stronger piece of gear.
Let me know if you have any questions! I would be happy to answer inquiries and make sense of my cryptic instructions.

This website contains affiliate links, which means The Trek may receive a percentage of any product or service you purchase using the links in the articles or advertisements. The buyer pays the same price as they would otherwise, and your purchase helps to support The Trek's ongoing goal to serve you quality backpacking advice and information. Thanks for your support!
To learn more, please visit the About This Site page.

Comments 7
Impressive.
I’m not seeing an approximate cost anywhere? I’d
Want to have that information before I’d consider starting a project like this.
RBTY has the main Cuben (Dyneemo composite) 0.51 oz at $16.00 per HALF Yard. Vs coated PU nylon at $4.75 to $7.00 per yard. Strength and weight advantage to Cuben; cost to PU nylon.PS Cuben is nearly transparent which is sometimes an issue.
RBTY… or “…by the Roll”? The latter being a good site for the fabrics =)
In reply to GAIA’s comment, The prices and availability change with fair frequency, so it’s fair to not list the cost… a little personal research goes a long way.
I really like the concept. I hiked 430 miles of the AT in 1999 using a cheap blue 8′ x 10′ tarp as my shelter. Thankfully it was in the spring when there were few black flies and mosquitoes. In 2016, I hiked 1560 miles of the AT using a $10 nylon poncho (86″ x 57″, 9.15 oz) as my rain gear/pack cover. The poncho worked really well – thumbs up on the poncho. If you could design one with an attachable/detachable floor pan/bug screen you’ld have a real winner.
Hello from Scotland, Jean,
I am very interested with what you have done. Its a line of design I have followed. I have made several poncho tarps over the years. My two latest are the same design, but in different materials.
The design is large, to give me a conventional tent. A light porch fixes onto the front. The ponchos are basicaly a rhomboid shape, to give a sloping ridge, higher at the front of the tent. (I thought of this before MLD did !)
To give cover over my lower forearm & hands, in poncho mode, I have two triangles of fabric.
The ridge is catenary cut.
One, the lightest, is much heavier than yours (of course!). Its in silnylon, & weighs 450 gm with all the clunky ties, biners,zips , reinforcements,etc, I wanted, for rough Norwegian conditions. It makes a good tight tent.
The neck opening is a slit. To close tight when in tent mode. (Again, thought of before MLD)
The other poncho, even heavier (at 750gm!!), actually follows your pattern to an extent. It has a breathable centre. But mine is a large rectangle of paclite Goretex. The sides zip up to make a breathable bivibag when tent pitching is impossible. So this makes the weight, plus the heavier silnylon & bits & bobs. Its for above treeline use, and I’m willing to lug the extra weight for safety.
For nipping out for pees in the rain, I have a 100gm festival type poncho, made from a Heatsheet (tougher than ordinary festival poncho). I can even put this on under my main poncho before setting my shelter up, which is what worries most people. It also doubles as poch groundsheet & extra insulation under my bugbivi
I have two types of ” porch”. With the silnylon poncho, I can open out my silnylon chaps & popper them on, due to their design, for sheltered conditions. I used this last year doing the Camino Primitivo in Spain.
I can also zip on a “porch” I made from Cuben. This fits both ponchos. This also works as a pack cover when, in windy conditions, I need to wear my pack over the ponchos, or when theres lots of stream wading.
This can also work as a small cape, to back up the festival poncho, or as a kilt.
I have plenty of drawings & measurements for alternative ,smaller,goretex centre panels. The idea of having bivibag won out for my prototype.
Ive also read about developments in material in the USA, and knew breathable Cuben was on the way. We can now get it from Germany.
So, technicaly, youre ahead of me!!!
Well done ! I wish you all the best with your project & adventure. I admire your energy.
Hello, Do I understand correctly, that your finished Poncho is 54″ wide; using the selveged Edges unhemmed/unfolded over ?
Thanks, IAC.