 ">
">
Getting Organized! Homemade Meals and Resupply Boxes
Okay, so I pulled it off! Fourteen 5000 calorie menus within my two pound daily goal for a grand total of 345 pounds of food! How on earth am I going to package all of this up into resupply boxes, you ask?!? It’s actually quite simple.
Steps to organizing homemade meal resupply boxes
1. Store prepared and/or purchased foods in dedicated totes with each recipe or food item in its own bag.
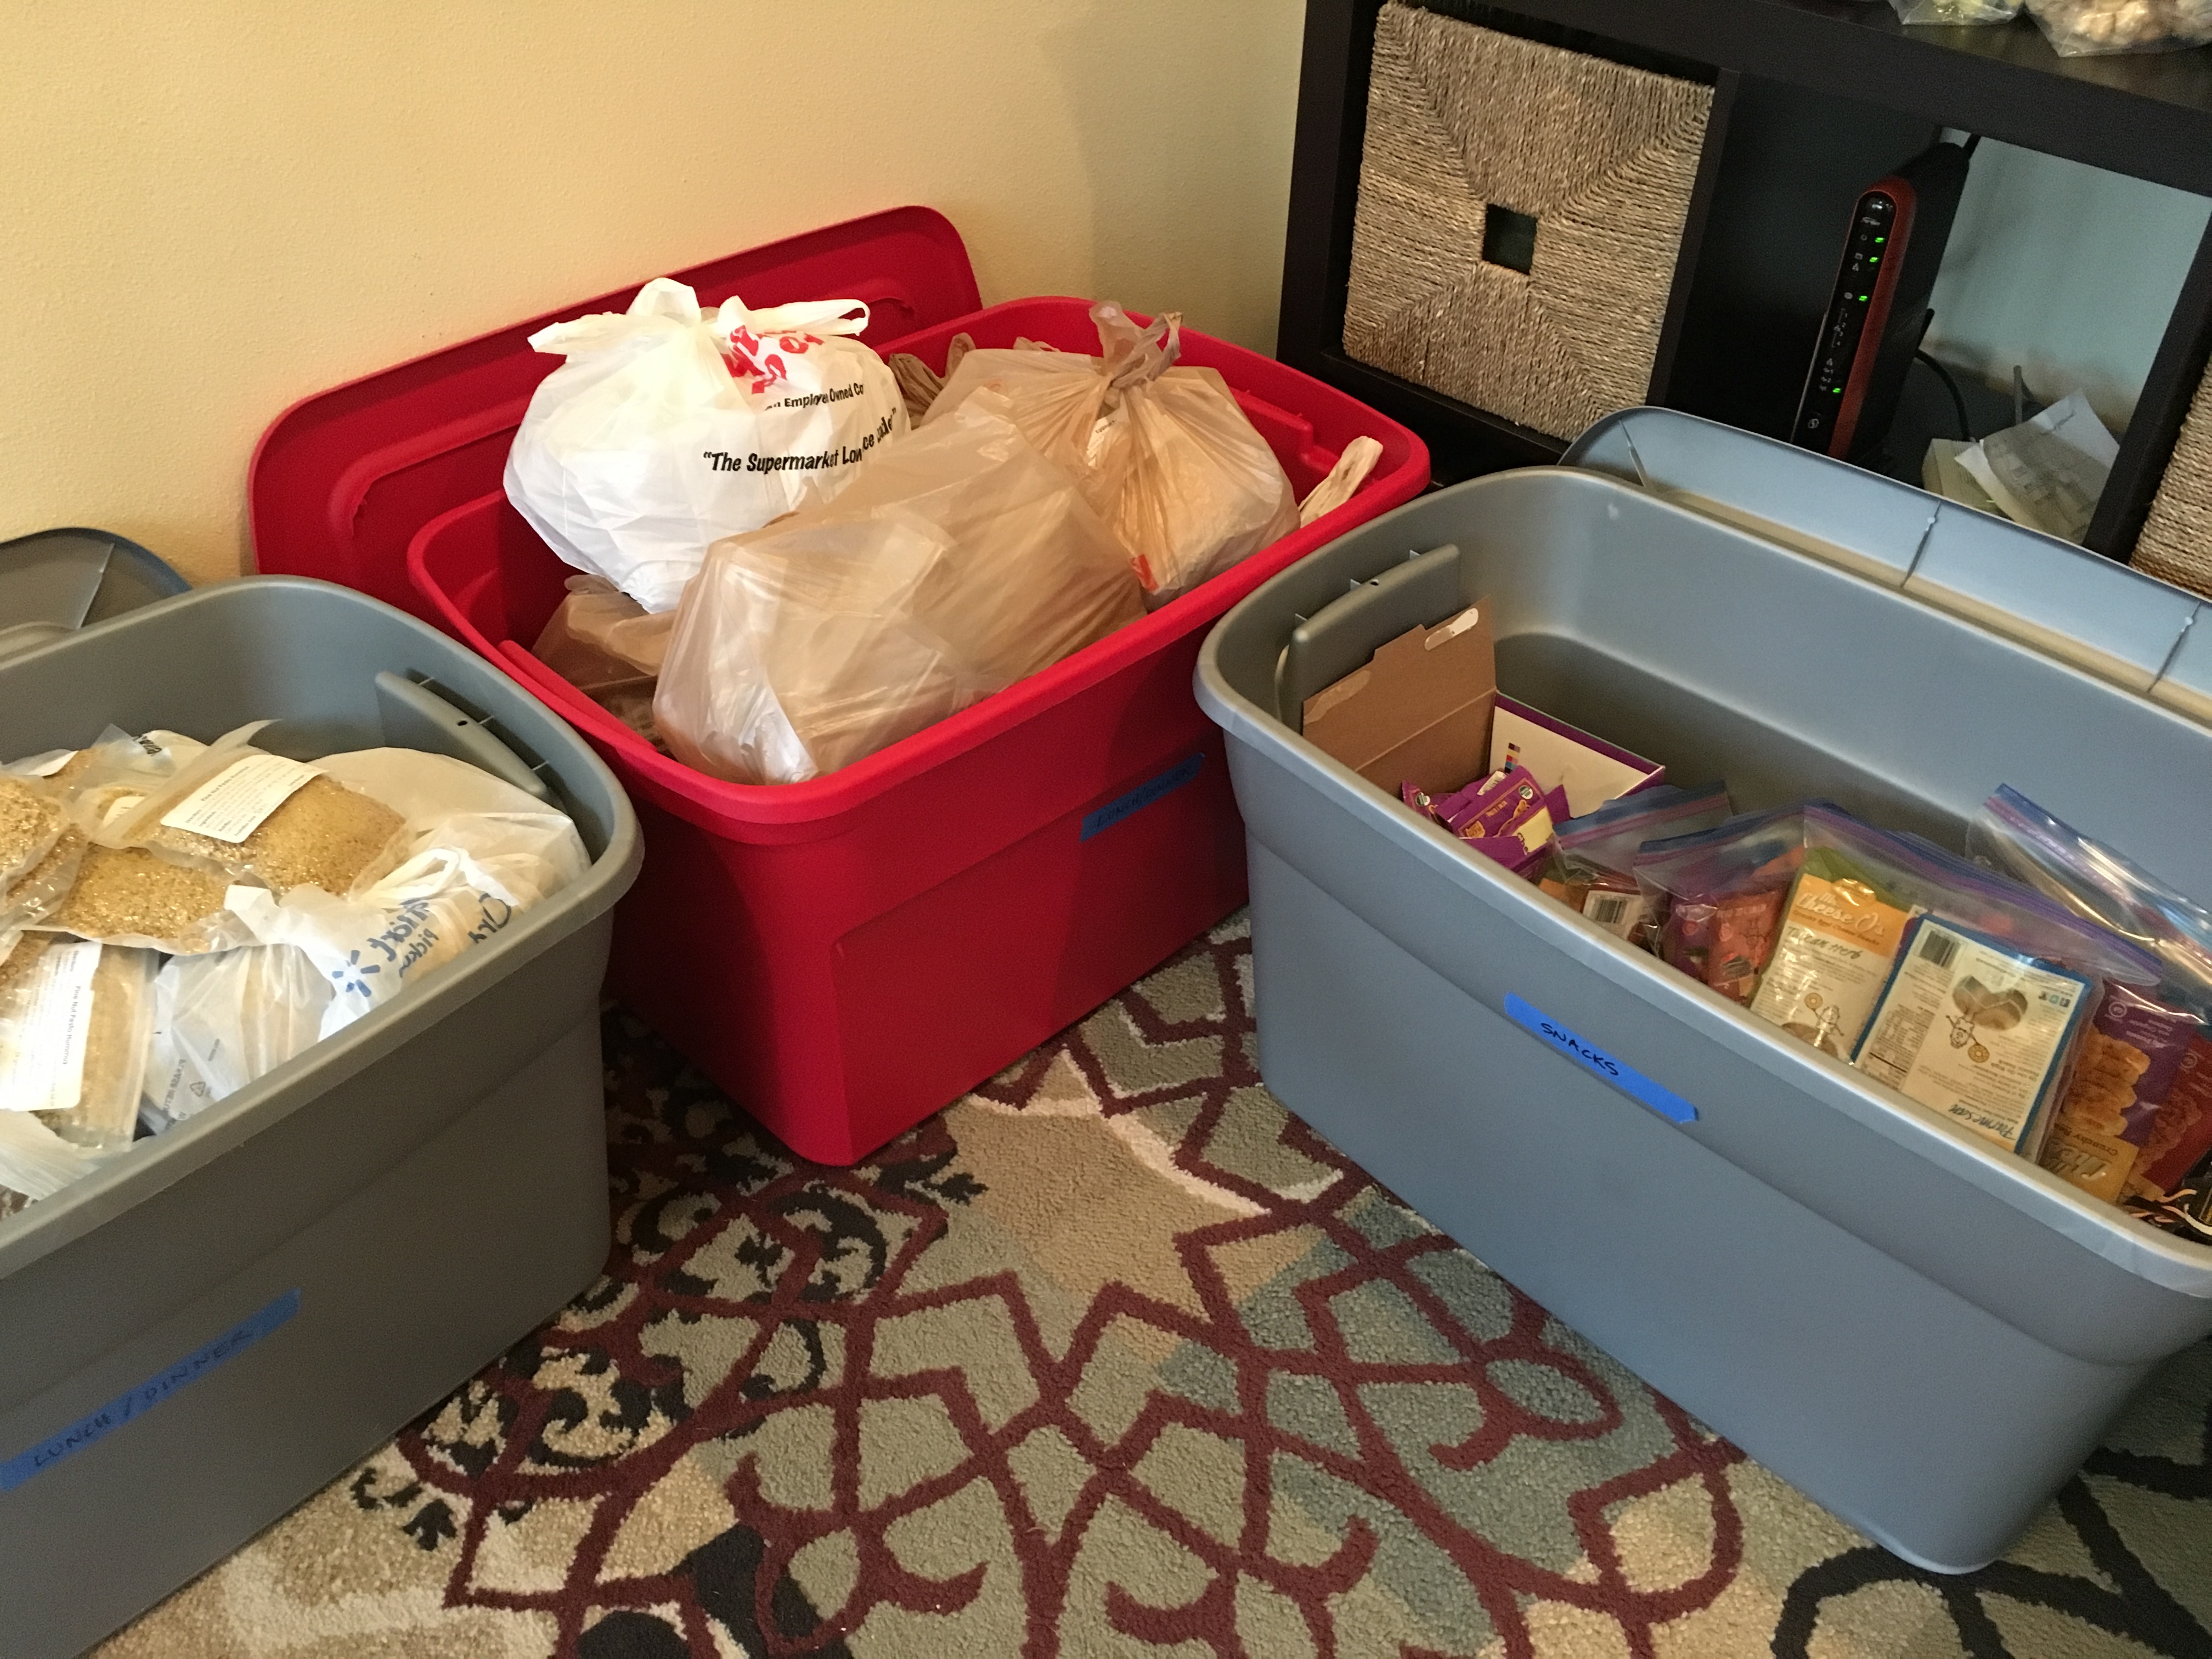
Totes are labeled: breakfast, lunch/dinner, snacks, beverages and treats

Packaging items individually speeds up up the menu bagging process as there is no need to sort through a pile of mixed items
In and effort to remain environmentally friendly, ask friends and family to save plastic and/or paper bags for you as you can re-purpose them and later recycle without using new bags. The number of bags that would arrive daily at my work desk was quite comical!
2. Develop and number menus based on your determined nutrition goals and food selection available
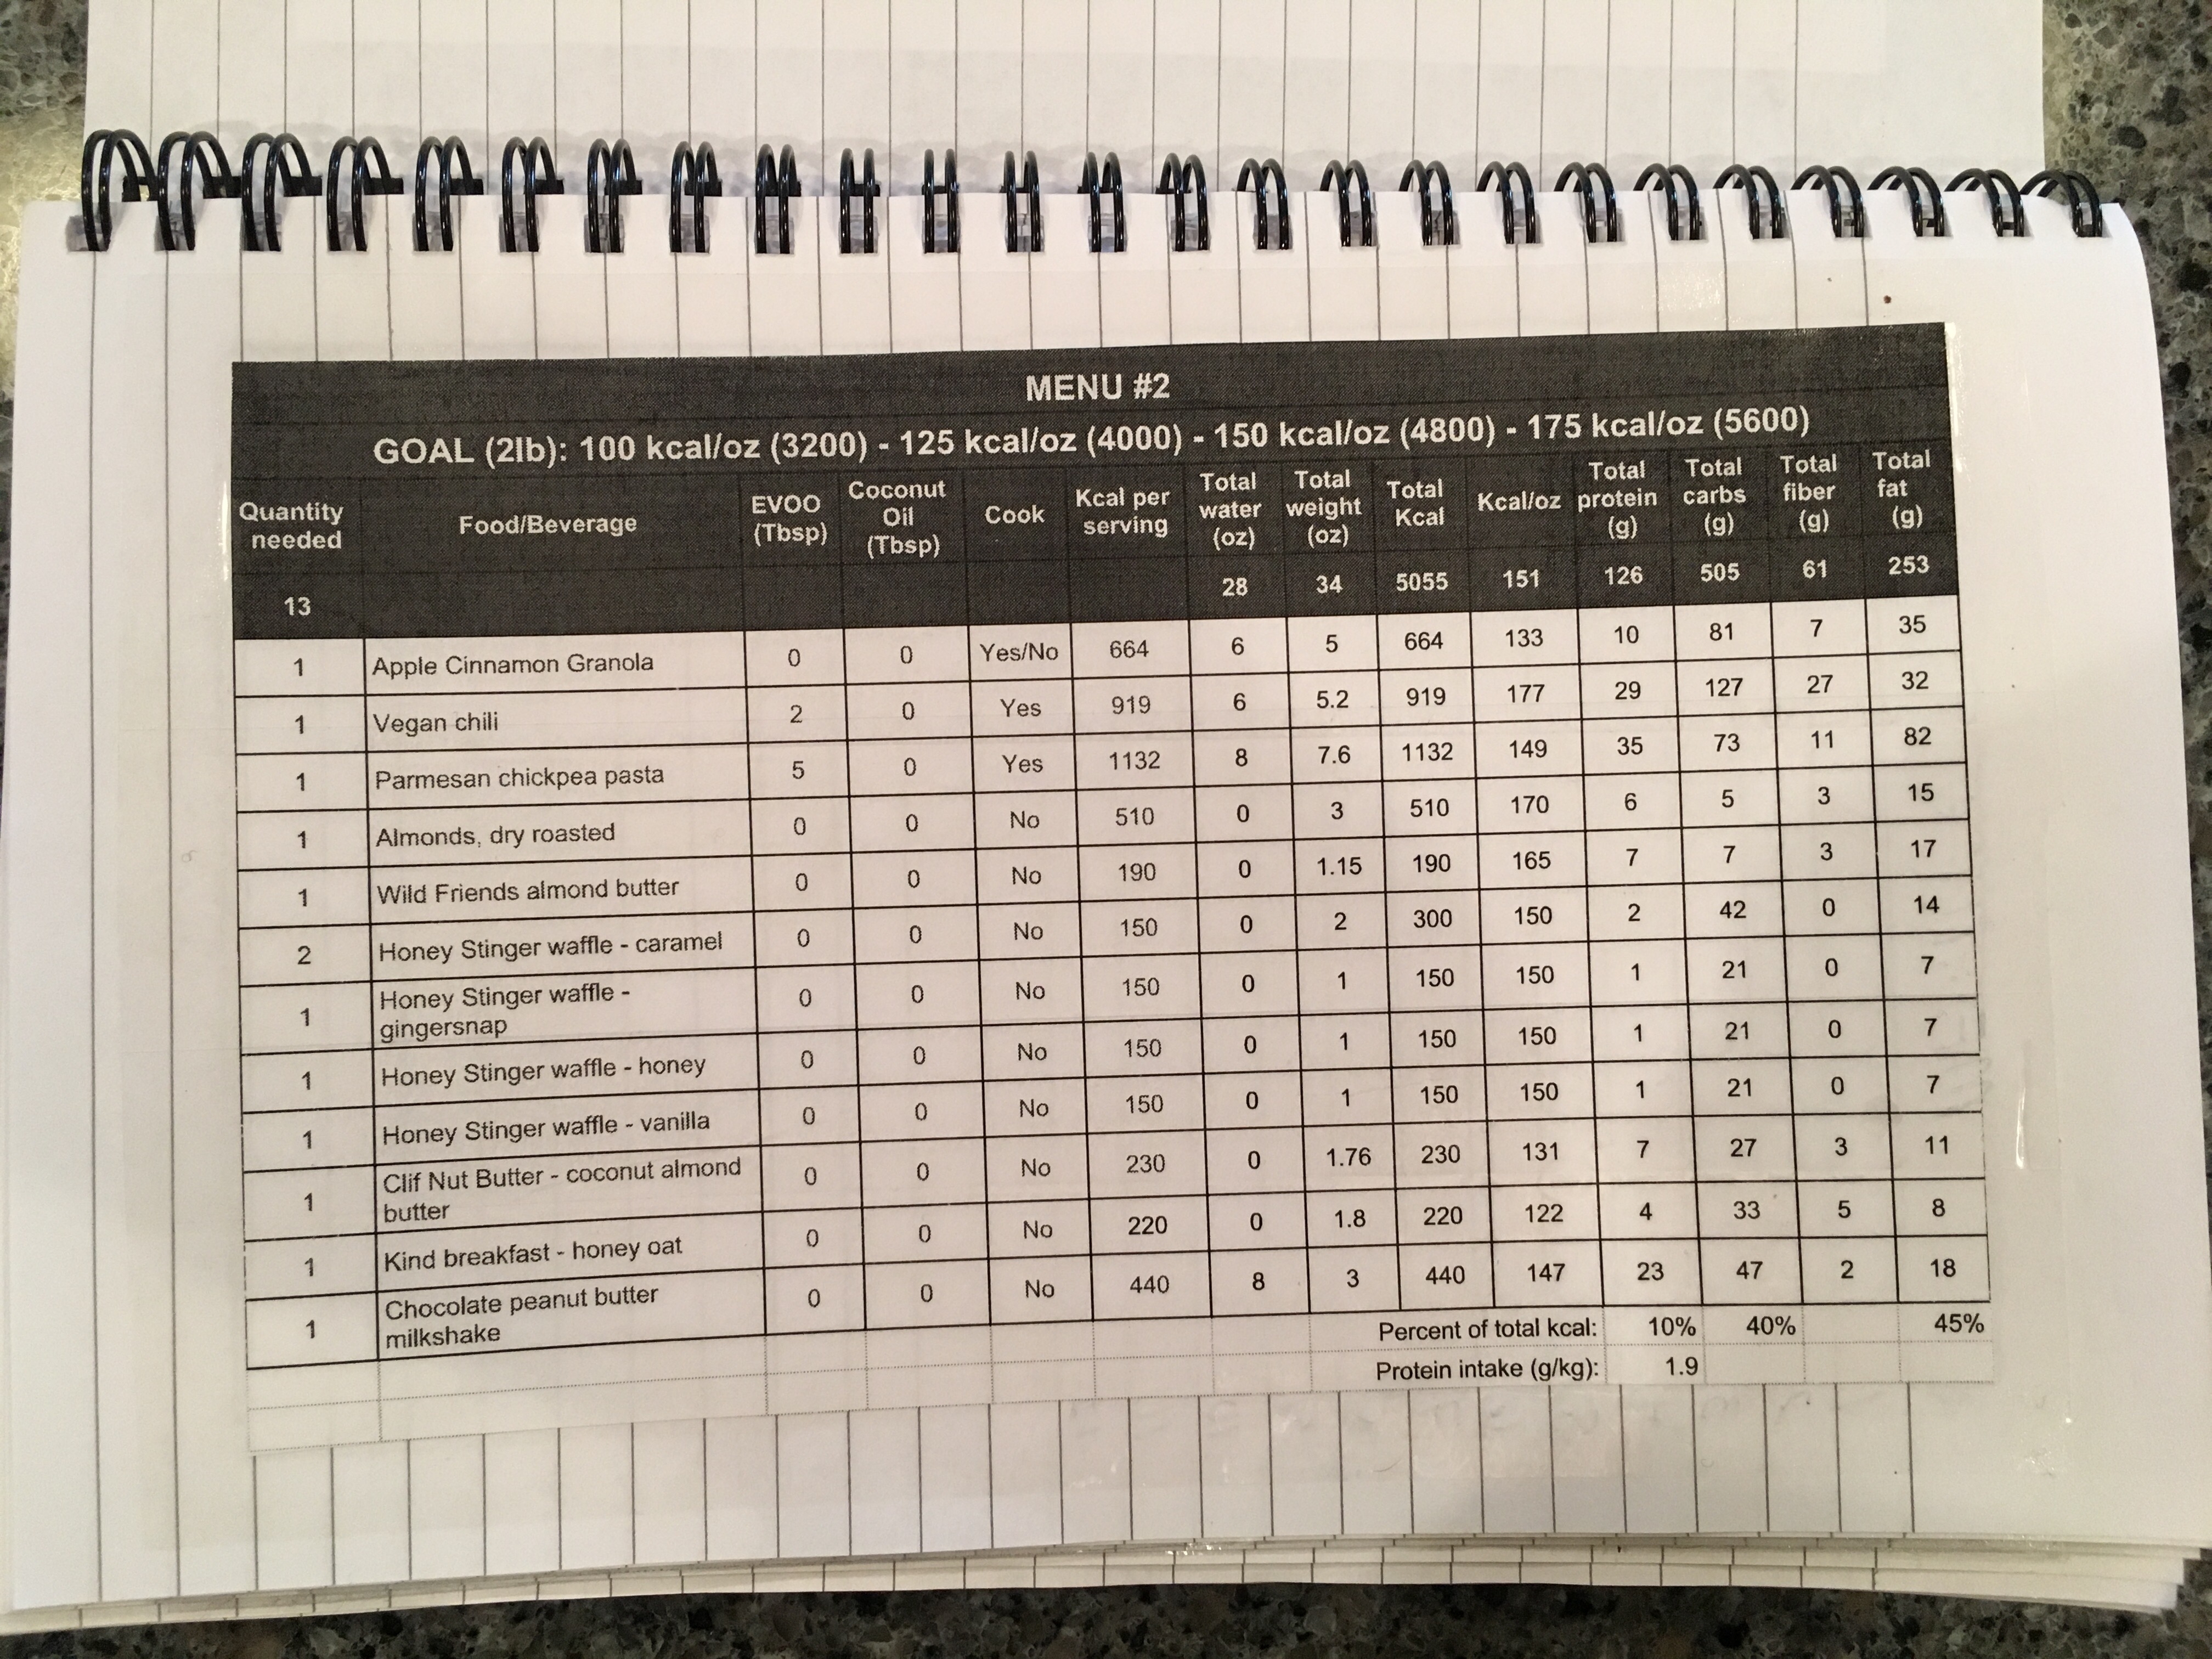
Example of a daily menu including water required, cook /no cook options and nutrition information.
Now that you’ve prepared your meals and determined the snacks that you’d like to take along, begin creating combinations that meet your nutrition goals set. This might take some time initially but you’ll quickly recognize which foods make up the best combinations.
Tips for creating menu combinations:
- Choose meals at varying caloric densities.
- Do not use up all of your highest calorie meals first as this will make it difficult to create high calorie menus when you run out of those meals
- For example: 160 kcal/oz breakfast, 110 kcal/oz lunch and 135 kcal/oz dinner.
- This averages out to 135 kcal/oz
- Choose snacks, beverages and treats at varying caloric densities in the same manner.
- In the end, the foods chosen should average out to your goal.
- This can be seen in the “kcal/oz” column in the menu photo above
I found that entering menus into a spreadsheet was more efficient as copying/pasting is quicker than writing each menu individually by hand.
Do I expect to follow each menu precisely on a daily basis?
Absolutely not! Menus were created to ensure that adequate food will be available to meet my daily goal. As long as all of the food is consumed prior to resupplying, I’ve met my goal regardless of what order the food is consumed in.
3. Consider practicing filling your bear can prior to finalizing menus

Seven day supply at 5000 kcal per day. Success!
I found that I had to design menus specifically for this purpose as other menus would not fit in the can. Oatmeal, mashed potatoes, couscous and nut butters tend to be space efficient. Macadamia nuts are not space efficient but calorically dense at 230 kcal/oz! They can be used to replace food that will not fit in the can.
4. Put each daily menu in a gallon sized Ziploc baggie labeled with the corresponding menu number

Now that meals have been prepared and menus created, t’s time to start bagging them up for your trip. I found that labeling the total number of Ziploc baggies needed per daily menu simplified the loading process.
Baggie labeling process:
- Purchase or recycle an adequate number of Ziploc baggies by determing how many cycles (full day supply) of each menu will be needed to provide adequate food for the duration of your trip
- To be more environmentally friendly, wash and reuse baggies over the course of a year reducing the number of new baggies purchased
- Collecting baggies from shipments received in the mail can also reduce the number of baggies purchased
- Label baggies “Menu #1”, “Menu #2” and so on until all daily menus have the same number of baggies each
Filling baggies with each daily menu:
- Set aside the baggies labeled “Menu #1”
- Pull the foods listed on Menu #1 from the corresponding totes one at a time
- For example, pull the Apple Cinnamon Granola bag from the Breakfast tote.
- Add one serving of granola to each of the baggies
- Continue with each food item until all menu items are added to the daily baggies
- Repeat process for Menu #2 and so on…
This method will help prevent the room from looking like a tornado hit it! Putting the loaded daily baggies in a paper grocery sack also helps keep the tote neatly organized.
5. Relabel the previously used totes with menu numbers and store the corresponding bagged daily menus in the totes

Totes filled and organized by menu numbers. In my case, roughly two menus fit per 30-gallon tote
Totes are now ready to be stored in a cool, dark, dry place until ready to fill resupply boxes. The preferred storage method is to freeze meals but storing over 500 servings wasn’t realistic in my case. Multiple deep freezers might be in my future!
6. Practice filling boxes ahead of time

Three days worth of food in a regional rate size box B.

The same three baggies emptied into the box including toiletry resupply items with room to spare
This will give you an idea of what size boxes to use and how many that will potentially need to be shipped. I have the luxury of using regional rate boxes, at a reduced cost, as I reside on the west coast. In my case, large flat rate boxes ($18.95 each) hold four daily menus with regional rate ($8-$11 each) boxes holding three daily menus.
7. Prepare resupply boxes in advance to reduce work required by friends and family while you’re away

Using return address label stickers greatly reduced time spent compared to handwriting on the boxes individually. Brightly colored stickers with my last name were used as a way to quickly identify my boxes. For the PCT, “PCT Hiker ETA” is required on all boxes sent to post offices. Stickers were used for this purpose as well.
8. When on trail and ready to resupply, contact your support team and request that the boxes be filled with your preferred daily menus.
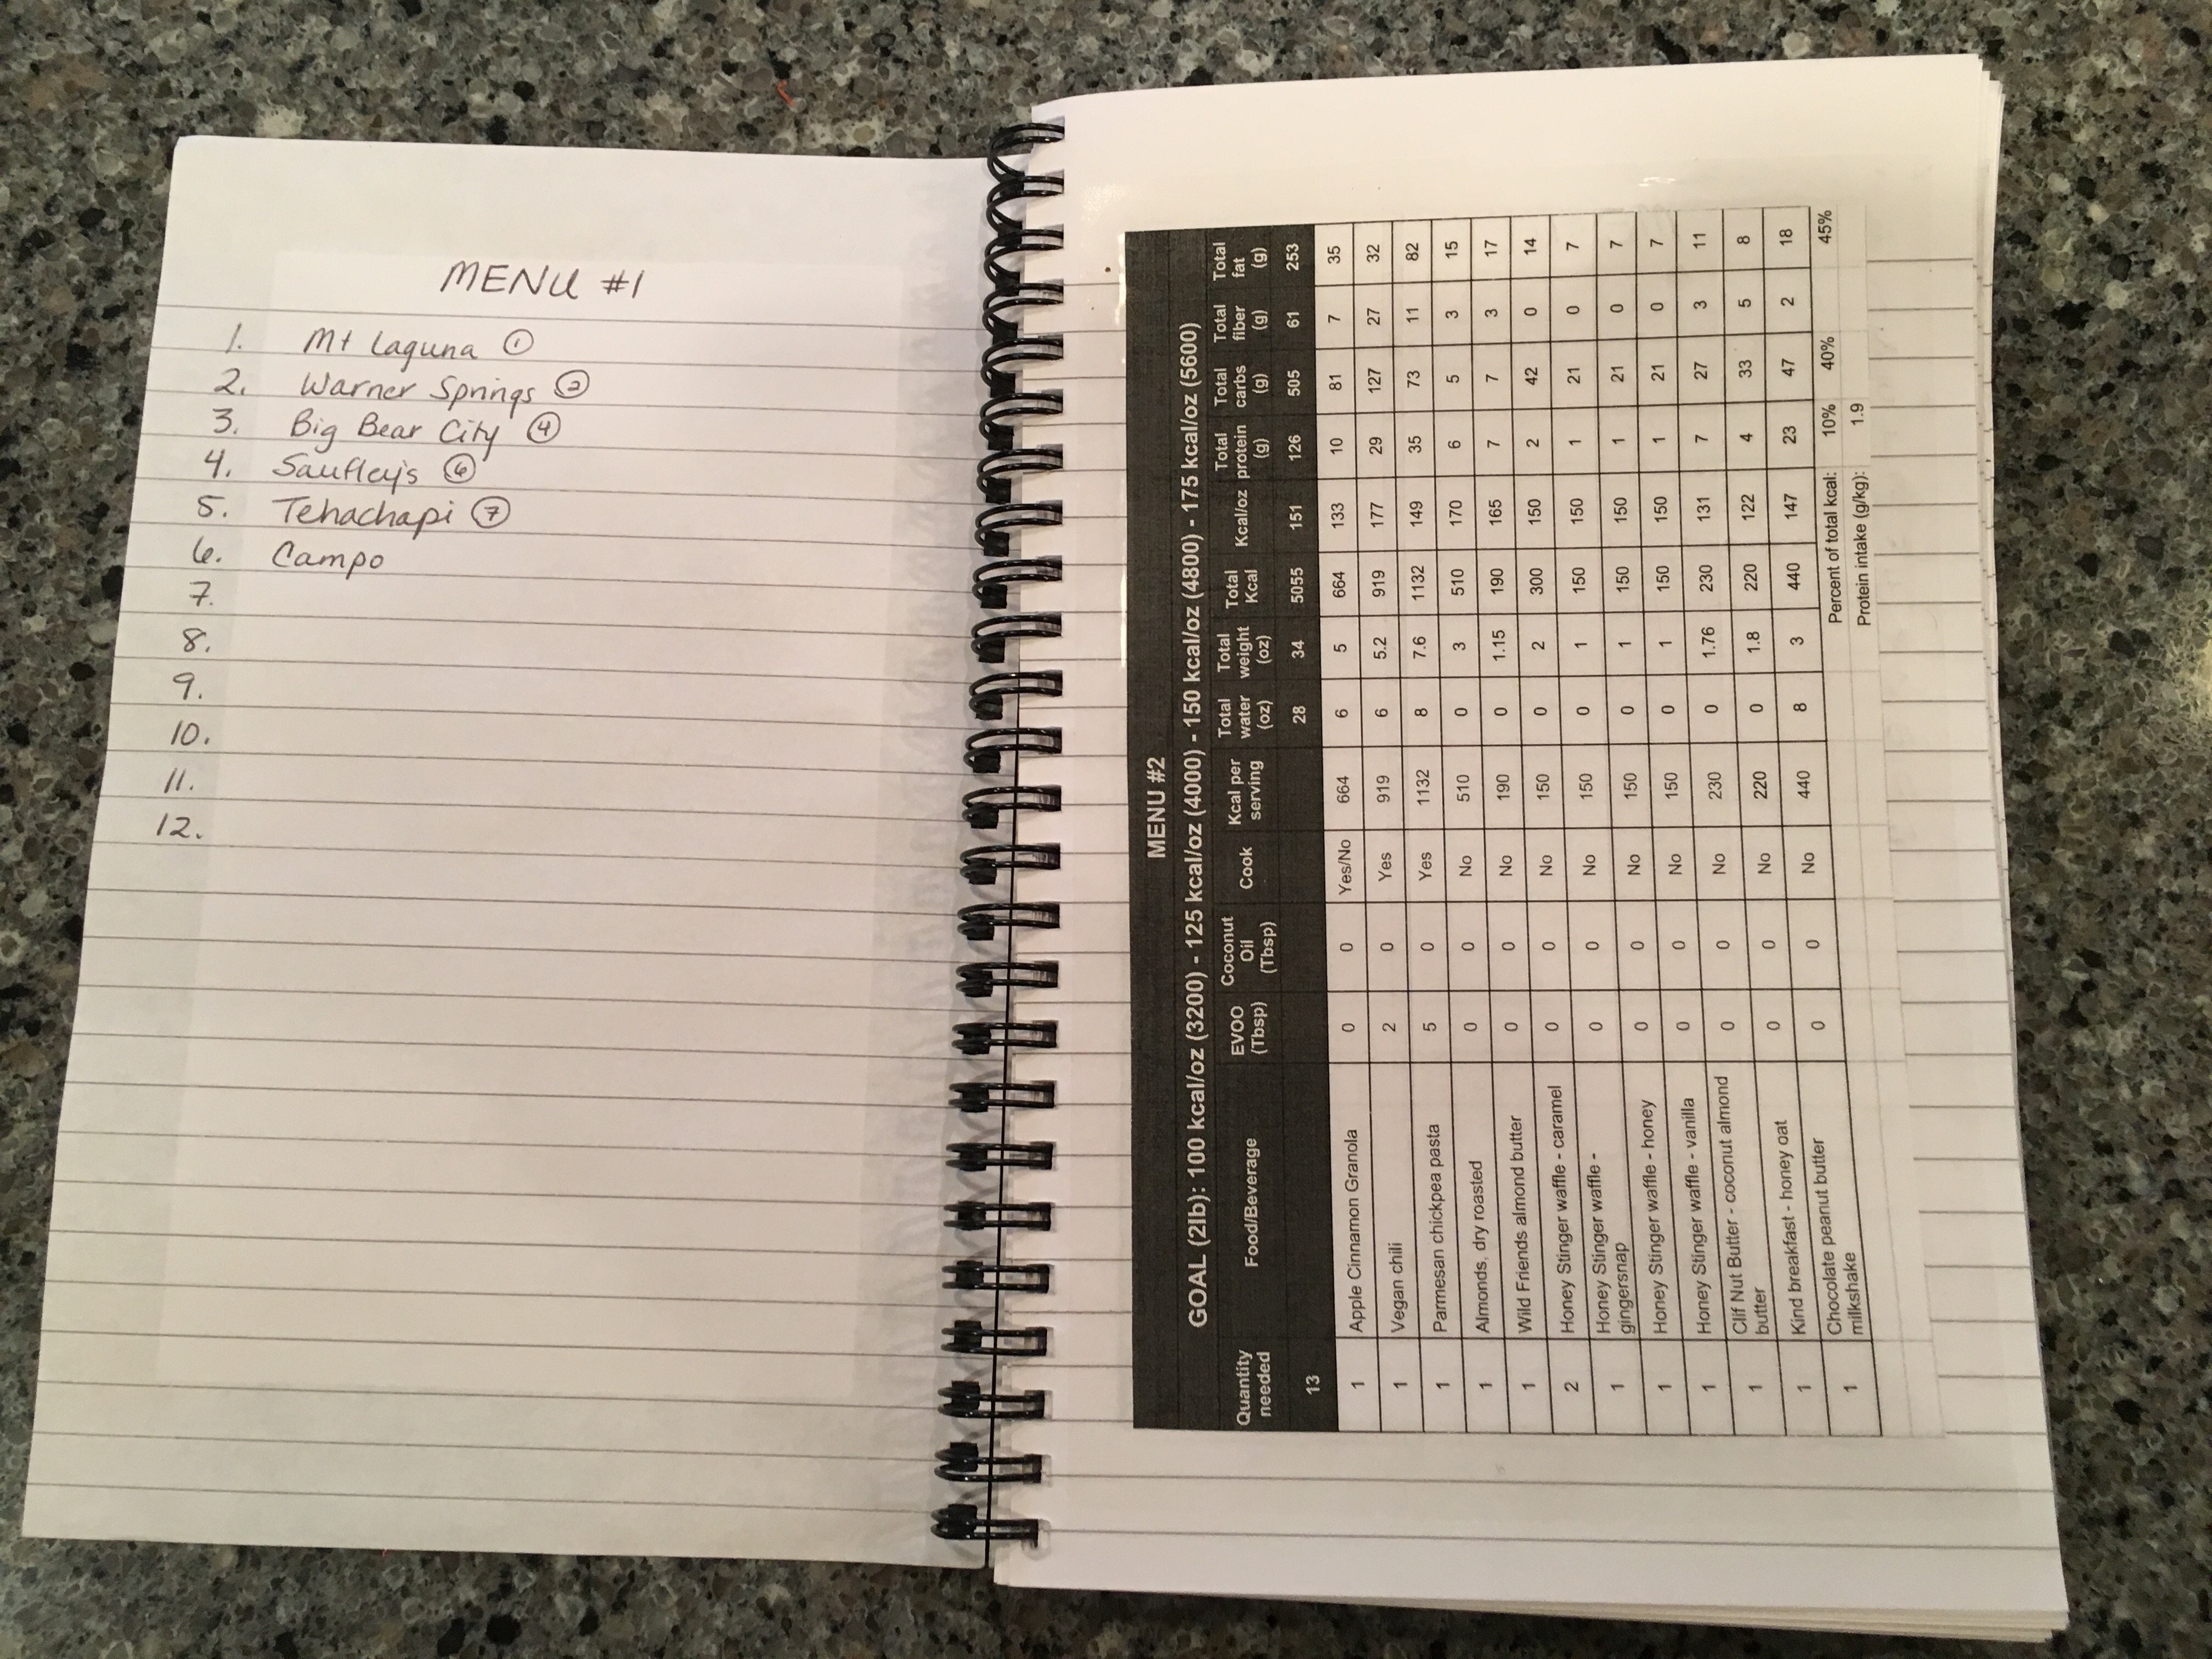
Notebook created for my resupply help
Leave a copy of the menus with your resupply help as they can review the choices with you and mark down how many have been shipped thus far. This will give you an idea of what’s leftover throughout the course of your trip.
My PCT resupply strategy:
- Thirty commonly used resupply locations have been identified as possible shipment options.
- Resupply will occur more frequently in the beginning
- As I get my trail legs, resupply will occur less frequently as I’m able to carry heavier loads
- Because of this, the total number of resupply locations and boxes to be sent is uncertain at this time
Are you exhausted, yet?!?
Maybe it sounds complicated due to the number of steps but the method is overall quite simple. With a little bit of organization, the contents of resupply boxes do not have to be boring and can vary over the course of your trek.
Well, it’s that time!
I leave for my PCT thru hike !!tomorrow!! with an early morning start on Sunday, March 26th which is also my 40th birthday. I’m looking forward to opening the first baggie and consuming Menu #1’s breakfast, a tri-berry granola! I plan to post when resupplying to include updates on how the menus fair on trail, taste preference changes and hopefully maintenance of my weight. Pics of my food over the course of the trip will also be posted via my Instagram and Facebook accounts.
Wish me luck as now the hard work really begins!

This website contains affiliate links, which means The Trek may receive a percentage of any product or service you purchase using the links in the articles or advertisements. The buyer pays the same price as they would otherwise, and your purchase helps to support The Trek's ongoing goal to serve you quality backpacking advice and information. Thanks for your support!
To learn more, please visit the About This Site page.

Comments 9
So excited for you. Good luck and have fun! Looking forward to your posts and progress…
Coffee
Good luck Aron,looking forward to reading about your adventures.Paul from New Boston Michigan
Good luck and safe travels! P.S. I love this blog!
Whew! 😮 I think food prep would be the hardest part of getting ready for a thru-hike! Look forward to reading more about your journey 🙂
Very impressive! Good luck!
Happy Birthday to you….
Happy Birthday to you….
Happy Birthday, have a great time, Aaron…..
Happy Birthday to you!!!!!!!!!!!!!!!!!
wow! totally awesome prep! Maybe we’ll see you our there, hoping to provide some trail magic on the PCT this year…
Fantastic info here, appreciate these details. Good luck!
-PCT Class of 2018
In reply to everyone’s comments above… Thanks so much for your support and am thrilled that my meal prep methods have been helpful. So far, so good on trail. Week one in the books!