 ">
">
Learning by Doing in the Big Ditch: A Solo Trek of the Escalante Route
The Grand Canyon is the type of place that you can’t understand or appreciate from a single vantage point. In photos, it looks so vast that it’s difficult to have a sense of its underlying architecture. Even standing standing at the rim for the first time, I felt relatively unmoved. It was objectively impressive, but so large that it felt difficult to wrap my head around, the harshness of the landscape giving it an impersonal quality.
It took me four days of hiking to understand what all the fuss was about.
The Route
Despite growing up only a 8-hour drive away from it (a paltry distance in the Southwest), I had never been to the Grand Canyon until this trip. (As a kid growing up in the desert, going to see a big hole in its floor just didn’t appeal). But as an outdoorsy adult, my interest had been piqued by friends who’ve raved about backpacking trips there, so when I made plans to spend Thanksgiving with my family in El Paso, Texas, over my vacation, it seemed like the right place to add on a shakedown hike.
A few quick google searches revealed that the most frequently attempted backpacking trip is some variation of the Bright Angel/South Kaibab Loop. But as an aspiring thru-hiker, I wanted a bit more of a challenge and opted for the more remote Escalante Route, which Backpacker Magazine had hailed as one of the “best hikes ever.”
The Escalante Route isn’t a trail in the traditional sense. Instead, it’s a suggestion for how to navigate a 12-mile stretch of canyon along the Colorado River. It’s not maintained by the park service, so some segments are a lot rougher than official trails (and guidebooks warn that navigation skills are required), but for the most part the route is relatively easy to follow and identifiable by cairns marking the way. You can reach the Escalante Route (which only describes the portion of terrain along the river) by taking various combinations of officially maintained rim-to-river trails, but most people take the the Tanner Trail down from the rim to Tanner Beach, hike the 12 mile route (usually split between two days), and then take the combination of the Tonto Trail (from Hance Rapid to Horseshoe Mesa) and Grandview Trail (from Horseshoe Mesa back to the rim) on their way out. This allows you to travel in the direction of the Colorado River’s flow through the land, and while you could do it in the reverse direction, the scrambling sections would probably be more difficult.
For those who are interested, I’ve written up a full trip report below, in hopes that it might be helpful to those preparing for a thru hike and anyone considering a trek of the Escalante Route. If you’re not interested in the details (and want to skip the parts about my stove dying and my tent collapsing on top of me), feel free to skip ahead to the TL;DR learning points in my next post.
Escalante, Day by Day
Day 1: Lipan Point to Tanner Beach via Tanner Trial (8 mi)
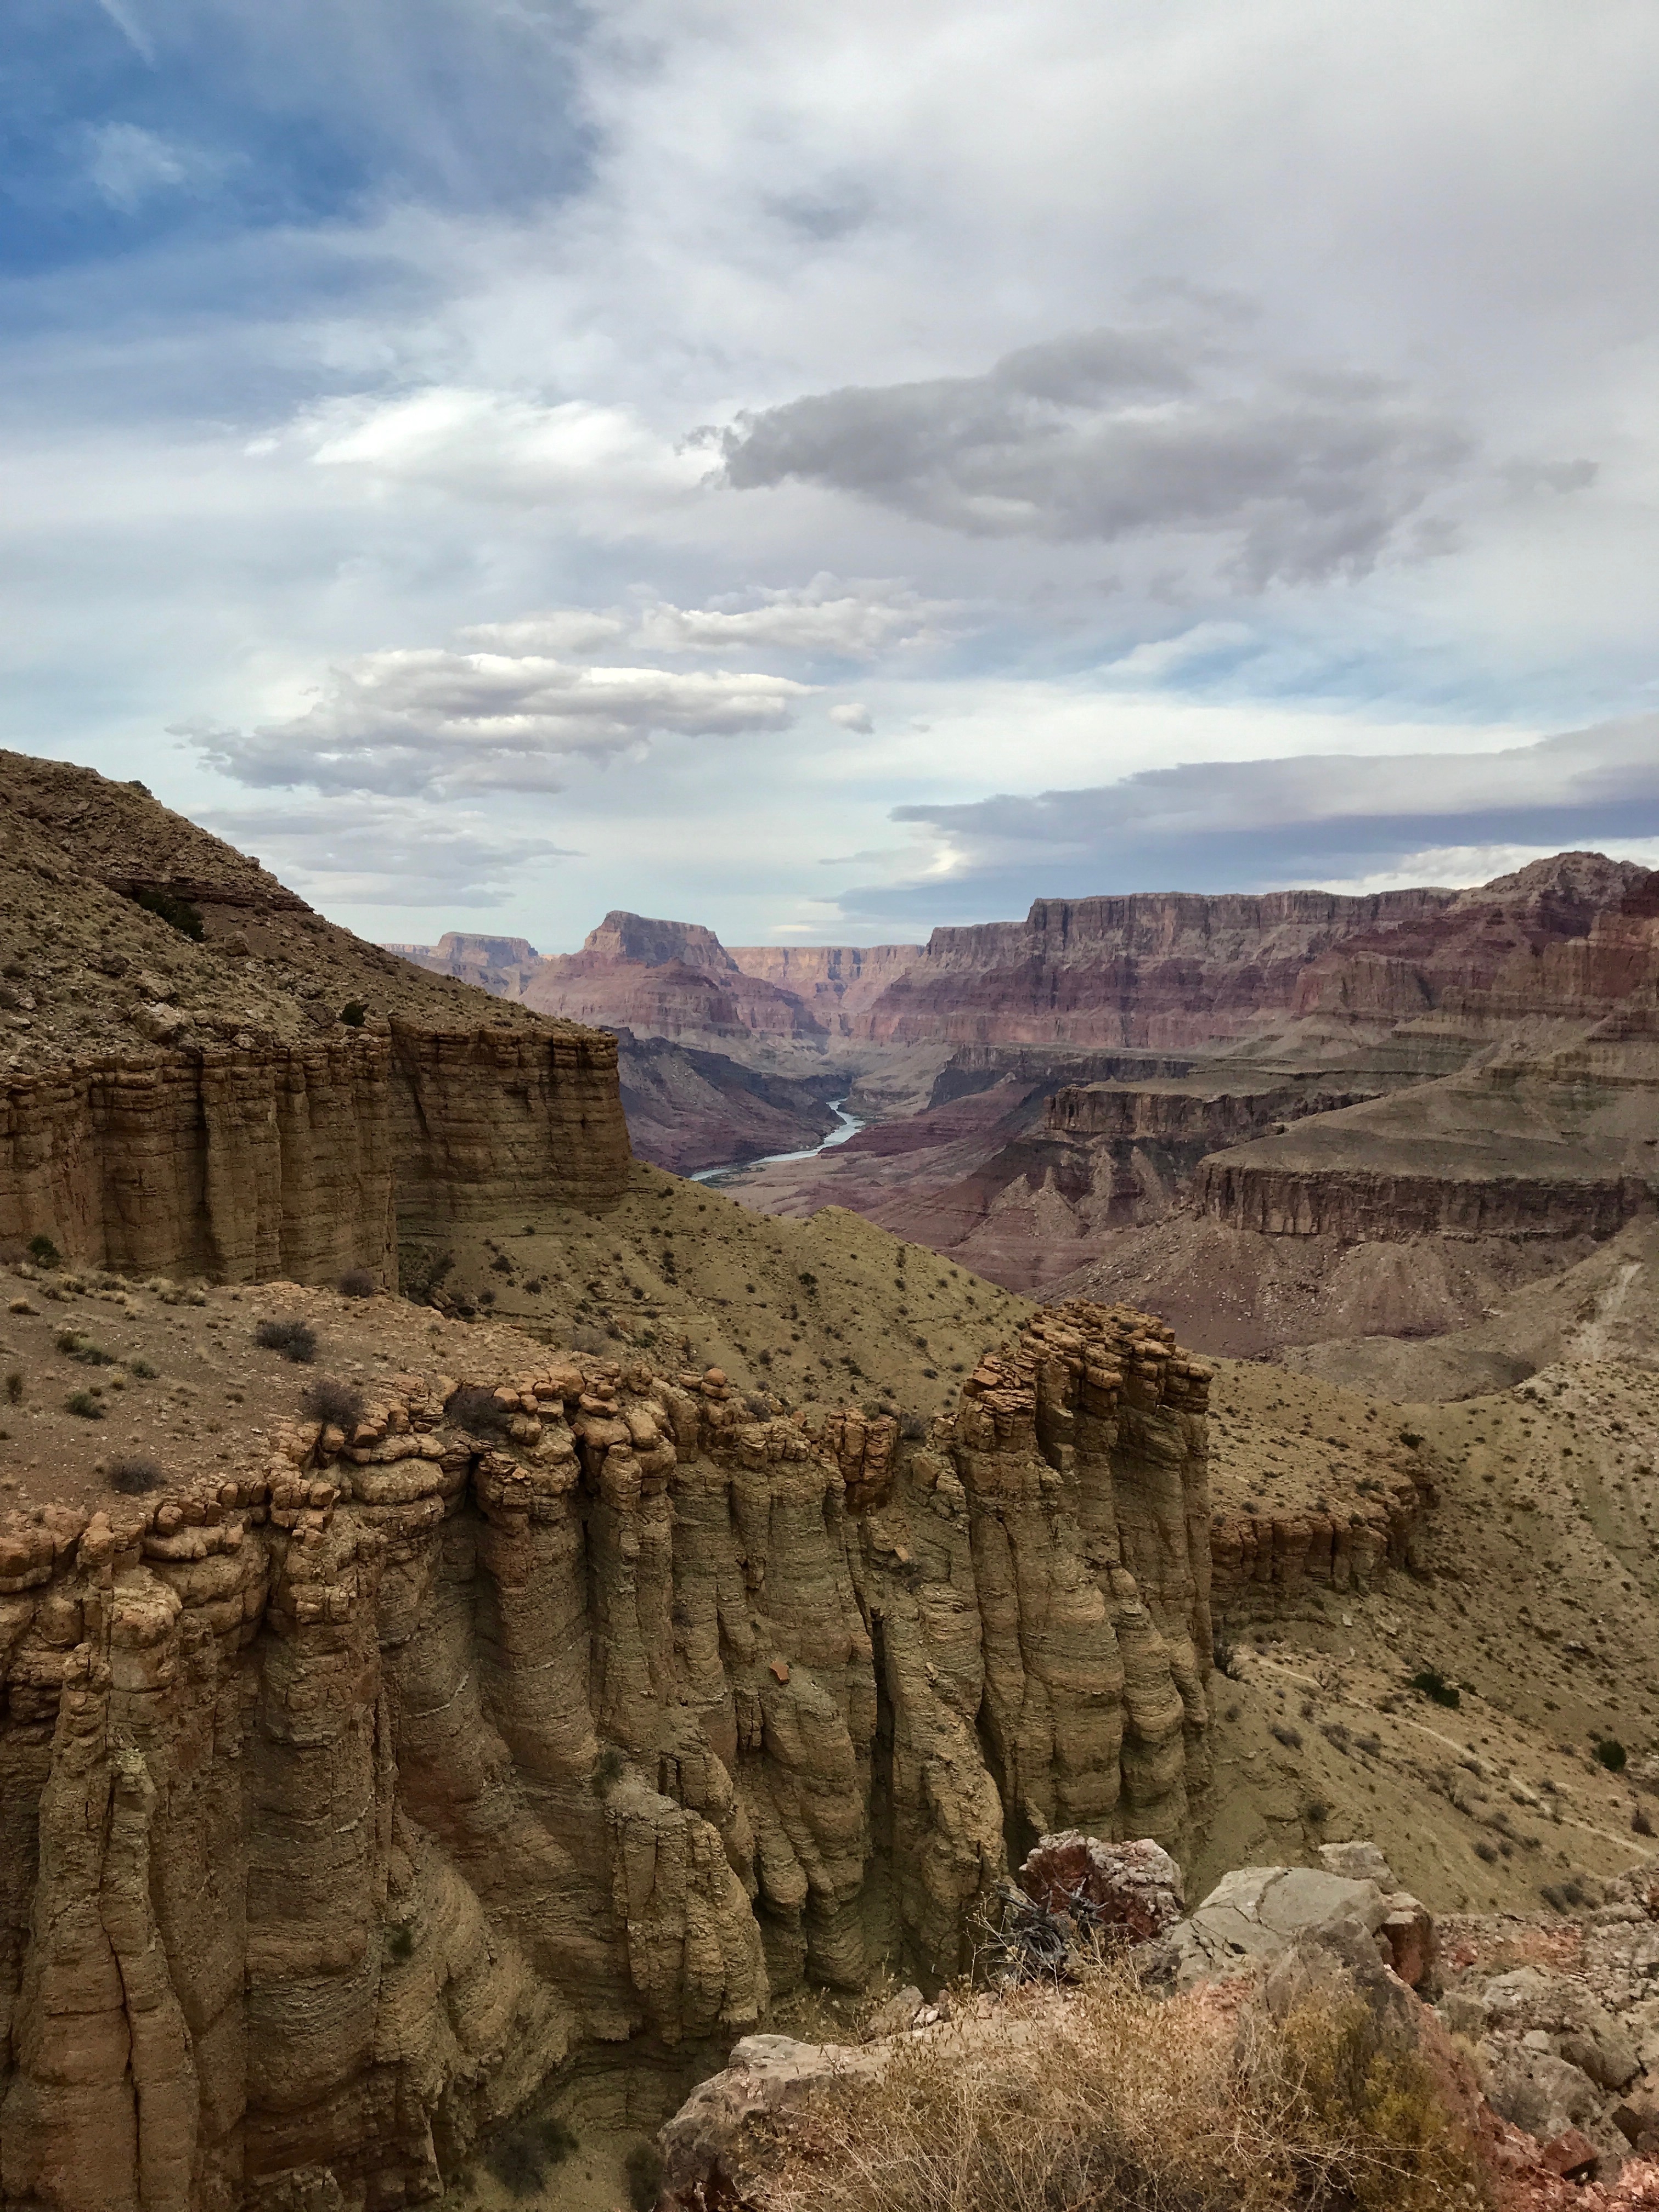
Of the many rocks revealed in the Grand Canyon, the Tapeats layer may have been my favorite.
I descended on the Tanner Trail from Lipan Point (there is overnight parking at Lipan Point, and it’s easy to hitch back from the exit point at Grandview). Because vacations during residency are few and far between, there’s a tendency to pack as much into as little time as possible, so I’d flown out after work on a Wednesday, landed in Phoenix at midnight, then departed at 6 am the following morning with a pitstop at the Flagstaff REI to buy fuel, food and pick up the ratsack I’d ordered (see food storage under technical details below) and to re-pack my pack. This meant that I arrived at the trailhead a bit later than I had hoped—around noon—so with an eight mile hike down to the river that the park service quoted as requiring 10-12 hours of hiking, I got going immediately.
Fortunately, the Tanner Trail wasn’t too bad. The park service’s description of it made it sound far more challenging than it was in reality: though the upper portion was steep, it wasn’t too tricky provided you take things slowly. It was an overcast, hazy day that made the viewpoints less dramatic but left me with plenty of time to contemplate the rock layers I was descending through, to watch the soil change abruptly from the brown of sandstone to the red of oxidized iron as I entered a new zone of geologic time.
Though I saw no one on the way down, I had met to guys two guys getting ready in the parking lot who had told me they planned to camp at Tanner Beach for the night before hiking back out to the rim the following morning, so it was comforting to know that if I tripped and broke my leg (as the trail description suggested I might), they would be somewhere behind me. I stopped for a snack break at the Seventy-Five Mile Creek/Tanner Canyon Saddle viewpoint a little over an hour in, then soldiered on without too many more breaks, and was able to make it to the river by 5.
Though the journey down was uneventful, my first night in camp was anything but: I spent 40 minutes struggling in the sand by the river to get a good pitch on my tent (which would flap threateningly with even the slightest breeze throughout the night), discovered that I couldn’t get a good seal between my $15 BRS stove and my fuel canister (resulting in a huge fuel leak that made me afraid to light it and rendered it useless), got a ton of bugs inside my tent, and met the infamous Grand Canyon mice, which preceded to climb over and under my tent for the rest of the night.
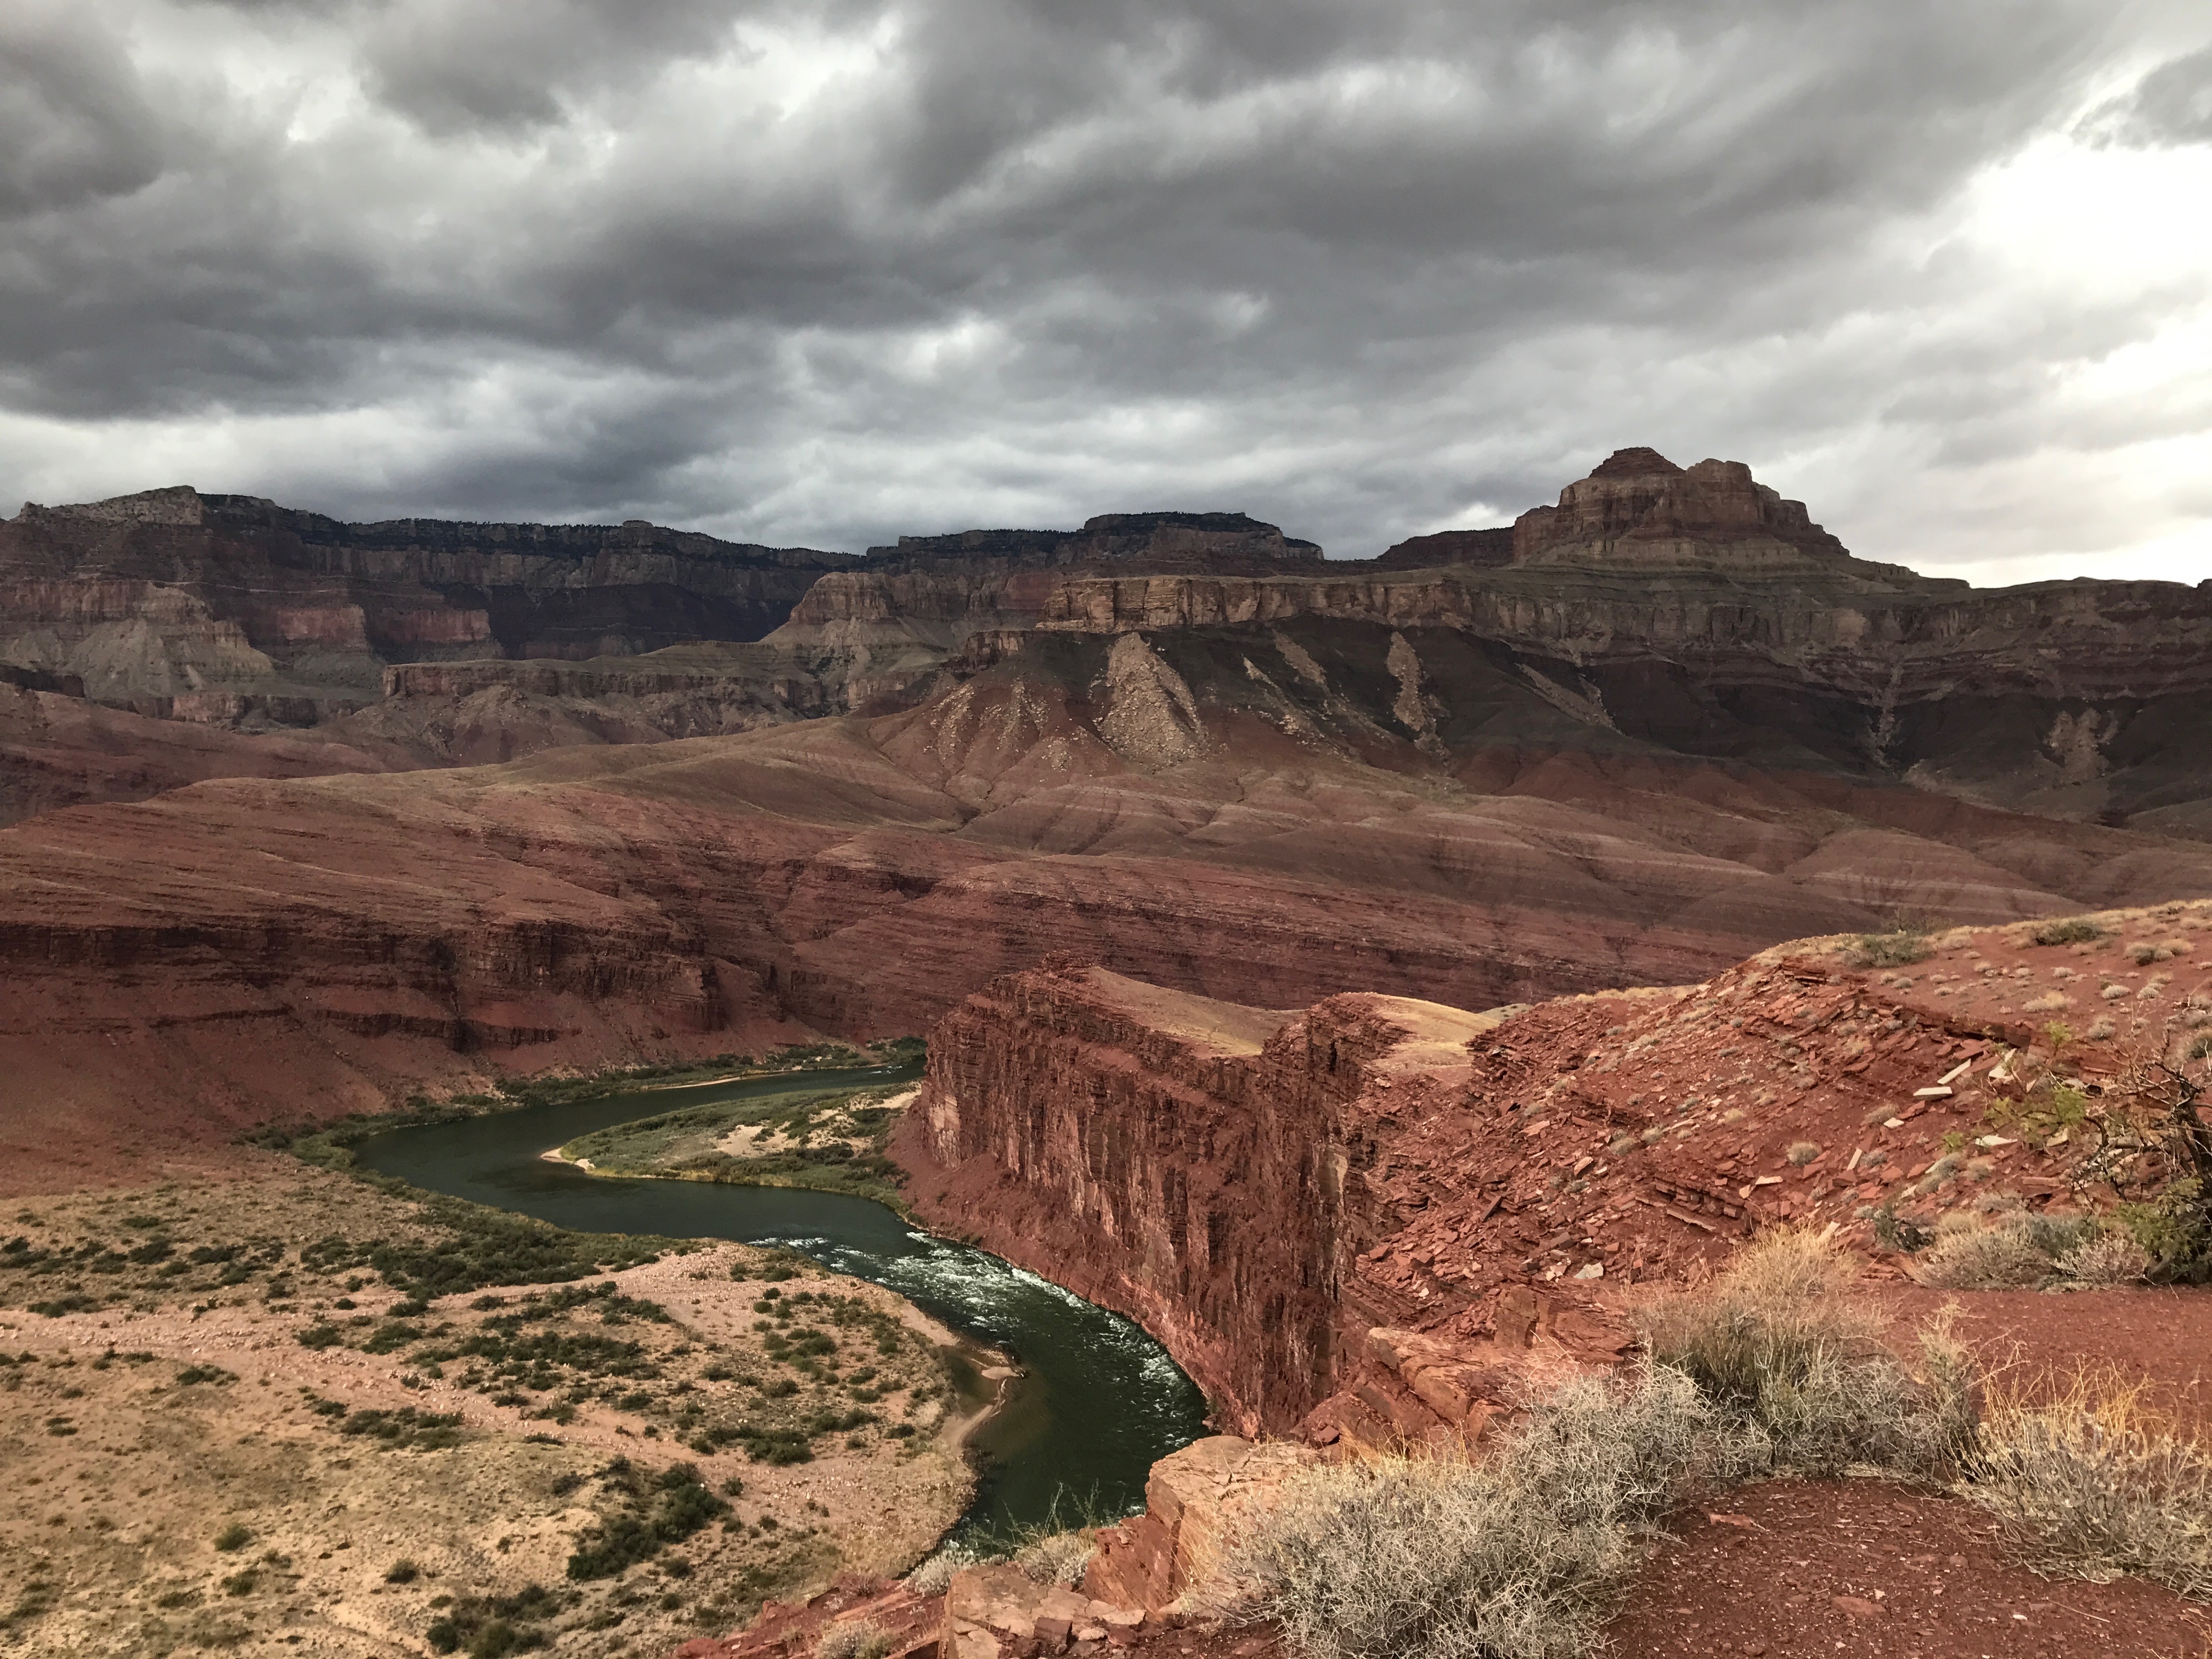
Day 2: Tanner Beach to Escalante Beach via Escalante Route (9 mi)
On the cliffs overlooking the Unkar Delta
After a somewhat sleepless night in which I’d been kept awake by concerns that mice might chew a hole through my tent, the wind my collapse it, or both, I arose to very sore muscles and an overcast day.
The first 4-5 miles were along the river and I took them slowly, warming up weary muscles. I walked through an area where around 100 crows were perched and all set alight as I approached, making for a slightly surreal sight against the dark grey sky. Like its rodents, Grand Canyon crows have a reputation–they’re known for opening zippers and pecking their way through unaccompanied packs in search of food, prompting some veterans to recommend storing food in cookie tins–but fortunately I had no problems with them.
If I’d done my homework on the history of the route, I would also know that I passed directly across from the Unkar Delta, a large plain of land adjacent to a dramatic U-bend in the river that had once been the site of ancient agriculture, inhabited by the Pueblo people until the 13th century. Just prior to the delta, the land on my side of the river started to rise, and the route started climbing and would eventually turn South/Rim-ward to circumnavigate the sheer cliffs that would rise up over the river. It would continue to climb for the next few miles, reaching an entirely different level of the canyon, to a peak of around 3900’ (1200 ft above the river’s 2700’ base) before winding North back towards the river and descending again at the Escalante Creek mouth.
The trail’s climb afforded some great views, but also more precarious segments of trail than I’d encountered thus far on the trip. While I had found the park service’s official description of the Tanner Trail a little hyperbolic (undoubtedly meant to deter the casual day hiker who might venture down towards the river underprepared), after my first day along the river I found that the park’s description of the Escalante Route tended towards understatement. As the trail traversed the slopes of smaller creek canyons, there were points at which it narrowed to 6 inches wide, the ground dropping down precipitously at its edge. To trip and fall in these segments would mean to fall a long way. The feeling of exposure wasn’t helped by the fact that it was a gusty, stormy day, with occasional raindrops, and sheets of wind that would catch my pack and physically move me a few inches when at their strongest. The treverse wrapped around a side canyon and above Escalante Creek valley, offering great views, but I didn’t pull out my camera for fear of a misstep. Finally, after rounding a tongue of land that dropped the trail into the next side canyon, the path became wider and flatter. The final mile of the day followed the now-dry Escalante Creek bed to the beach and was extremely fun, following the path where ancient water had rounded the canyon’s floor and dropped feet at a time on its run towards the Colorado.
I found Escalante Beach deserted when I arrived at 3:30. I sat for a few minutes before trying to pitch my tent, a task that would be far more challenging than I’d anticipated. Though the skies were less grey then they’d been that morning, periodic gusts of wind kept blowing through the canyon. I tried to pitch near natural wind blocks, but the wind paradoxically seemed to come from all directions, and whenever I laid my tent out, it billowed up like a kite, no matter how I oriented it. I ended up covering the guylines in heavy rocks and throwing my sleeping bag inside to keep it grounded, but it still took over an hour to pitch. This wasn’t helped by the fact that I was again camping on a thin layer of sand overlying rock. Unable to get my stakes in more than a centimeter (I bent one in my attempts), I had to lay them horizontally and cover them with boulders. This didn’t stop a few from escaping in the strongest gusts, forcing me to make frequent revisions over the course of the evening.
It was going to be another sleepless night unless I did something right then and there. Not for nothing had I survived nearly 3 years of residency (read: constant assault on my circadian rhythm), so, like the defender of sleep I am, I pulled the Benadryl out of my first aid kit and popped one in my mouth before I could think twice. (Pro tip: while as a physician, I’d recommend avoiding certain sleep aids, a few, such as melatonin and oral Benadryl—which I’d brought primarily as an antihistamine, but is also used by many residents struggling to sleep during the day while working nights—are relatively benign.) I knew that my tent stakes would likely fail overnight and I didn’t want to care. I put in ear plugs (another resident survival staple) to sweeten the deal. Sure enough, within half an hour of entering my bag, I could hear the high pitched “ping” of my aluminum stake escaping the rock it was under. Collapse was inevitable, but I just rolled over and went to sleep. I woke a few times overnight, the tent in increasing states of sag as other stakes failed. The trekking poles remained vertical for a remarkably long time, with one collapsing around midnight while the other stood valiantly till morning. It was a good thing it didn’t rain.
Day 3: Escalante Beach to Hance Creek via Escalante Route and Tonto Trail (10 mi)

Dawn at Escalante Beach
I knew day 3 would be a big one when I set out: I had the two biggest obstacles of the route—the Papagos Wall and Slide—ahead of me, and as I packed up my bag—feelingly remarkably fresh despite the tent collapse—I felt ready. What I hadn’t planned on was losing the route and hiking 3 miles off course before reaching those obstacles.
Let’s rewind. The hike out from Escalante Creek was pleasant enough. After day two, I felt like I was really getting a sense of the inner workings of Grand Canyon’s topography, how the Canyon was carved not only by the Colorado but by its feeder streams, with resultant rockfalls collapsing inward and carried away by the river. On day two, this information had been acquired by hiking up from the river around the dry reminants of feeder streams until their gullies were shallow enough for the crossing, hopping in and out the side canyons that run from the mid-Canyon level to the Colorado.
The third day started in this vein, the route climbing onto the bluffs above the eastern walls of Seventy-Five Mile Creek and following them away from the river until I could bypass the steep canyon.

Peering into Seventy-Five Mile Creek Canyon from its rim
It was at the apex of this side canyon that I lost the route. The most obvious path – along the Western rim opposite the Eastern limb I’d approached on—seemed intentionally blocked off with a few branches crossing the trail. Here, the topography formed an upside down Y, the steep canyon cliffs on either side eventually converging to make the “V” portion while a shallow streambed reached down from the rim’s direction to the canyon’s apex. Should I go up the creek bed towards the rim? I didn’t see any cairns (and it was tough to interpret whether I’d gone as far as the turnaround point from the map), but walked 15 minutes upcreek before turning around after failing to find anything that looked like a convincing cairn.
I walked back to the V and snooped around for clues to no avail. It was time to try the blocked off path, as it seemed possible that the tree branches had been blown across the trail accidently or placed there by a hiker who didn’t know the correct route. I took off my pack (just in case it was dangerous) and climbed up the steep slope. The path narrowed sketchily above the canyon (but I’d seen similar sections on day two) before widening into a convincing footpath after 200 meters or so. It seemed legit. I retraced my steps with care, grabbed my pack, and took the West cliff path.
I followed it for about 1.5 miles, growing increasingly nervous. I had seen what I convinced myself were boot prints, but had yet to see any cairns. The path had winded back towards the river and was now running parallel to it–as the map said it should–but seemed too high. I was on cliffs that continued to gain height with no clear area of descent, when I should have been heading down towards the river. Finally, my phone’s altimeter sealed the deal. I was at 3200 feet, but should have been around 2800. I was on the wrong path.
I knew I needed to turn around, but it was demoralizing to do so without a clear idea of where the real trail went. I finally resolved to get back to the canyon apex where I’d lost the cairns, spend another 20 minutes searching for the correct route, then turn around and go back the way I came if I was still unable to find the trail. It would mean a tough hike out with 2.5 days of terrain to cover in the two days I had remaining, but it was better than getting lost.
As I walked along the Western limb of the 75 Mile Creek Canyon, I hazarded a few glances at the canyon floor. The walls were so steep that I could only see it in a few places, but in one of them I thought I might have seen a cairn. Had I missed some way to descend into the canyon? Upon return to the apex, I walked all the way up to the edge (something I hadn’t done previously) and saw that the steep walls relented somewhat and that it looked reasonable to downclimb into the canyon. It was such a weird move that I could hardly be angry at myself for having missed it. I down climbed hand-over-foot into the canyon, and found a clearly placed cairn in its floor.
I was so upset about the wasted time and miles that I didn’t enjoy the canyon as much as I should have, which is a pity because it was pretty cool. By the time I reached the river again – this time at 2800 ft, as billed—I felt exhausted, and I had yet to deal with the two big ticket items of the day. The hike along the river rolled up and down along a rough, rocky slope and further tired me, though probably wouldn’t have if getting lost hadn’t exhausted me so much.

Plumbing Seventy-Five Mile Creek Canyon
By the time I reached the beach from which the Papagos Wall rose, I didn’t want to waste any time. I ate seven “pump up” gummy bears, didn’t spend too much time contemplating the next cairn 35 feet above me, and started scrambling up. Getting to the first ledge was easy, as was the second, but in my rush to get up it I may not have taken the path of least resistance, as subsequent moves felt a little trickier. I lost my nerve on the fourth move—something I could have certainly done in the climbing gym but made uncomfortable by the fact that I couldn’t find any good hand holds—and had to downclimb to the previous ledge. I could hear V’s voice in my head (he had always been a belayer full of unsolicited advice) telling me not to psych myself out and to just step back and try another approach. I found another set of moves slightly to the left of my original route, and was able to hoist myself up. The worst was behind me.
Or so I thought, until I saw the Slide. It was a lot steeper and higher than it had looked in the photos I’d seen: basically a big pile of rocks precariously stacked one on top of another at a 60 degree angle, without a clear route down. I could see why the route description advised large groups to stay far apart, as a poorly placed foot could easily dislodge rocks and send them tumbling.
Still shaking with adrenaline from the wall ascent, and exhausted from getting lost, it took extra effort to psych myself up for the descent. Fortunately, a series of cairns perched on boulders marked a way down. I didn’t know if it was the best way and I didn’t care. I just knew that I’d have to focus on getting from one cairn to the next. I’m not usually afraid of heights but I did what the height-fearing are told to do in this sort of situation: I only focused only on the few steps ahead of me, and avoided looking down. I was a good seven cairns in before I even allowed myself to look up at the segment of rockslide I’d descended. Eighteen cairns later (I may have gone a little crazy and started saying “ba-bing” each time I passed a cairn, like some sort of weird hiking videogame), I was back at the river and overjoyed to be there.
The next few miles to Hance rapid–up and down rocky slopes and through overgrown riverside vegetation that cut at my baselayers—seemed to fly by. When I got to Hance Beach I was so excited that I may have done a little dance. It was right after dancing (and maybe 5 minutes after peeing) that I realized I was not alone: there was a splashing sound in the water. A large animal? No, a whitewater raft flying a comically large Canadian Flag. I went to the edge and waved eagerly (these were the first people I’d seen in over 36 hours) to a group of rafters who seemed nonplussed. Only a few stopped to exchange pleasantries as I filtered my water, while the rest trooped stoically by. I would later learn that the Hance Rapid is one of the largest and scariest in the park (it didn’t look especially impressive from my vantage point), which might have explained their apparent nervousness.

Rafters scout the Hance Rapid
Hance Rapid marked the end of the Escalante Route, and the origin of the Tonto Trail, a 70-mile route (the longest in the Canyon) that connects some of the GC’s major trails. I would be following the Tonto for the rest of the day and half of the next day onto Horseshoe Mesa, where it met the Grandview Trail.
It felt fantastic to be on an official trail after the Escalante Route, where some of the less maintained sections had required scrambling and bushwhacking (which my scratched-up legs could attested to). I did feel some regret leaving the Colorado, as I had enjoyed the river and would not see it up close again after the Hance Rapid.
The trail climbed steadily and offered some great views of classic GC rock formations: Solomon Temple, Sheba Temple, and Krishna Shrine all glowed in the afternoon sun. I enjoyed the hiking quite a bit, but with 6.4 miles to go when I left Hance Rapid at 2:30, was getting worried about daylight. I didn’t want a repeat of the previous evening’s hour-long tent pitch in the dark.
I hiked briskly around Mineral Canyon, stopping only briefly to put on extra layers as the sun set. In that moment – which started with anxiety about making it to camp before dark – I spotted a large, four-legged figure walking on the crest between Mineral and Hance Canyons. It was magical, as though the bighorn sheep had been sent by a higher power to reassure me in a moment of need. I’m not a religious person, but it was a spiritual moment in the canyon in which I felt oddly at peace. Seconds later, the ram crested the ridge and I hiked on.

Grand Canyon monuments soak up final rays of afternoon light
As I entered Hance Canyon, I looked signs of water. All of the creek beds I’d hiked through had been dry, but I was counting on Hance Creek to be flowing (though had carried 3 liters up from the Colorodo just in case). It was almost dark, but I finally spotted another magical shape: a large, billowy tree whose yellow leaves caught the last of the fading light. I hadn’t seen anything like it in the Canyon so far, and I knew it meant water was close. I raced on, reaching the apex of the canyon and stopping as soon as I found a reasonable camping spot. Thankfully, it was a windless night, and I had my tent up in minutes. A mouse emerged but I didn’t even care, I was so relieved to be there. It was the coldest night in the canyon to date (likely in the low 40s by sunset, with the mercury dropping below freezing overnight), so I didn’t linger outside for long and was zipped into my sleeping bag within 45 minutes of having arrived in camp.
Day 4: Hance Creek to Rim via Tonto and Grandview Trails (5 mi)

Magic trees of Hance Creek Canyon
Though I never saw it in full sunlight—it was almost dark when I arrived and still shrowded in canyon shadow when I left at 7:30 the next morning—Hance Creek may have been my favorite spot of the whole Canyon. As I’d discover the next morning when I went to filter water (it turned out I’d camped 20 ft from the stream and hadn’t even noticed), the creek was tiny—just a trickle of water connecting some puddles—but despite that, it completely changed the flora of Hance Canyon, creating a thriving little microclimate with vegetation unlike any other in the canyon. As I hiked out, I’d see more of more of the trees I had spotted on the way in, and they continued to look as magical and otherworldly as they had the night before. It was a cold enough morning that I’d skipped breakfast in order to get on the trail and warm up, but did stop briefly to take a final photo of them.
Soon enough, I was over the ridge and climbing up the next valley. The trail climbed steadily—forked once (take the left fork, as the right circumnavigates Horseshoe Mesa, which might be a nice side trip for those who have more time) and forked again at Page Spring (take the right limb to continue on the Tonto Trail; the left goes down to the spring where the last water ’til the rim can be found). There, it started climbing the steep walls supporting the Horseshoe Mesa, switching back against the rocky crag and passing the remnants of an old mine. It was a tiring climb, and I felt accomplished by the time I reached the mesa at 9:30.
It was on the mesa that I saw the first hikers—a European couple out for a dayhike—in over two days. I was thrilled to stop and chat with them for a few minutes, then started on the Grandview Trail, which continued an easy climb up the inclined plateau. After a mile and a half, the trail would become cobbled and steeper, and I began seeing more and more dayhikers. I took the ascent slowly and steadily, passing a few backpackers who said they’d spent the night at Cottonwood Creek on the other side of the Mesa, and stopping to rest only when I reached the Coconino Saddle. It was a beautiful spot with views of some gorgeous rock formations, and a couple of blue jays that flew to and fro as I stuffed about 100 cheetohs into my mouth.

Above Horseshoe Mesa
From the saddle, it was about 45 minutes of slow, tiresome climbing to the rim. If I were to do it again, I’d probably take more photos, but I was too tired at the time (particularly having lugged an unnecessary amount of water for the cold day) to care. I passed numerous dayhikers on their way down, and a particularly noisy family of five led by a guy carrying a huge pack, followed by an 8-year old boy carrying an external frame, a seven-year-old girl who excitedly told me, “we’re going backpacking for two days!” and a fussy five-year-old in the rear, whose mother was saying, “no sweetie, I can’t carry you, you’re going to walk like the big girl you are.” God bless them all; what they were doing was WAY harder than what I had just done.
Back on the rim, I felt accomplished. After lying on a bench at the top for a bit, I hitched (my first time!) back to Lipan Point, where the canyon I’d seen on the first day now seemed familiar. From it, I could see the saddle where I’d snacked on the first day, the U-bend of river and Unkar Delta that I had passed on Day 2, the Hance Rapid I’d ascended from on Day 3, the world from which I’d just emerged spread out below me. This is the gift the Escalante Route gives: a sense of the inner canyon’s structure and secrets, hard-won knowledge acquired slowly, exploring the canyon layer by layer.

Looking down at the route from Lipan Point
The Nitty Gritty
For those of you who are interested in hiking the Escalante Route in the future, there are several additional concerns you will need to consider that differ from the average backpacking route. These include :
- Water purification: during parts of the year, you will need to be prepare to purify turbid water for the at times sediment-laden Colorado River. (This wasn’t necessary on my trip because the river was pretty clear, but I was prepared to do it if needed). This typically involves letting the river water sit (e.g., in a portable bucket) so the sediment settles and using alum, which catalyzes clumping of sediment and allows you to remove the clear water from the top: see here for more info.
- Food storage: no bears in the GC, but you will need to take measures to protect your food from the aggressive rodent population. Grand Canyon mice are not shy, and have been known to chew through tents, so most chose to protect themselves and their gear by lugging chainmail “Ratsacks.” (Based on my research, most people didn’t think Ursacks–even the minor–were tough enough). A budget alternative to this would be storing your food in a large cookie tin (seriously, people do this—google it), which has the additional benefit of being crow proof. (Grand Canyon crows are notoriously aggressive and can open/peck their way through packs left unaccompanied. I didn’t have an issue, but I also didn’t leave my pack alone during the day when the crows were out.). Either way, some sort of basic food protection is an absolute necessity, as the mice had no qualms walking right up to me while I was cooking dinner, running over my foot, and trying to steal food in plain sight.
- Permit: You will need one in order to legally stay overnight in the Grand Canyon at anywhere other than a couple of campgrounds on the rim. I applied in early September for my mid-November trip, but if you go during a more popular time (summer, late spring, early fall), you’ll likely need to apply earlier. For more information on permits, see Escalante Route Resources below.
- Navigation: You can get away with following cairns for the vast majority of this hike, but I always travel with a paper map and compass and found them helpful on this trip. I used the National Geographic’s GC/Bright Angel Canyon map. (GPS is also an option, but I survived without it.)
- Heights: Just to be clear, the Escalante Route is not for the height fearing. The park service’s description of the route notes that, “some sections offer a walking surface about a boot-sole wide while traversing slopes that fall steeply away for hundreds of feet. Take your time and walk with care.” While I found their descriptions of official trails a bit hyperbolic, I think this was right on the mark, particularly for the hiking faced on day 2. On day 3, there are bigger obstacles to contend with: route-followers will need to free climb the 40 foot Papagos Wall, an easy ascent with big holds and plenty of resting places, but one that is nonetheless made cumbersome with a full pack and pretty nerve-racking for lack of protection: a fall would be bad. The wall is swiftly followed by the descent down the precarious Papagos Slide, a vertical boulder pile formed by a prior rock slide, which I actually thought was worse and more time-intensive than the wall (it’s a lot steeper in real life than the pictures I had seen online), particularly since it seems as though the rocks could continue on their down-tumble of the slope at any moment. I was too busy surviving to take any pictures of these obstacles, but you can google image search them. I will also mention that while I didn’t feel that a rope (for the purpose of hauling a pack up or down the Papagos Wall) was necessary, I would strongly recommend going in the East-to-West, downriver direction, as a climb up the wall is certainly easier than descending it would be. In summary, though I’m a casual rock climber and typically don’t have a problem with heights, there are portions of this route where a fall would have been highly damaging that made me surprisingly nervous and required my full concentration. There, you’ve been warned.
- Tent setup: Be prepared to pitch your tent on sandy and/or rocky surfaces and have the appropriate stakes (particularly if you have a non-free-standing tent as I did).
- Weather: This is Grand Canyon 101, but still warrants a final reminder since the canyon’s weather extremes can be deadly. As you know, the Grand Canyon is horribly hot in the summer, so I’d advise hiking in the more pleasant shoulder seasons if you’d like to avoid carrying your weight in water and wearing your body’s entire supply of electrolytes on your clothing. November was perfect and I’d highly recommend it. As a reminder, the 4500 foot change in elevation from rim to river mean that temperatures at the canyon’s base tend to be 15-20 degrees warmer than at the rim. If you’re planning a trip and would like to stalk the weather, you can search for “Phantom ranch weather” (a rustic lodge near the river) to get a sense of inner canyon temps and “Grand Canyon Village weather” for info on the rim. If you go particularly early/late in the shoulder season (March, April, November, December), you should be prepared to face ice and snow on the rim and higher elevations and take traction devices (a pair of micro spikes should do the trick). I left mine in my car after finding the rim clear on my arrival and no chance of significant precipitation in the forecast, and would recommend taking them to the rim as I did and then making a last minute decision, since any ice on the steep trails near the rim would make for perilous descending. You’ll also need clothing and a sleeping system that’s versatile enough to handle the canyon’s huge variations in temperature. On my mid-November trip, temps were in the 60s during the day in the sun and 50s in shadow, and I hiked in shorts, a tank top, and a thin merino baselayer top. The nights were incredibly variable: the first night was in the low 50s and I left my bag open and sweated through the night, while the last night was in the 20s and had me wearing all my layers (merino base layer, down puffy, rain shell) to set up camp and required that I go full mummy mode in my 17 degree down bag.
- Remoteness: The Grand Canyon is visited by millions of people a year, a fact that I do think lured me into a false sense of security. The Escalante Route is touted by backpacker magazine as being one of the “best hikes ever,” and perhaps because of that, I expected to see more people. Instead, it was just little ol’ me. Which makes for a great unadulterated backcountry experience, but also makes it pretty shitty if you fall or seriously injure yourself. This route is dozens of miles away from the more trafficked parts of the park, the South Kaibab/Bright Angel area, so there’s no chance you’d be happened upon by a mule tour if things went wrong, and I didn’t have any cell reception in the canyon. If I were going to do it again, especially solo and in the late shoulder season (it’s probably a lot busier at peak), I would bring along a PLB (personal locator beacon). Or some personal bacon (yum). One of the two.
Planning Your Trip
Pre-Hike Logistics
- Apply for a Grand Canyon backcountry permit.
- Be prepared to purify turbid water.
On the Trail:
- Official Tanner Trail description from the park service: (nb: I thought this was pretty hyperbolic. It’s not nearly as bad as they make it sound)
- Escalante Route information from the park service. (FYI, I thought this description was a bit understated. E.g., of the Papagos slide, they write, “This gully seems dangerous – steep, with lots of big boulders in precarious balance.” I would have replaced “seems” with “is.”)
- Grandview Trail info from the park service:
- Itinerary I followed (as posted by a Gossamer Gear Ambassador Trinity Ludwig): **FYI, the park service will recommend that you do this distance in 5 or 6 days. Like this GG ambassador, I found it entirely doable in 4 days, even with a late start on day 1 and an early exit on day 4.
- A good trip report with some nice photos and cool GPS reconstructions of the route.

This website contains affiliate links, which means The Trek may receive a percentage of any product or service you purchase using the links in the articles or advertisements. The buyer pays the same price as they would otherwise, and your purchase helps to support The Trek's ongoing goal to serve you quality backpacking advice and information. Thanks for your support!
To learn more, please visit the About This Site page.

Comments 4
Love this post. I hiked this trail (although tanner to new hance) this spring and hand an almost identical experience. It was also my prep hike for the PCT in June.
I was an Experienced day hiker, but first time backpacker, my ego told me the cautions of the trail we’re meant to deter out of shape day hikers so I went through with the hike.
Made it down to tanner rapids easily enough, but those 6 inch sections along the escalate route had me quite literally shaking in my boots.
Our itinerary had us going from tanner rapids to new hance rapids all in one day, when we made it to the apex of the 75 mile canyon we also stepped over the logs and rocks blocking off the trail and took the high line back to the river.
After paralleling the river for about 200 yards we came to the same conclusion…we keep going up and don’t see a way down. Thus we turned back around and headed down the canyon to the beach.
At this point we determined we were lost. Luckily there was a rafting crew camped out at the beach and they gave us a ride in the morning down the river to new hance so we could hike out.
Anyways, the guides told us that the high line along the west side of 75 mile canyon is actually the correct way and that it eventually leads to the rockslide/downclimb. I’m planning on heading back to redeem my first attempt and was wondering if you have any input after the fact on if you would have been able to access that down climb if you had continued along the high line?
Cheers!
Also, you can check out my run down on my experience along the escalate route if you’re interested: https://www.untamedsloth.com/backpacking-grand-canyon-tanner-trail-new-hance/
I enjoyed your gripping account with compelling verbal imagery. If you haven’t read Colin Fletcher’s The Man Who Walked Through Time you might enjoy it–he was the first to walk the length of the canyon in a single go (Harvey Butchart, a math professor at Northern Arizona State did it in pieces first), and talks about the difficulty of assessing the sizes of boulders and canyons and the resulting disorientation. And, of course, its spectacle. I look forward to reading your PCT entries.
Good writeup! Did your exact route 2 weeks ago. Your weather descriptions are spot on. Froze my butt off on night 3 at Hance Creek near the big tree. Had a mouse chew into my tent and run across my face on night 3 to get to one of my spoons that was inside my backpack. (Food was hung outside in a ratsack) Not sure how you missed the entry to 75-mile Canyon. It would best be described as “steep marble steps.” It was really the first point at which you could safely drop into the canyon without ropes.
Interesting and right on the spot description of the beautiful but challenging Escalante route. I did it two months ago, in late November 2023 and used the information in your post while preparing for the trip – thank you! The permit system is different now and the rangers want to know your previous backpacking experience – you need to prove you know where you are going and what you are doing 🙂 I had the “luck” to go through the narrow sections of the route + Papago Wall and Slide in a rainy day – this slowed me down and made for an even more trilling experience 🙂 I actually continued west on the Eastern Tonto Trail all the way to Indian (Havasupai) Garden Campground and up Bright Angel Trail for a total of 5 days / 4 nights adventure – unforgettable and exciting. Thanks again for your post!