 ">
">
Snow Travel for Thru-Hikers: Essential Gear, Skills, Tips, and More
Safe snow travel is key to any thru-hike, but considerably more crucial this thru-hiking season due to the dumping of snow the west—especially California—has received.
PCT and CDT hikers are likely to encounter snowfields even in an average year, but 2023’s record-breaking snowpack means thru-hikers need to prepare for potentially dangerous conditions in the high mountains. And the trouble may start sooner than you expect: as the season kicks off, hikers are more likely to encounter snowy passes in the early miles on the PCT and CDT in 2023.
Fundamental snow safety skills aren’t just for mountaineers and winter hikers. It’s important for anyone recreating in the backcountry to know what to do when encountering snow fields or high-angle alpine terrain. Here’s what you need to know.
Quick Navigation
Snow Gear for Thru-Hikers
Self Arrest
How To Walk on Snow
Navigating Snow-Covered Trails
Timing Your Day
Glissading

Thru-Hiking Snow Gear
Microspikes
Having proper gear is crucial to safe snow travel and can be make-or-break in an emergency situation. Most thru-hikers carry microspikes, which are traction devices best equipped for hard-packed snow and low-angle ice. They’re just like your car’s tire chains, but for humans! These relatively lightweight devices have small spikes that you can easily slip over your footwear to prevent slips and falls on slick surfaces.
READ NEXT – How To Navigate the Sierra in a High Snow Year
Microspike Recommendations
Snowline Chainsen Pro – Weighing just 9.8 0z for a size small, these heavy-duty spikes are ultra-durable. They are unique in that they have front points and are a flexible hybrid between spikes and crampons. The Chainsen Pros are secure and have reliable traction on icy terrain.
However, their larger spikes make them a bit bulky for thru-hiking, and they perform better when worn with stiffer boots as opposed to trail runners. When worn frequently, they can actually crease and create holes in your trail runners, wearing them down more quickly than their counterparts.
Kahtoola MICROspike – Kahtoola is the classic, trusty option when it comes to reliable snow traction. A bit heavier than the Chainsen Pro, the spikes clock in at 11 ounces for a small.
Although only a few ounces heavier, they are less bulky and quite easy to pack. These spikes have plenty of traction for thru-hikers and are quick and easy to put on.

Photo Courtesy: Flickr/Rebecca Siegel
Ice Axe
Another important piece of gear some thru-hikers carry is an ice axe. Again, the sharp image of an ice axe is typically equated with rugged mountaineers crossing over glaciated peaks on high-altitude expeditions. However, it can be an equally important tool for thru-hikers encountering snowy peaks, like in this year’s epic snowpack.
An ice axe can be a vital, life-saving tool used to provide stability on steep, slick traverses, self-arrest a fall on a steep slope, control a glissade, or cut steps on an ascent or descent. In a low-snow year, some PCT and CDT thru-hikers opt out of bringing along an axe. But even in normal years, early-season hikers on high-elevation trails are strongly encouraged to bring one. And due to this year’s high snowpack and likelihood of dangerous conditions, it is essential that you bring one.
There are many different types of ice axes for different activities. For thru-hiking, opt for a classic mountaineering ice axe with a straight or slightly curved shaft.
What Size of Ice Axe Is Best for Thru-Hiking?
On steep snow traverses, you will hold the ice axe in your upslope hand by the head with the pick facing backward, digging the sharp spike into the ice with each step in place of a trekking pole—so you want the shaft to be long enough that you can use it this way while walking comfortably upright.
Fitting yourself for an ice axe is key to using it correctly (and safely). To narrow in on your fit, stand up straight and hold the head of the axe by your side. Ideally, the spike of the axe should land just above ankle height but no higher than mid-calf.
According to Rab Equipment, a rough estimate of height-to-length ratio when purchasing online looks like this:
- 5’8 or less: 50/60cm axe
- 5’8 to 6’0: 60/70cm axe
- 6’0 or above > 60/75cm axe
Ice Axe Recommendations
Black Diamond Raven Ice Axe – This is a great starter for thru-hikers not looking to break the bank. At $99.95, the Raven is a popular choice for PCT thru-hikers due to its affordability and comfortable carry.
While it’s certainly not the lightest or most compact on the market starting at 15.1 ounces, the Raven’s longer shaft makes traversing snow fields a breeze. It’s also ideal for beginners who don’t have much self-arrest experience.
Black Diamond offers a lighter version, the Raven Pro, at a higher price point.
CAMP Corsa Ice Axe – On the other side of the spectrum is the CAMP Corsa, one of the lightest axes on the market and another common choice among thru-hikers. At a mere 7.1 ounces, you’ll hardly notice this hyperlight aluminum axe when attached to your pack.
It’s no secret thru-hikers flock to ultralight gear like moths, but note that the Corsa’s lack of weight comes with a sacrifice. Since it’s smaller and lighter, the Corsa can be more difficult for ice-axe beginners to maneuver; it’s better suited for more experienced snow travelers with excellent self-arrest form.

Photo Courtesy: Pixabay/Javier Contreras Sales
Sun Protection
While many people associate sunburns and skin damage with hot summer days, it’s just as easy to get burned while hiking in the snow. In fact, the reflective nature of the snow can actually increase your risk of sun damage.
Bright white snow reflects up to 80 percent of the sun’s UV rays, leading to a condition known as snow blindness, or photokeratitis. It’s important to wear polarized sunglasses or glacier glasses with eye shields. Not only will these accessories shield your eyes from the sun’s harmful rays, but they’ll also help you see more clearly in the blinding, snowy environment.
Glacier glasses differ from regular sunglasses in both the intensity of the UV-blocking lens, as well as the distinguishable eye shields on either side. This is to ensure that no harmful rays are hitting your eyes from the bottoms and sides of the glasses, whereas regular sunglasses have gaps and no side shields.
To DIY eye shields on a pair of regular, polarized sunglasses, stick duct tape to the sides of your sunglasses to ensure maximum coverage from the sun. Sunglasses that fit over regular eyeglasses also help to reduce peripheral glare.
Snow hikers should also carry high-SPF sunscreen and reapply it frequently. Additionally, consider wearing sun hoodies or other UPF clothing to keep your skin safe from the sun’s damaging rays.
READ NEXT – How To Pick the Perfect Sun Hoodie for Your Next Hike
Self-Arrest
The ability to self-arrest on steep, icy slopes is crucial for any thru-hiker. Self-arrest can prevent a slip from turning into a serious or fatal fall and potentially save your life.
Even on terrain with a moderate slope of 30 to 35 degrees, hikers can quickly gather speed and slide downhill, reaching velocities similar to free fall. To prevent these accidents, it’s crucial to train and perfect self-arrest techniques on short, obstacle-free snowfields. Consistent practice can help with muscle memory to make the process automatic and ensure that your reactions are immediate and effective.
How To Self-Arrest
The key to self-arresting is to stop the slide as quickly as possible. Depending on which way you fall, the process of self-arresting may vary slightly from start to finish. However, the end goal is always the same: the pick of your ice axe should be buried deep into the snow’s surface with your body’s weight planted over the axe until you are no longer sliding.
1. Orient Yourself: To properly and safely self-arrest, your chest should be oriented towards the snow with your backside toward the sky. Your head should be facing upwards, and your feet downslope. Whether you fall feet or head first, orienting yourself is the first step to a safe self-arrest.
2. Drive in the Pick: Once on your stomach, if wearing spikes or crampons, spread your legs and bend your knees while digging your ice axe’s pick deep into the snow’s surface with both hands. Do not swing the axe to achieve this; rather, utilize your body weight to push it in as deep as it will go.
3. Plant Feet: Then, kick your feet sturdily to plant them in the snow, and push your whole body over the axe. Position yourself so that your weight is over the axe to create a braking force.
This will help slow down your momentum and stop the slide. Your ice axe should lie diagonal to your body, with your hand covering the head of the axe near your shoulder and another on the shaft near your hip. The axe will experience drag and want to fly from your grasp—keep a firm hold of it.
Self-Arrest Is a Last Resort
It’s important to note that self-arresting is not a substitute for proper mountaineering equipment and training. Good judgment and proper use of your equipment (including your ice axe) can prevent many falls from happening in the first place.
If you’re planning to hike in icy or steep terrain, you should have an ice axe, traction, and proper training in how to use them. Additionally, it’s important to assess the slope and the conditions before attempting a potentially dangerous traverse. If the slope is too steep or icy, or if the snow is too hard, self-arresting may not be effective.
Timing Is Key
Another key factor in self-arresting is timing. You need to be able to recognize when you’re starting to slide and act quickly to stop the slide. The more momentum you gain while sliding, the more difficult a self-arrest will become. This requires practice in a safe, controlled environment, so it’s important to dial this in as muscle memory to ensure your body kicks into gear upon an emergency.
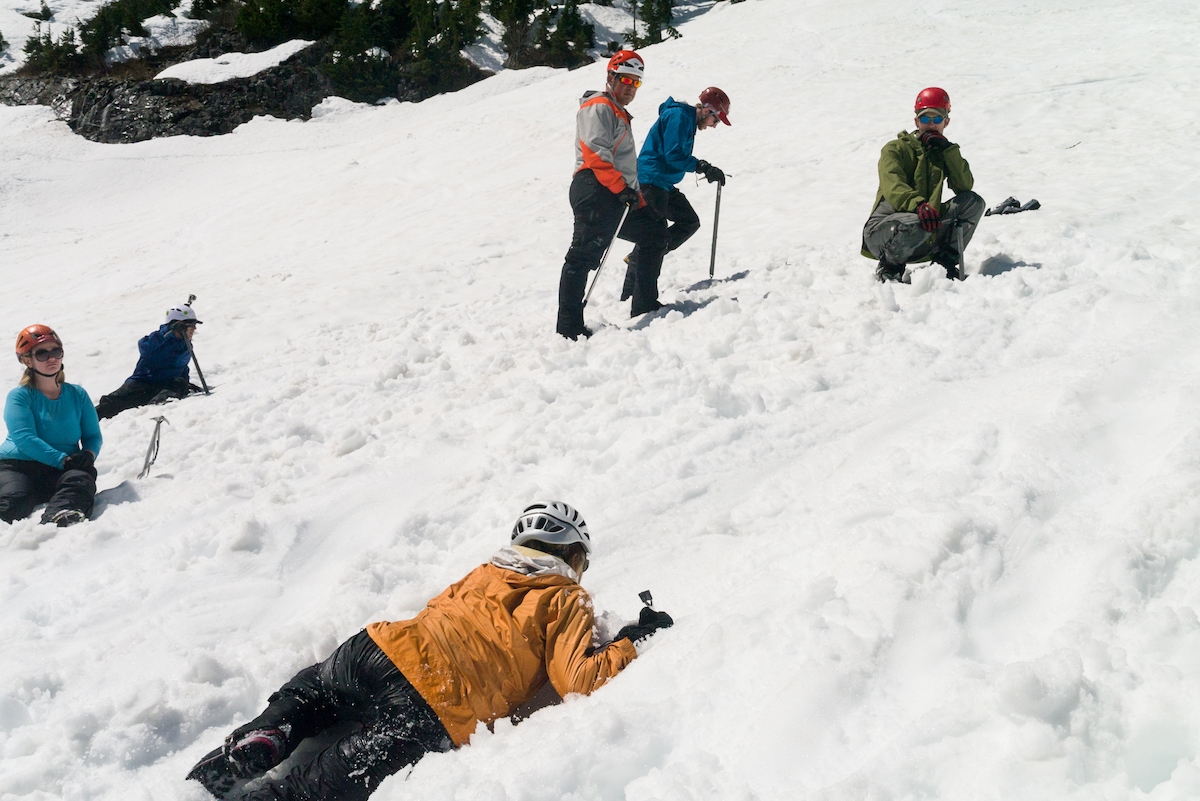
Photo Courtesy: Flickr/Brook Peterson
Traveling Across Snowy Terrain
Walking Techniques
Depending on the terrain, thru-hikers may utilize different walking techniques, both for safety and efficiency, when ascending or descending snowy passes.
In moderately steep terrain, the optimal approach is to traverse the slope in a zigzag pattern. Kick steps into the snow with the side of your foot to create footholds, which you can then step into. It’s important to note that this works best when the boot pack is slightly inclined towards the slope to reduce the risk of slipping.
Another pro tip: Kicking steps can be exhausting! To conserve energy, take smaller, shorter steps upward, ensuring the footholds are as deep as possible.
Always be sure to carry your ice axe in your uphill hand, switching sides when you or the topography changes direction, and use it as a “walking stick.” On particularly steep slopes where a fall could be dangerous or potentially fatal, having your ice axe in hand is best practice in case of self-arrest. Unfortunately, it won’t do you much good when strapped to the back of your pack.
When descending, it’s recommended to face the valley to maintain a clear view of the terrain. On level sections, descend with a wide stance and lean forward slightly, while keeping your knees and hips slightly bent and ready to respond to any changes in the terrain.
Once again, footholds are your friend in making an easy descent. Use your heels to kick steps into the snow, with the footholds pointed inwards to the slope while using your axe for support.

Photo Courtesy: Flickr/Brook Peterson
Navigation
When the trail is buried under feet of snow, it can be difficult to follow the established path. Footprints left by other hikers can be misleading, so it’s important to take them with a grain of salt. Be wary of your environment and use critical decision-making to decide which route is best and most comfortable for your skill levels. It’s crucial to have a solid understanding of map reading and navigation skills to stay on course.
When trudging through snow, your pace will be significantly slower. Route finding, post-holing, higher caution, and assessing snowpack are all variables that could factor into a slower time, as well as the added difficulty of walking on slippery terrain.
In deep snow, it can take twice as long or more to cover the same distance. This means that resupply points may be further apart than what is typical on dry trail. It’s important to plan ahead and carry enough food and supplies to last longer than expected in case you encounter unforeseen delays or difficult snow conditions.
When navigating a snow-covered trail, it’s also important to remember that the red line on your GPS or FarOut app isn’t the only option. In fact, following the trail exactly may not always be the best or safest choice.
In some cases, it may be more direct and safer to take an alternative route. It’s important to keep an open mind and consider all options, taking into account factors such as avalanche risk, snow conditions, and terrain.
Timing
Another important consideration when traveling across snowy terrain is timing—generally speaking, hiking earlier in the day is preferable. But we’ll get into the nitty-gritty of the risks to assume when traveling on snow in the early morning versus late day.
Mornings
As the opposite of a morning person, there are few things that get me stoked for an early morning start—with mountain activities being one of the few. I prefer starting early in snowy terrain due to some key safety aspects.
The benefits of traveling across a snowy pass in the morning means a harder snowpack from a lack of sun, which in turn equates to less post-holing. Post-holing is the killer of energy, and it’s frustrating for any thru-hiker to constantly be knee (or waist) deep in snow with a heavy pack. So to avoid it altogether, I prefer an early start, where I can travel atop a snowfield in confidence.
Fords are also safer early in the day: streams will be at their lowest flow due to the lack of snowmelt in the cold morning hours.
However, starting early has tradeoffs. Depending on weather and overnight temperatures, an early start may mean more icy or hard-packed terrain, which can be intimidating for people who are not comfortable on snow. This is where your traction and ice axe will come in handy.
If you’re one of the first to travel through an area, you may also be responsible for creating the boot pack, an arduous task, especially with hard-packed snow that does not create footholds easily.
With proper gear, hiking earlier in the day is still likely the safest and easiest option. It’s best to be over high passes and heading down toward lower terrain (and, hopefully, dry trail) by early afternoon. Some thru-hikers start as early as 2 or 3 a.m. to make that happen.
READ NEXT – I Hate Mornings, But I’m Always On-Trail by 5 A.M.—Here’s Why
Afternoons
For late risers, crossing a snowy path may come at the heat of the day, when the snow is melting and softing from the sun’s rays. Softer, mushier snow may feel less daunting for those worried about icy terrain; you can often go without microspikes, and there is a less chance of slipping.
But mushy snow means hellacious postholing, so any amount of mileage can suddenly become a day-long slog when caught in this constant cycle. Furthermore, this can become quite dangerous in certain areas, such as river crossings that are iced over, where thru-hikers have the potential to poke through a snow bridge.
A snow bridge is an arc formed by a snow drift across terrain, such as over running water, which can be risky to cross over due to its delicate nature and melting snow. If formed over a rushing body of water, hikers can fall in and get sucked under the snow, creating a dangerous situation.
When streams are not bridged over, they will flow faster and deeper in the afternoon, swelled by snowmelt, making fords more dangerous.
While snow bridges can collapse without warning, they are more likely to do so when the snow begins to warm and the bridge becomes brittle and melted.

Glissading
Glissading is a fun and efficient way to descend steep snow slopes and the perfect way to celebrate topping out on a high pass. When done safely and correctly, a glissade can save time and energy, but there are some key factors to consider before sliding down a chute of snow.
It’s crucial to first assess the slope and snow conditions before attempting to glissade. The slope should be consistent and free of rocks, boulders, and drops. Glissading should be done in soft snow. Terrain that’s too icy can quickly turn into a self-arrest situation.
If the conditions are not suitable or if you’re unsure, play it safe and descend by foot. Additionally, glissading is not recommended for novice hikers or those without proper gear and experience with self-arrest techniques.
For a safe and epic glissade, sit with your feet down the slope and ice axe in the snow. One hand should hold the head of the axe comfortably, while the other on the shaft to control your speed. Keep your feet and knees together, and aim to slide in a straight line. Avoid twisting or turning, which can increase your speed and cause loss of control.
As you near the bottom of the slope, press your feet or ice axe into the snow to slow down and come to a stop. Avoid jerking the axe or abruptly stopping, as this can cause injury or damage to your gear.
And voila! With practice and proper gear, glissading can be a fun and efficient way to descend steep snow slopes.

Photo Courtesy: Flickr/Brook Peterson
Final Thoughts
While snow travel can feel daunting, it’s an epic and rewarding aspect of thru-hikes like the PCT—and an unavoidable part of the journey with this year’s insane snowpack.
Always be sure to assess for hazards regarding snow quality and the steepness of terrain. Consider the safety of yourself and fellow thru-hikers when assessing for things like avalanche risk, wet slides, and travel across steep terrain.
Even with proper gear and training, some hikers may not feel comfortable on steep or icy slopes. It’s important to recognize and respect these feelings and make decisions that prioritize your safety and well-being.
There’s no shame in turning back if conditions become too dangerous. Thru-hiking on snowy terrain requires a combination of physical and mental strength, and it’s important to listen to your instincts and prioritize safety.
Overall, this year’s PCT thru-hikers are in for a heroic journey across blanketed snowy terrain. While snow certainly comes with its own challenges, the pristine nature and intense accomplishment of completing a thru-hike in this challenging environment are worth the additional precautions.
With the proper gear, knowledge, and preparedness, thru-hikers can enjoy the serenity and beauty of the snowy trail in safety
Featured image: Photo by Javier Contreras Sales. Graphic design by Zack Goldmann.

This website contains affiliate links, which means The Trek may receive a percentage of any product or service you purchase using the links in the articles or advertisements. The buyer pays the same price as they would otherwise, and your purchase helps to support The Trek's ongoing goal to serve you quality backpacking advice and information. Thanks for your support!
To learn more, please visit the About This Site page.

Comments 3