 ">
">
Pack Your Bear Canister Like a Pro With These 8 Tips
If you’ve ever spent the night in bear country, you’ve probably experienced the hassle of packing (and carrying) a bear canister. These bear-proof storage containers are designed to safely store all food, trash, and scented items when spending the night in the backcountry.
The saying “a fed bear is a dead bear” illustrates why you must store scented items effectively. These hard-sided canisters are the best means of keeping yourself, others, and bears safe. While hanging your food in a tree to protect it from bear theft is the more traditional method, canisters are harder for a bear to defeat and eliminate storage issues when camping in treeless areas.
Bear canisters can be bulky, heavy, and limiting. And fitting all your food and smellables in a small plastic container can often feel like a losing game of Tetris.
But if done correctly, you won’t have to sacrifice any of your favorite snacks for your next trip. Keep reading to learn all about bear canisters—including how to pack one efficiently.
8 Packing Tips To Make the Most of Your Bear Can Space
If you’ve read this far, you, too, have probably experienced the heart-wrenching disappointment of spending hours packing and repacking your bear canister, only to discover a hidden granola bar or smushed Poptart still waiting to be packed upon your perceived success. Instead of eliminating food (because, let’s face it, you’ve got to eat), here’s how to minimize dead space and pack like a pro.
1. Start by repackaging.
Repackage everything. Many store-bought items like chip bags and dehydrated meals take up lots of unnecessary space. Between bulky packaging and tons of excess air inside the bags, repackaging everything on your own can quickly help you make some space. This is also a great time to remove all the air in your packaging by forcing it out and resealing the bag; this will save on space, as well as keep your food fresher.
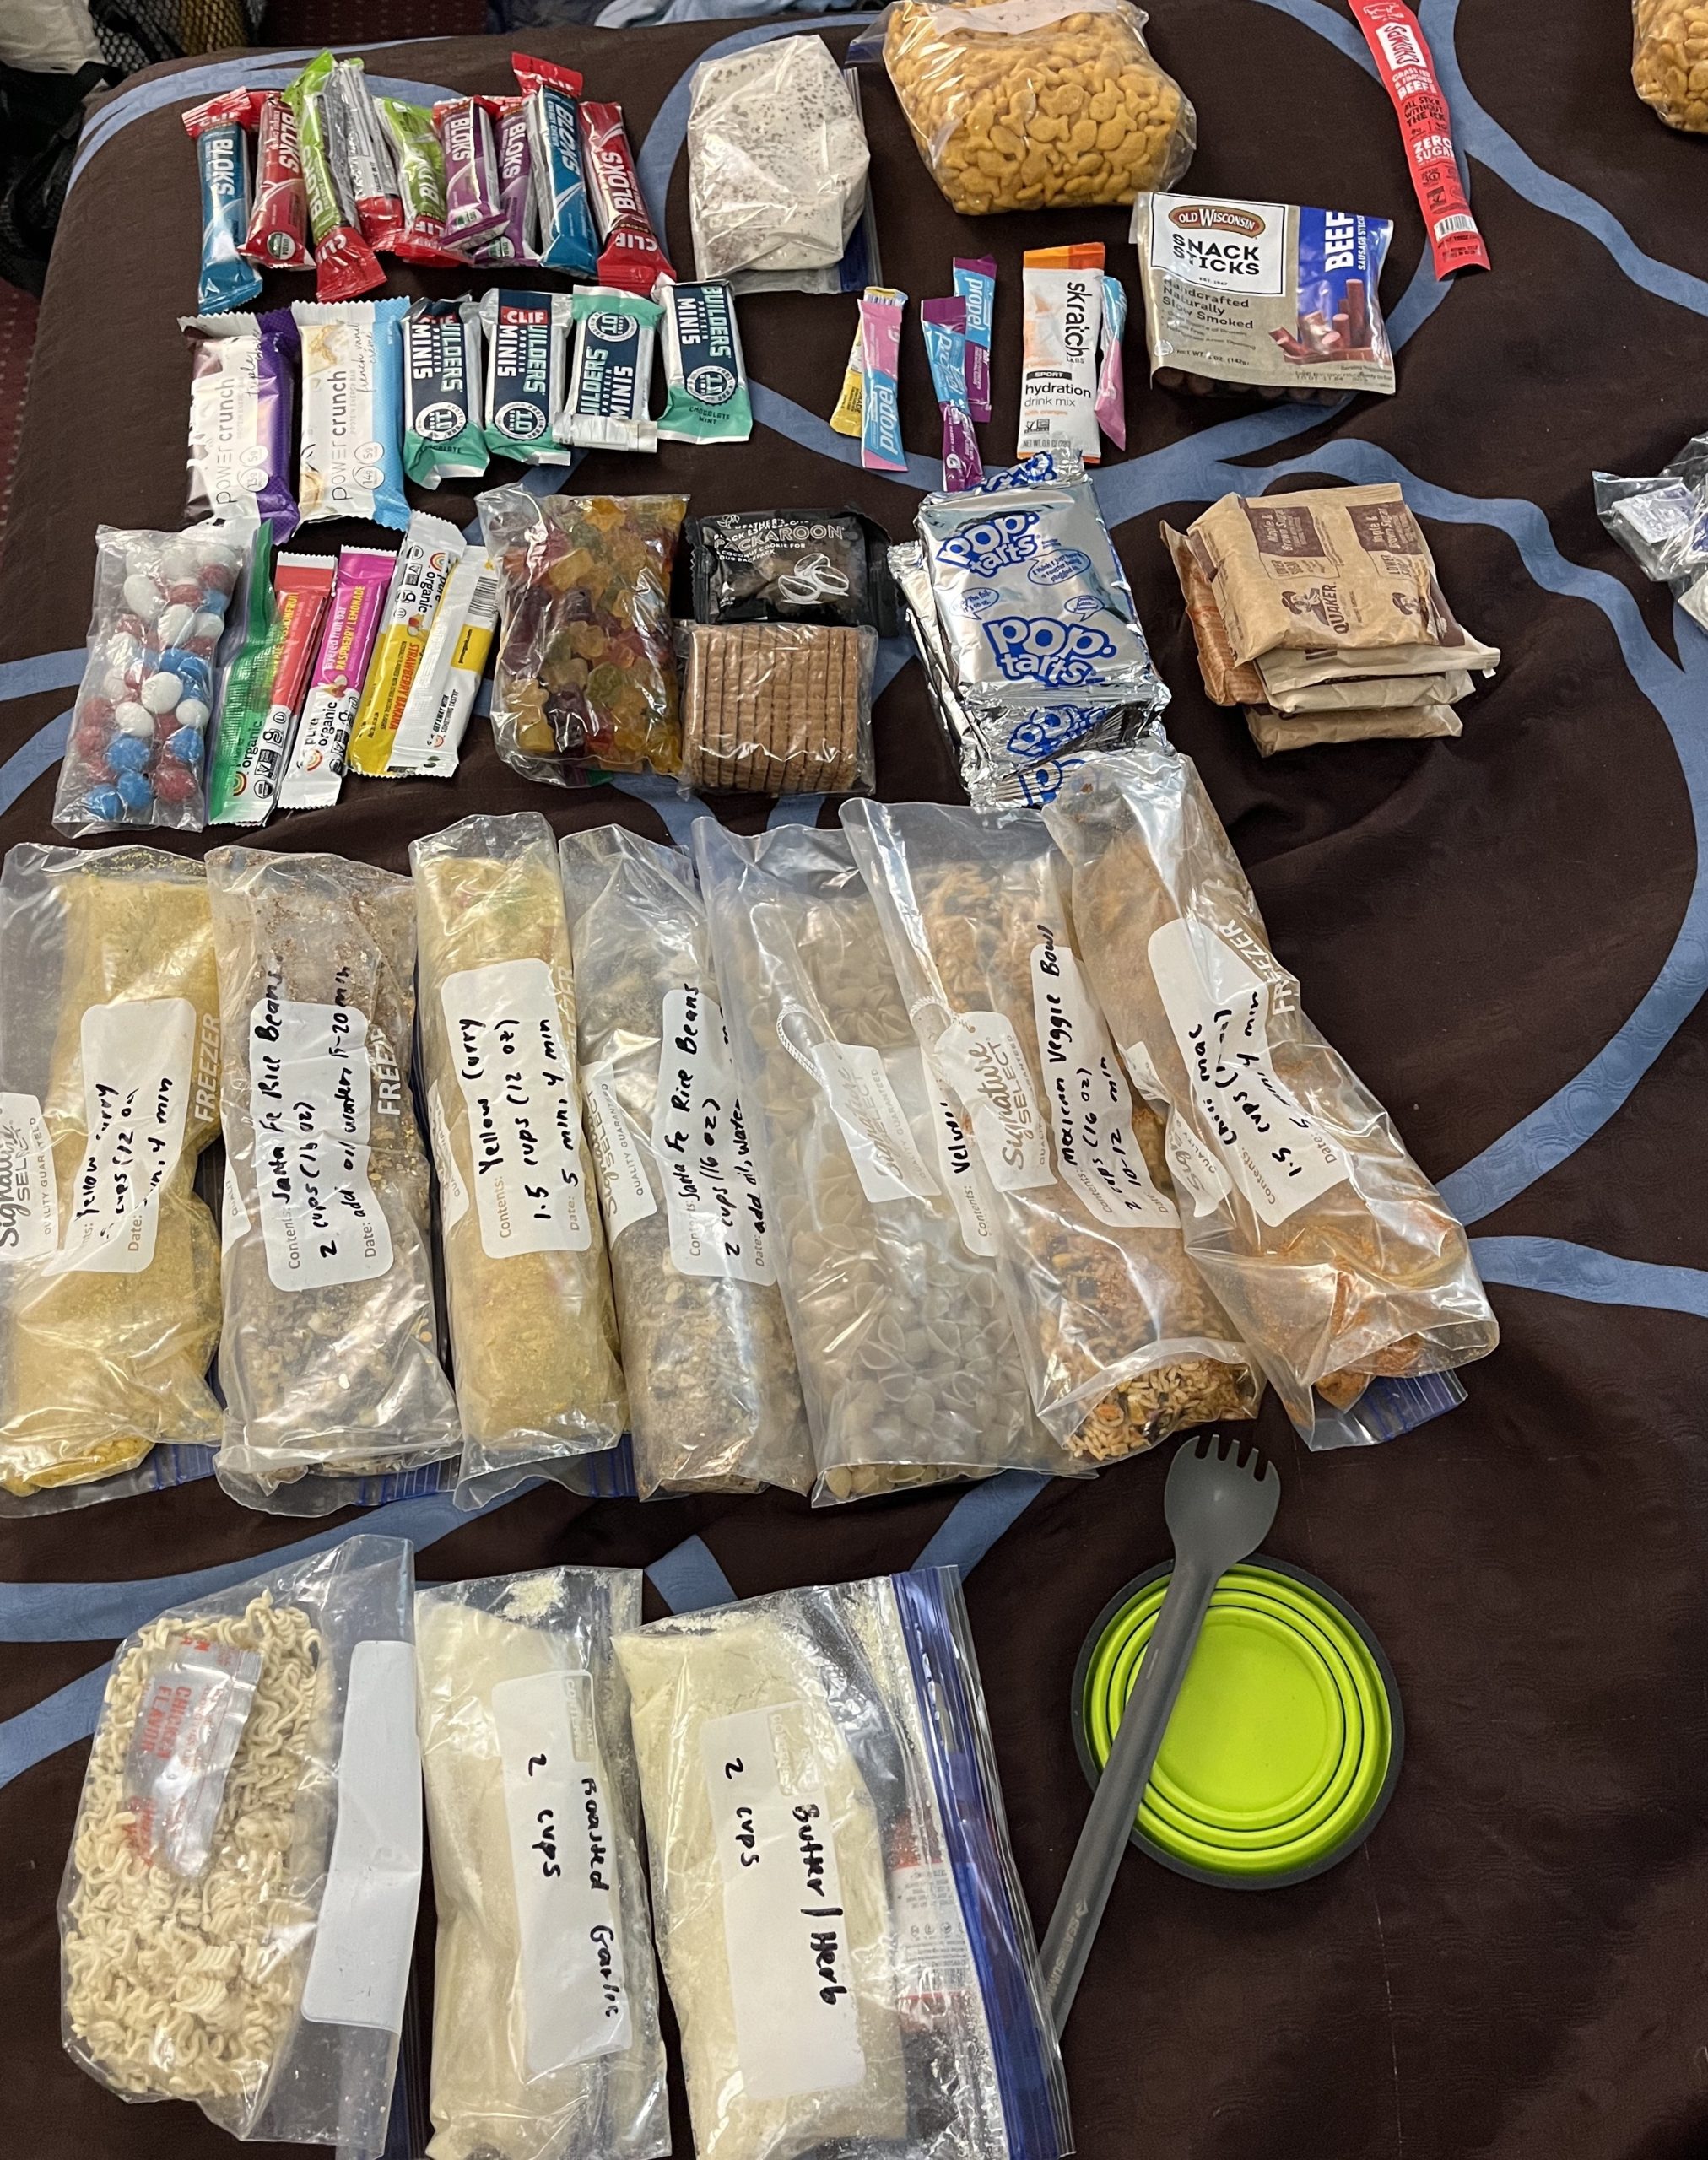
To save on space, I repackaged all the bulky items—like dehydrated meals—and sealed out excess air to keep them fresh.
2. Label everything.
With repackaging comes another responsibility—making sure your food is labeled and easy to identify. There’s nothing worse than finding a plastic baggy of what you thought was electrolytes, but was actually instant potatoes… Clearly label each bag, and feel free to add any instructions you may need, like cook time or how much water is required for hot meals.
3. Avoid foods with low calorie density.
Opt for foods with a higher calorie density instead. Think quality over quantity when it comes to picking out your snacks. Low calorie foods require a larger volume, which will take up more space in your canister. Try dense foods like peanut butter or energy bars.
4. Pack in layers.
This tip will save you from repacking your bear canister every time you need a snack. Plan out your days and pack your food in layers according to what you anticipate eating each day so that you don’t end up rooting at the bottom of the canister for what you’re craving.
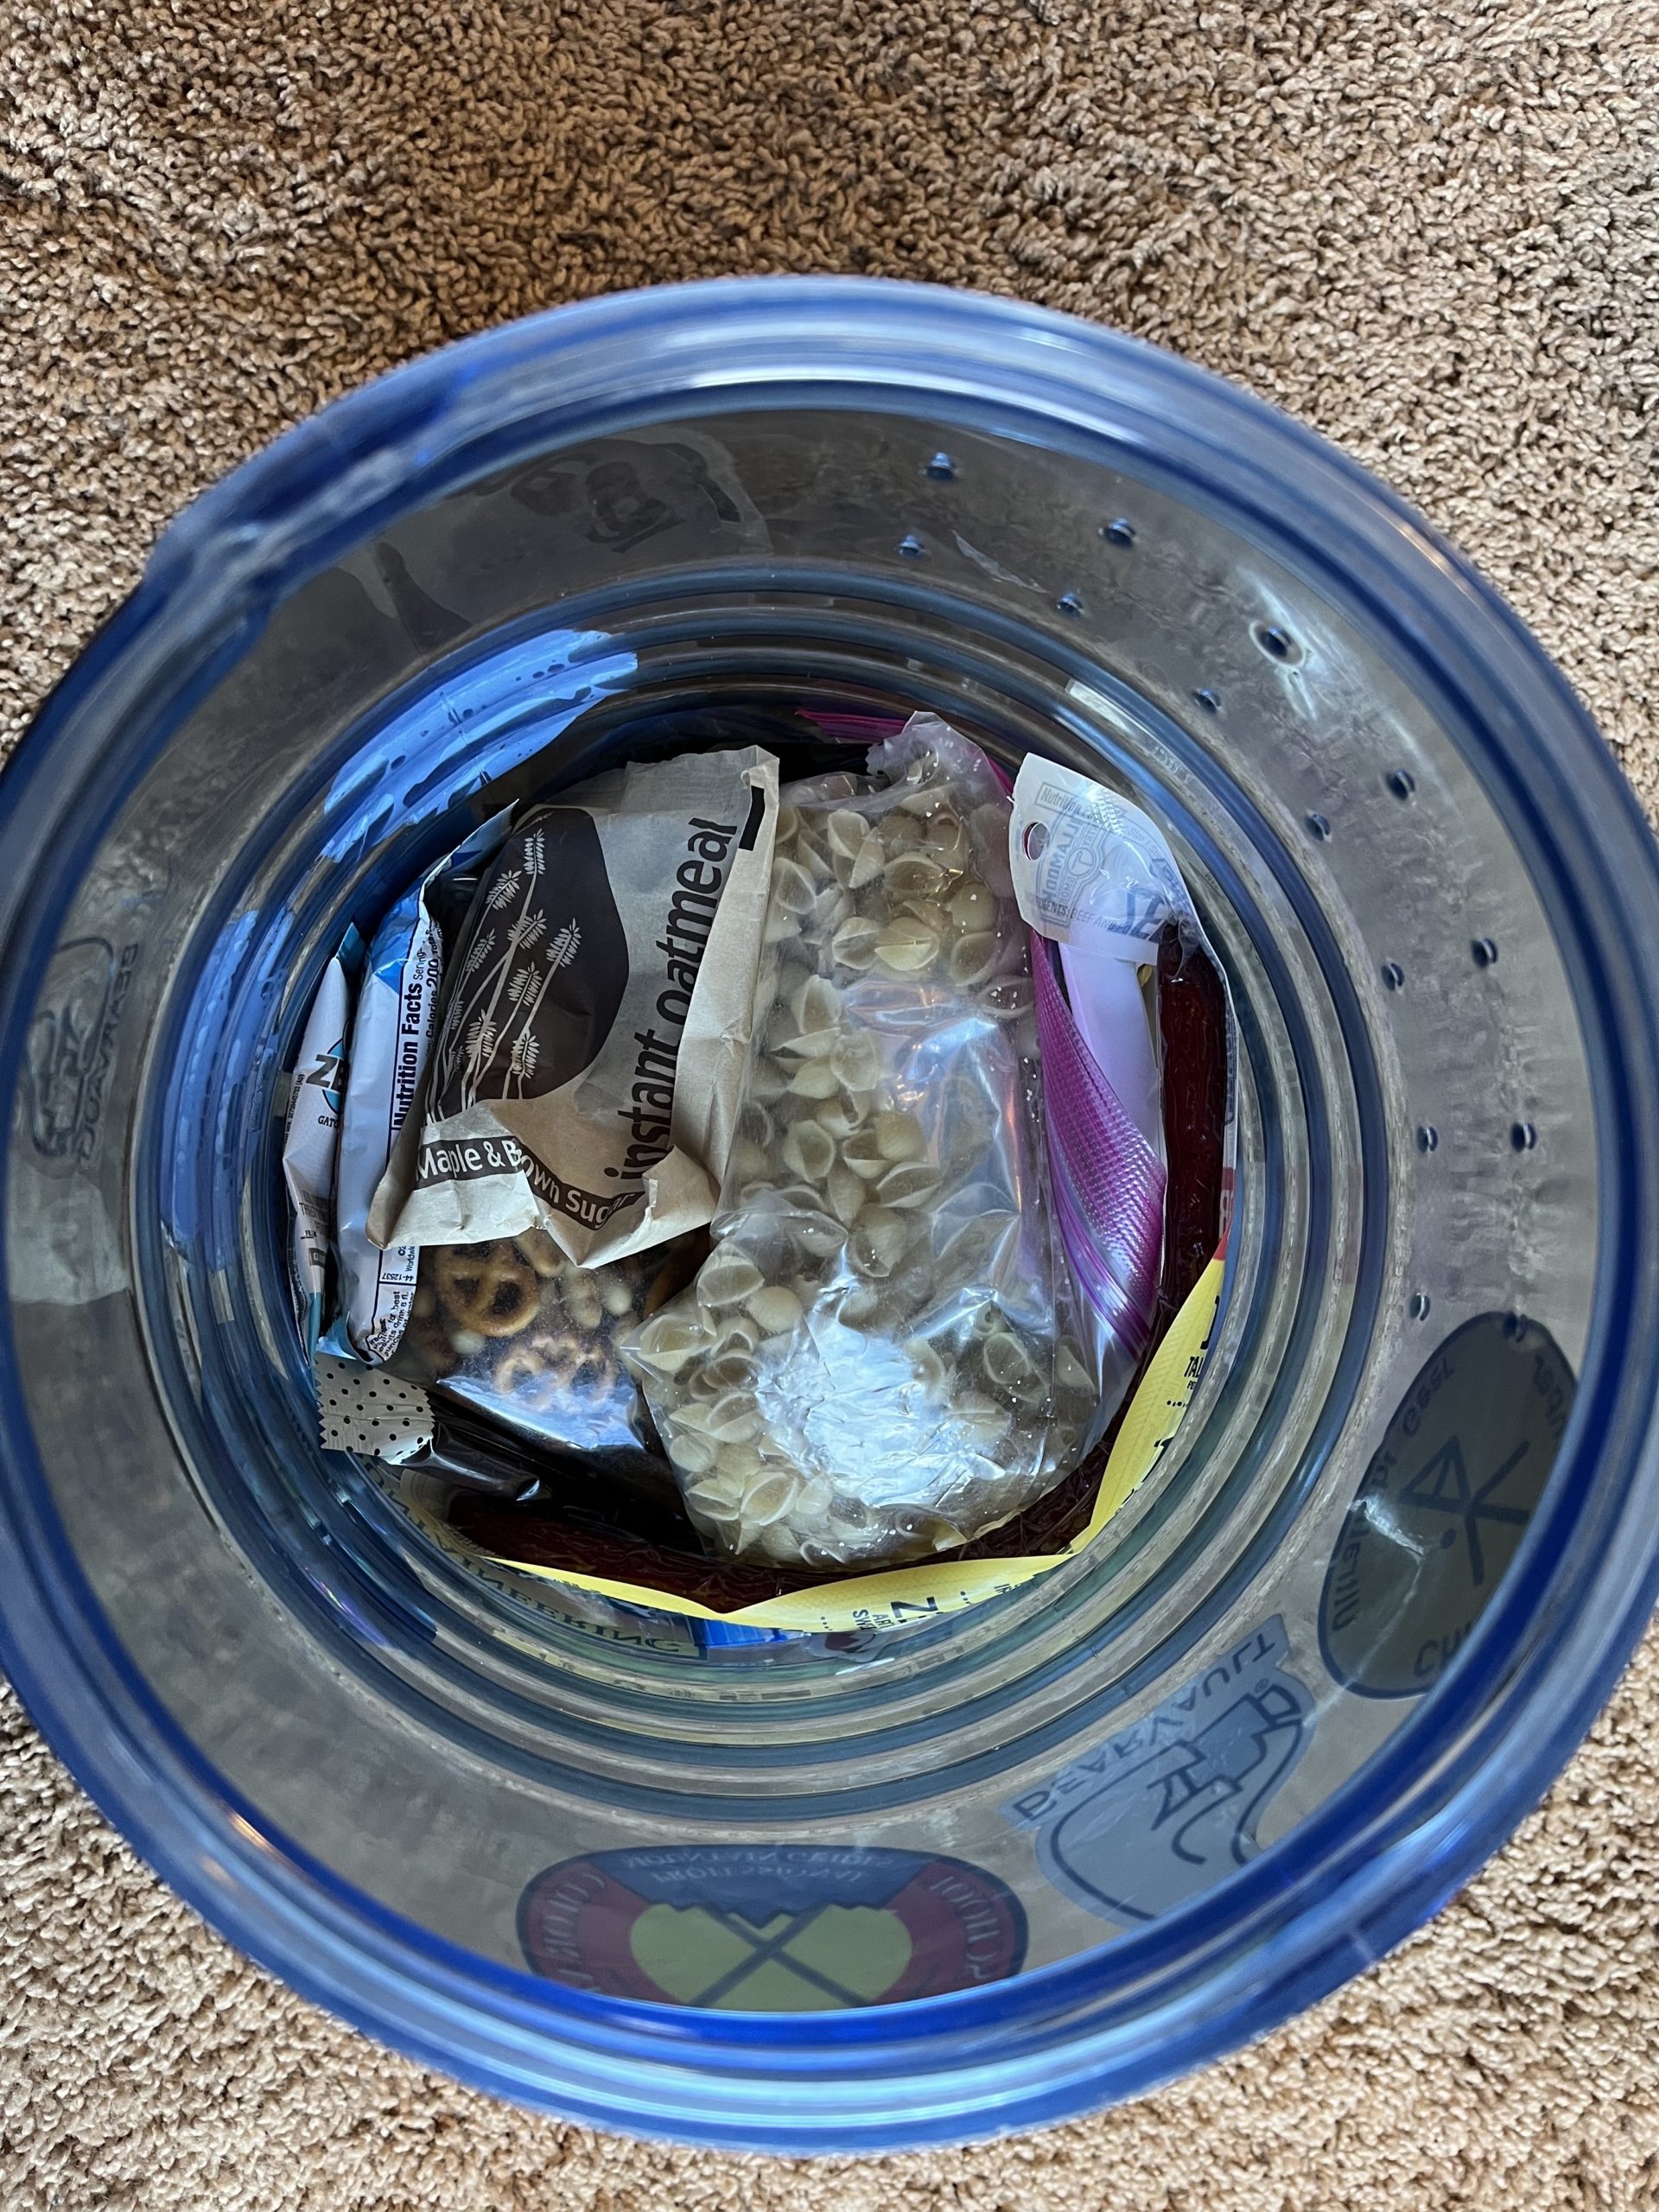
To avoid repacking my bear can every time I needed a snack, I packed in daily layers and filled in pockets of air with smaller items, like electrolyte packets or coffee.
5. Utilize the air pockets.
Like I said, packing a bear canister is like Tetris or a 3D puzzle. When packing by layers, make sure to pay attention to the air pockets and dead spaces between your food. Fit your smaller items, like electrolytes, coffee, or hot sauce packets, into these spaces to really maximize space.
6. Don’t forget to account for all scented items.
When considering what to pack in your bear canister, don’t fool yourself. Anything scented needs to go in there at night, including trash and toiletries. Make sure to save a little space at the top for items like toothpaste, hand sanitizer, sunscreen, or chapstick.
7. Take each day’s food out in the morning.
This was one of my best time-saving hacks each day on the JMT. Before I’d get going for the day, I’d take out a handful of snacks from my bear canister and stick them in my pack’s hip belt for easy and quick access while on trail. This way, I was able to spend more of my breaks eating as opposed to rummaging through my bear canister. If you do this, though, make sure to put anything you didn’t eat for the day back in your bear canister at night.

A quick and easy way to snack while you walk!
8. Keep daily essentials at the top.
If you find yourself using the same ingredients day in and day out, make sure to keep these handy towards the top of the canister. Spices and seasonings, coffee (duh), and electrolytes can be kept up top for convenience.
Types of Bear Canisters
When researching which bear canister is right for you, make sure to note how much space you need. Many companies offer multiple sizes (often measured in cubic inches). If you plan to be in the backcountry for more than an overnight, make sure you have enough space in your bear canister to fit all the essentials.

BearVault storage containers range in size depending on the length of your trip, like this smaller 3-4 day canister (left) vs. the week-long canister.
There are quite a few certified bear canisters you can consider for your next trip, ranging from budget-friendly to ultralight. Here are a few options.
-
BearVault BV500 – $92.50, 41 oz
This is one of the most popular options, and for good reason. Its price point won’t break the bank at $92.50, it’s tool-less and easy to open (if you’re a human), the transparent hard shell makes it easy to identify all your food from the outside, and it even doubles as a sturdy camp chair. While it may not be the lightest on the market, it clocks in at two pounds, nine ounces. I used this bear can on the JMT and felt the ease of use and weight-to-space ratio were most ideal.
-
Wild Ideas The Weekender Bearikade – $330, 31 oz
If you’re looking to go ultralight, here’s a quick way to shave a few pounds off your bear canister weight. The Weekender is one of the lightest bear cans at just under 2 pounds, yet holds the same capacity as the BearVault BV500. Made from carbon fiber, this sleek design will barely add to your pack’s weight. However, UL comes at a cost, and this bear canister is no exception, with a hefty price tag of $330.
- UDAP No-Fed-Bear – $90, 38.4 ozThis super strong, compact container is perfect for a few days out in the backcountry. It requires a coin or hard-edged object to open. While only $89.99, it’s less spacious and ideal for shorter backpacking stints only. If you’re thru-hiking or plan on doing longer trips, spend a bit more for a larger canister.
- Grubcan Bear Resistant Container – $297, 28 oz
The tubular design of this funky-looking bear canister stands out on the trail. At one pound, 12 ounces, this is another ultralight option that comes with a high price tag. It’s made from carbon fiber and Kevlar and boasts a unique latching system that requires no tools.
- Bare Boxer – $80 25.6 oz
The Bare Boxer is the lightest canister on this list, but also the smallest. It stands just eight inches high and, with 275 cubic inches of volume, should store 1-3 days of food for one person.
- Backpacker’s Cache Bear-Resistant Container – $79, 41 oz
This classic model has been around for years. Though not the lightest canister out there, it’s very affordable. This is typically the model you’ll get if you opt to rent a bear canister from one of the national parks.
Bear Canister vs. Ursack vs. Bear Bag
So how do you choose between a bear canister, an Ursack, and a traditional bear bag?
Hard-sided bear cans are reliable, easy to use in any type of terrain, and sometimes required, but they are also heavy and bulky.
Traditional bear bags (just any old stuff sack or dry bag hung from a tree with some paracord) weigh and cost little, but hanging one every night is a lot of work and can be tough to do correctly. Plus, you need trees.
Ursacks are a compromise solution between the two. These bags are made of bullet-proof fabric, and combine the convenience and security of a canister with the comfort and packability of a bear bag. However, they are expensive, and some folks think they try to do too much and excel at nothing.
It’s important to note that none of these options are inherently smell-proof. That’s why you should always keep your food at least 200 feet from camp and line your container with an odor-proof sack.
Where Do You Need a Bear Canister?
Before any backcountry trip, check the requirements where you’ll be recreating to ensure you’re safely and correctly storing your food.
Pacific Crest Trail and John Muir Trail Requirements
According to the Pacific Crest Trail Association, bear canisters are required in parts of Sequoia and Kings Canyon National Parks, Inyo, Sierra and Humboldt-Toiyabe National Forests, and in all of Yosemite, Desolation Wilderness, and Lassen Volcanic National Parks. While they strongly recommend carrying one for the entirety of the trail, it is only required in these particular areas.

Hiking along the John Muir Trail. I preferred to carry my bear canister under my pack’s Y-strap for convenience and ease when stopping for breaks.
Continental Divide Trail
Because the majority of the CDT meanders through bear country, it is once again recommended—though not required—that you carry a bear canister for the whole trail. Bear cans are required on some sections of the CDT, including San Juan National Forest, Rocky Mountain National Park, Glacier National Park, Bridger Teton National Forest, and more.
Appalachian Trail
The ATC and other eastern land managers have not yet required thru-hikers to carry bear canisters along the trail. However, human-bear conflicts on the AT are growing more frequent. The ATC recently passed a new policy recommending their use.
How To Carry Your Bear Canister
There are several ways to pack the actual container in your pack, depending on what feels most comfortable—packing the canister inside the body of your pack or strapping it to the outside with the Y-strap or under the pack’s brain. I tried both methods when thru-hiking the JMT and felt the latter was more convenient.
Inside the Pack
Carrying a bear canister inside the body of your pack is a comfortable and easy way to ensure the heaviest items stay closest to the center of your pack. This will keep that dense, weighted container close to your core and prioritize balance. This is especially key if you’re doing a lot of scrambling, climbing, river-fording, or walking on uneven terrain.
Outside the Pack
If you’re going for ease and convenience, this is the method for you. It may take some getting used to as the pack will feel top-heavy and unbalanced. However, if you prefer not to unpack your entire backpack each time you need a snack, carrying the canister under the Y-strap or brain is hassle-free.

Conclusion
While packing a bear canister can sometimes be tricky, there are plenty of ways to squeeze in all the nutrients you need. Along with these other tips and tricks, making sure you have a large enough canister for your trip will help you maximize space efficiently with room for some extra goodies.
Featured image: Photo by Ariella Nardizzi; graphic design by Zack Goldmann.

This website contains affiliate links, which means The Trek may receive a percentage of any product or service you purchase using the links in the articles or advertisements. The buyer pays the same price as they would otherwise, and your purchase helps to support The Trek's ongoing goal to serve you quality backpacking advice and information. Thanks for your support!
To learn more, please visit the About This Site page.

Comments 8
Nice article. You’ve summarized it very well and it’s actually what I’ve been doing but it took me years to get to where I am.
In addition there is a short stretch of trail on the AT in Georgia:south of Blood Mountain where bear canisters are required.
Also, there’s a pretty neat piece of gear (if what you need is protection from squirrels, rats and mice (but not bears): called an outback. Made by a company in Flagstaff and is very very light compared to a canister.
Regards,
Alan
Outsak UL Bags, look likes a great solution while hiking the Arizona Trail.
Great article! I would add that for Tip #7 one way to keep track of your snacks for the day would be to put all your snacks & stuff for the day in separate plastic bag. Then, as you go through the day, just keep all the empty wrappers in that bag as well so everything for that day is in the same place and just dump it all into your “trash” bag when you open your bear can at camp that night for dinner. No finding out the next morning you missed a wrapper and now have a new hole from a rodent friend in your hip belt pocket.
This is great! I will do a repack of everything next time and excited to see how much extra space there will be.
One thing I was waiting for you to say but didn’t (maybe because it’s just super Obvious?) is you don’t need to account for day one food in the can, since you will be eating it before storage is needed.
A bear canister is the way to go. Not only does it protect your food from the bears and the bears from your food, but it eliminates the need for hanging your food! Skip a small one and get a full sized one if you are thru-hiking, unless you want to resupply every couple of days. As for how to carry a canister, get the Nunatak Bears Ears backpack. It works great!!
Canisters also make handy stools for those primitive campsites w/o convenient rocks (or picnic tables); and nothing beats being able to pack your food up and store it pretty much anywhere (200ft away and not near water sources, or steep hills) in the woods–instead of searching for a good tree for a hang. In the rain. With your head lamp.
Several land managers, including the White Mountain National Forest, offer free loaner bear cans. Loaners are also available from the Green Mountain Club for AT/LT hikers. Rentals are available from some outfitters. Note that the are south of Blood Mtn in Georgia only requires a canister if you are camping there overnight–you do not need one to hike through the area. As with most things Government, check for the latest regs before your trip….
I carried a BV500 for 1000 mi on the AT before changing to Mighty Ursak w/ large Opsak for my second half.
1)Finding a secure spot for a BV500 isnt that easy when you are camped high up on a steeper mountain. Sometimes every spot is susceptible to a rollaway loss if an animal can knock it around. You may need to stop in daylight to find a hollow tree, down trees, or rock “basin” which makes it difficult to move a BV.
2) the BV center of gravity is several inches out resulting in additional torque on a hikers back, and carrying a full BV on top is also not a good ergonomic plan. Lighter, smaller thru-hikers will be subject to these additional load issues, and they matter when you hike for months.
It would be phenomenol if all the AT states would place large bear boxes at every shelter and official campsite. This is the only thing that the bears cant get into and that less educated hikers can be successfully encouraged to use, from pesonal experience. Yes, i know volunteers get discouraged by hikers & locals leaving trash in them. But those folks were leaving there trash all over before, such as grocery bags on bear cables, or in shelters. And give some credit to hikers who do carry out lighter trash. We do, i have.
If you’re using a clear canister like a BearVault and carrying it externally on your pack, I recommend cutting up a silver space blanket and taping it inside the canister. This way it reflects the sun and helps alleviate the issues of food (like chocolate, etc) melting or getting too hot inside the canister from sun exposure.