 ">
">
Winter Peak Bagging Tips for Beginners
Winter is not my favorite season, which is unfortunate as it lasts about nine months here in Montana. My primary activities include Netflix, complaining, and waiting for the weather to turn. What my activities don’t include is peak bagging. However, during a recent trip to New Hampshire, I had the chance to accompany AMC trip leader / Gridder John Bergman and my father (hitting the NH Winter 4k’ers) up Cannon Mountain—a summit they needed for their respective lists. They assured me it was a relatively short, low-skill-level hike. I picked up advice from these two badass hikers on how to make winter peak bagging safer, more enjoyable, and less intimidating.
The following tips can be translated to low-key snowy walks in the woods, but they are geared towards hikers heading above tree line on a challenging (but non-technical trail), with potential for unpredictable weather and exposure.

Looking up at the summit of Cannon Mountain, New Hampshire
John and Neil kept an eye on the forecast, which is the first lesson. If the weather looks unpredictable or dangerous, don’t go. New Hampshire’s White Mountains are notorious for bad weather, and too many experienced hikers are lost trying to gain winter summits.
The temperature stayed around 5 degrees Fahrenheit for the whole day, with a slight breeze at the summit and snowfall with mixed cloud cover for part of the afternoon. The snow was knee height and fluffy, which was challenging but could have been worse. The hike took about six hours.
These are some gear, technique, and layering tips I picked up from chatting with John and Neil, and experiencing this other side of hiking. If you’re planning to hit winter peaks with high exposure potential or technical aspects, find an experienced winter hiker to accompany you and teach you the ropes.
Tips, Technique, and Consideration

Depending on snowpack, the branches will be face-height… or lower
On a month’s worth of snow, you’ll wind up several feet above ground level. The branches that would be above your head are now whacking you in the face (or stomach). If they’re loaded with snow, it’ll also be dropping on your head. Keep your hood up and be prepared for this added obstacle.
The trail can be hard to find
With the snowpack several feet above the dirt, the trail won’t look much different from any other section of woods. Our trail was faintly discernible in most places, but we still lost it a few times. John and Neil told me they’d lost the trail numerous times on other hikes, and GPS units helped immensely. Sometimes they were only 100 yards to the left or right. Always bring a map and compass, and make sure you know how to use them.
Keep gear and food easily accessible
Everything is harder to access in the frigid temperatures, and you’ll want to take less time to do things like grab water and snacks. Both John and Neil kept small wide-mouth containers of trail mix clipped to the front of their packs, which minimized effort / time spent without mittens. My food was buried in the top of my pack, and I was frustrated by how long it took me to fumble for it. I also tucked my Buff away at one point, and wished I just stuck it in my jacket pocket. Because of my subpar planning, I didn’t want to stop to drink, eat, or adjust layers. If my gear had been easier to access, I wouldn’t have been so crotchety about it.

All of this snow will fall on your head
In deep snow, alternate the lead hiker to pack the trail out
This might seem obvious to anyone who’s packed a trail before, but as we gained elevation and the snow got deeper, John had us switch out the leader every 100 steps to keep everyone’s heart rates elevated and make sure no one got too worn out in the front. We counted each step up to 100, then the person in front stepped off the trail, the second in line became first, etc. In a larger group, you’ll have more time at the end of the line to recuperate.
Bare boots in deep snow isn’t just harder hiking, it creates postholes for other hikers
On trails with deep snow, consider how hiking with bare boots creates postholes in the snow, and how frustrating this might be for others hiking after you. Traversing with snowshoes flattens the trail in a more ergonomic way. Plus, it’s just easier hiking.
Heat your water, then insulate your bottle
Neil boiled water and added Gatorade mix to it before we left. I was horrified at the prospect of drinking hot Gatorade, but it wasn’t so bad. I shoved the Nalgene in an insulated sleeve and attached it to my shoulder strap, and the Gatorade stayed warm until the summit, then was cool—but not frozen—on the way down. Not bad for six hours at 5 degrees. Other options include insulated water bottles and canisters. Neil carried a HydroFlask that stayed ice-free the whole time.
The summit is an option, not a requirement
If you start to lose an unnerving amount of feeling in your hands, feet, or face, you could be at risk for frostbite. If you’re becoming uncomfortable, are having trouble maintaining the trail, or are losing daylight, turn around. The summit will always be there. Check in with every person in your party periodically. It can be intimidating to speak up if you’re having a rough time, and everyone should feel safe and comfortable.
The Gear

Snowshoes
Snowshoes give floatation over snow while providing traction for steep ascents and descents. We used mountaineering snowshoes that come with a “televator bar.” This nifty steel bar flips up under your heel for steep ascents, which mimics walking up stairs. John and Neil both had MSR Lightning Ascent snowshoes, while I wore John’s bomb-proof MSR Evo Ascents. Choose your snowshoes based on the majority of terrain—flat/recreational, rolling trails, or mountain. The mountain snowshoes John and Neil wear have crampon-like traction, televator bars, rugged straps, and secure bindings. More on choosing snowshoes here.
Water bottle insulator
This goofy-looking attachment on the front of my pack fit a Nalgene perfectly, and kept my boiled Gatorade warm for almost the entire hike.
Hiking poles with snow baskets
You’ll want snow basket attachments on the end of your poles. My poles didn’t have them, and I kept sinking and falling forward into the snow—super dignified. For more technical ascents or backcountry skiing (but not roped mountaineering) consider a pole with a pick embedded in the grip, like this one.

Packed but not used: ski goggles, microspikes, headlamp, safety gear
The wind never picked up, so my goggles stayed packed, and the snow was deep enough that we didn’t need microspikes. While it was never in the plan to be hiking after dark, winter days are short and it’s best to be prepared with a light source. For weather and safety gear, John had a thermometer on his pack, and a watch that tracked our elevation. Neil and John carried first aid kits, extra hand/toe warmers, space blankets, and fire starters. Even if you don’t plan to use these items, bring them anyway. Safety!
Clothing

If I end up .05% as cool as my dad when I grow up, I’ll be happy
My layering system worked really well, and I packed an extra lightweight fleece and down vest in case I became cold during breaks. I was out of shape compared to my hiking companions, so I was working harder (thus staying warmer), but I believe my system would have worked even if my heart rate was lower. You’ll want a wicking base layer, a warm mid, a windproof jacket, and down or synthetic insulation. Hoods with plenty of real estate are necessary, as the amount of snow dumping from branches was almost laughable. I stuck with merino and other natural fibers, but John and Neil had mostly synthetics. Pros and cons to both.
Upper Body
Base was the KariTraa 1/2-Zip, a wool layer from a random booth at a tradeshow last year. It’s a little tight (winter probs) at the moment, so worked well as my next-to-skin layer. Midlayer was my SmartWool 250 1/4-zip, which could have been replaced by a fleece. Doubling up on merino pieces kept the bulk down, especially since I’ve had this shirt forever and it’s stretched out.
My windproof was Sitka Gear’s Jetstream. This lightly lined Windstopper jacket is moisture-wicking and a bomb-proof outer layer. I wear it pretty much every day in my real life. Insulation was the Adidas Terrex Down Jacket, which I wore for the first 15 minutes of the hike, while it was still pretty flat. Once I warmed up enough to sweat, we stopped and stashed the extra layers in our packs, then pulled them back out closer to the summit and left them on for the descent.

Shedding layers before the real ascent began
Pants
Base layer were Duofold Double-Layer Thermal Leggings. My mid-layer was a pair of Stio XC ski pants with a terrible fit, but I had no other options. John wore Eddie Bauer Ascent pants, which he lamented were out of production. Neil wore a pair of insulated Reebok pants that aren’t available in the US. Guess you’re on your own for hiking pants! I also wore my super flattering rain pants as an outer layer and was glad I had them.
Feet
I had calf-height Outdoor Research Rocky Mountain Gaiters from the first few weeks of my AT hike. Boots were AKU mid-rise—not winter boots, but with toe warmers, good socks, and consistently elevated heart rate, my feet didn’t get cold. This was John’s main concern for me, as he recommends a boot with at least 400 grams of insulation. If you’re heading out without heavy winter boots, make sure you tuck your toe warmers on top of your socks. The air flow will help keep them activated. Also, loosen your laces—increased circulation will help keep your feet comfortable. Socks were a merino-blend from Gore, my favorite socks of the moment.
Accessories
Marmot waterproof mittens with hand warmers, Army Surplus wool liner gloves (thanks John!), wool beanie, fleece ear warmer, and a Merino Buff rounded out my clothing. I wore all of the items nearly the entire time, and was glad I brought a hat and ear warmer.
I hope this helps, from one beginner to another. I am fortunate to work in a field where I get to pick the brains of experienced outdoorsmen, then have the chance to follow them up a mountain a few months later. For all of you winter peak baggers out there, you have my utmost respect, and stay safe!

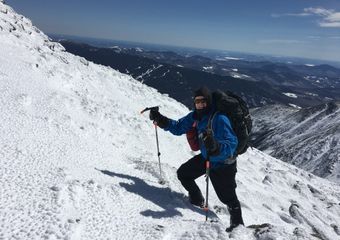
Pictured: not a beginner. Picture taken by: a beginner
Related


This website contains affiliate links, which means The Trek may receive a percentage of any product or service you purchase using the links in the articles or advertisements. The buyer pays the same price as they would otherwise, and your purchase helps to support The Trek's ongoing goal to serve you quality backpacking advice and information. Thanks for your support!
To learn more, please visit the About This Site page.
