 ">
">
Yoga for Hikers and Backpackers
Alright hikers, I know most of you don’t stretch as much as you should. Don’t get all nervous over the title of this post. Everything listed will be simple standing or sitting poses. I know how difficult stretching can be on the trail when you are tired, tight, lazy, embarrassed, or oblivious.
Before I left for my thru-hike I was your average yogi, nothing to brag about. After my hike, I was strong but completely immobile. Yoga helped me with my post-trail depression and weight gain.
While on the trail, I neglected my daily stretching let’s say… around Pennsylvania. I hate admitting I did this to my body but the truth must come out. Even when I did stretch, I would have a peanut gallery of my hiker brothers and sisters making silly remarks about my not-so-ordinary yoga releases.
Here is a list of simple but effective yoga asanas (that means pose in yoga talk, you caveman) for the hiker, especially the thru-hiker. These poses are broken down by body part, especially the parts affecting an AT hiker. Also mentioned is when to execute these poses: before, during, or after a hike. Many of the asanas stretch multiple parts of the body.
Remember: The most important rule to follow in yoga is HONOR YOUR BODY. This means no forcing or jerking into any movements. The more you practice these stretches, the more you will execute them with ease.
Stay in each pose at least three full inhalations and exhalations. If a pose feels extra restorative, feel free to stay in the pose as long as you like.
Below is a chart with when to use the certain poses. This is flexible. Please feel free to modify for your own body. Sometimes I would just do leg swings in the mornings and do fuller stretches during the day or at night. This all depends on preference.
Poses
Quads
Standing Quad

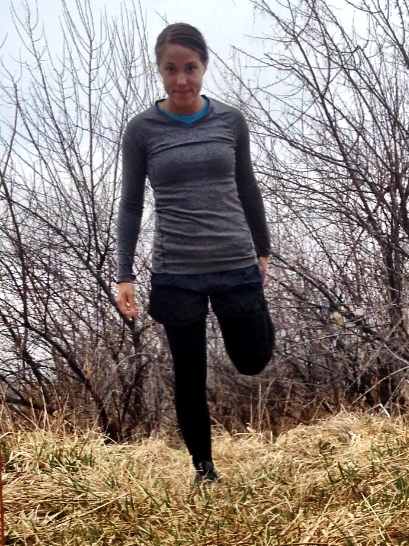
This stretch is not particularly a yoga pose. The pose it most resembles is Dancer Pose.
To Execute: Stand with your feet shoulder width apart. Holding a tree or shelter or hiker for support, bend your knee, bringing your foot toward your butt. Grab your foot with your hand. Remember to keep your hips square, knees close to each other, and only lean forward if you want a deeper stretch. Try an unsupported stretch to work on balance.
Hero Pose


Hero Pose is very restorative for the quads while also stretching the ankles. However, if you are experiencing too much pressure on the knees to the point of pain, sit on a stuff sack of clothes for relief. This pose is NOT recommended for those with knee injuries.
To Execute: Kneel on the floor, your knees as your base and a bit wider than hip distance apart. Lower your hips toward the ground. The idea is to have your hips in between your calves and your bottom on the ground. Sit on something for knee or quad relief. For more of a stretch, lean back or, if you can, lay down.
Leg Swings
No, I don’t have a video of me doing leg swings. I know you’re disappointed. But, here is a YouTube Video!
Leg swings are not yoga. However, I feel this exercise is perfect as a pre-hike stretch. Leg Swings stretch the quads, hamstrings, and hip flexor.
To Execute: Gripping a tree for support, stand on the leg closest to the tree while you swing your other leg forward and back. Only go to the extent that is comfortable for you. Swing your leg 8-10 times per side.

Hamstrings
Standing Hamstring Stretch


Standing hamstring stretch involves propping your leg either on a tree, bench, or boulder. The goal is to have your leg at even hips level. The yoga pose most similar to this is Standing Hand to Big Toe balancing pose. No need to be a yoga pro, everyone starts somewhere.
To Execute: Take one wide step away from a bench, tree, or boulder. Face your prop object. Prop your leg on your object at any angle that is comfortable for you. Do not raise your leg higher than your hips. Now, bend forward at your own degree, feeling the stretch in the hamstring.
Caterpillar Pose

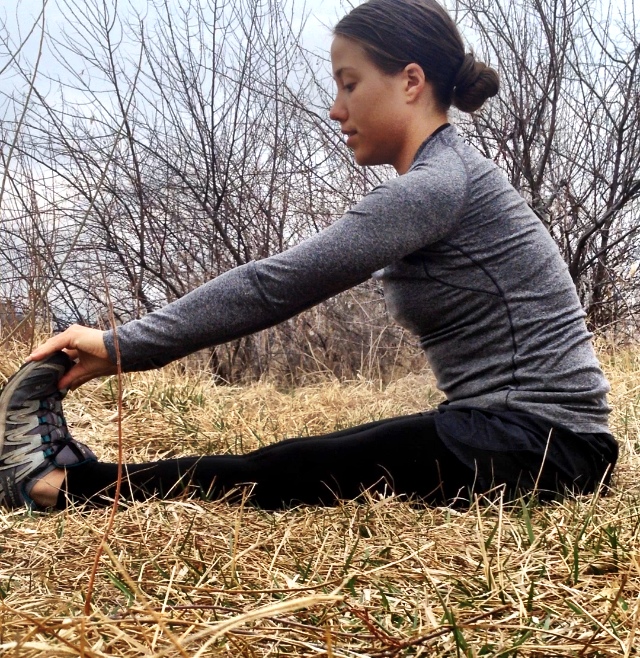


Caterpillar is great for the hamstrings, calves, and the spine. If you can’t touch your toes, you can’t touch your toes. NO FORCING. For an ankle stretch, play with flexing and pointing your feet.
To Execute: Sitting with your legs straight in front of you, lift your arms to the sky and slowly lower down your torso toward your legs. Experience the pose with a straight spine or relaxed in a rounded spine (difference in bottom pictures).
Calves
Downward Facing Dog
This isn’t downward facing dog but a simpler stretch for the calves.

My calves were in the best shape from life on the trail. My calves were also ridiculously tight. Downward facing dog is great for calves. No need to execute the exact pose for a calf stretch though.
To Execute: Facing a tree, place your straightened arms against the tree about the height of your shoulders. Lean into the tree slightly, as you step one foot back, pressing your heel toward the ground. Switch sides.
Back/Spine
Standing Backbend


Standing backbend is perfect to do during a break. The spine will be extra sensitive after carrying a pack. Execute this move with awareness. Play with your body by not only leaning back but also to the left and right side.
To Execute: Stand with feet together. Place your hands on your lower back, hands facing down as the way they would go to insert them in to back pockets. Push your hips forward and bend back at the torso to an extent which feels good for you. Hold for a few breaths. Slowly and with awareness, return to neutral spine. You can execute this pose supported with hands or not. For your first few times, I recommend the support of your hands.
Standing Forward Bend


Standing forward bend is my favorite. Standing forward bend relieves any tension in the spine and neck while also giving the hamstrings and calves an awesome stretch.
To Execute: Begin in standing with your feet hip-distance a part. Inhale arms up. Exhale and fold your body all the way to the ground. Don’t fret if you can’t touch your toes or the floor. You can get a great hamstring stretch by keeping your legs straight but straight legs are not necessary to achieve a wonderful spinal stretch.
There are two variations I recommend with your arms:
1. Ragdoll: Bend your knees slightly and make a cradle around your head with your arms. Allow gravity to draw your head further to the ground. Breathe.
2. Shoulder Stretch: Before you bend to the ground, clasp your hands behind your back. With soft knees, bend forward.
Hips
Cobbler Pose

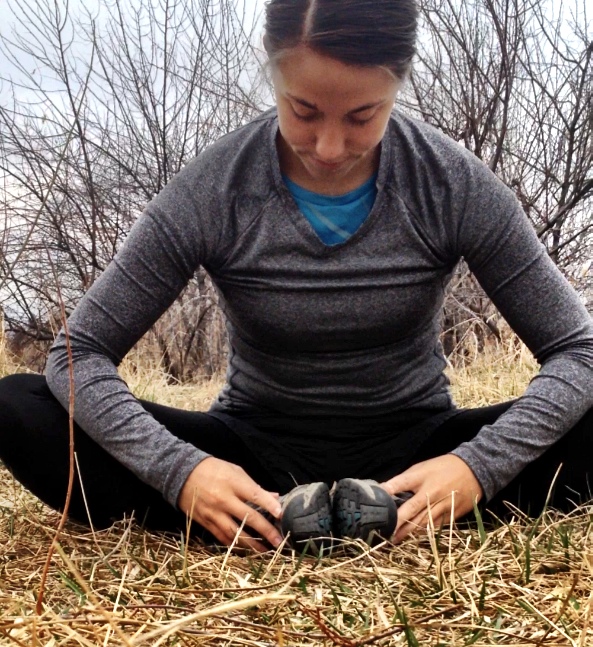
Cobbler pose is easy and nearly effortless. This pose is also widely known as butterfly and also stretches the groin and inner thighs.
To Execute: Sit on your bottom with knees up and feet on the ground touching. Allow your knees to sprawl to the side. Stretch up with a straight spine and then bend over. Bending over also provides a wonderful spinal stretch.
Runner’s Lunge or Crescent Pose
Runner’s lunge is great for the hip flexor. I added this pose in after I took my little photo shoot so HERE is a picture of a random girl doing it! Crescent Pose is considered a high lunge with arms up while still balancing on back toes. Crescent Pose isn’t necessary to get a great stretch.
To Execute: Stand with your legs about hip distance apart and your hands on your hips. Step back wide with one foot and land on the ball of that foot. Allow your front knee to bend but never past your toes. You want to aim your front knee at 90 degrees, nothing less.
Butt
Double Seated Pigeon Pose


Double seated pigeon is so relaxing after a tough day or any day really. Double seated pigeon stretches the hips and the glutes. Don’t forget to stretch both sides.
To Execute: Begin sitting. As if going into a seated cross legged position, stack your legs one on top of the other. The goal is to have one shin directly on top of the other. This might not be possible for you and that’s ok. Lean forward for a fuller stretch in the glute. Don’t be shy to stay here awhile. Switch to the other side with the other shin on top.
Neck
Neck Rolls

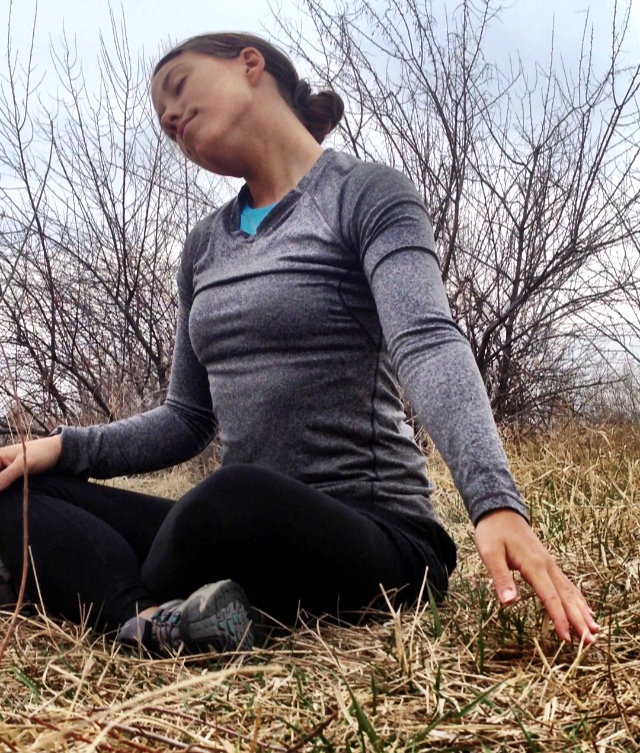
We carry a lot of tension in our neck and upper body whether we are hiking the trail every day or not. Remember, standing forward bend also relieves neck tension by ragdoll. I imagine you know how to do neck rolls. Remember to relax and allow the weight of the head to guide the roll. However, instead of using your hand to force your neck in a deep stretch, try reaching your arm out the opposite way your neck is swaying like in the picture.
Ankles (& Wrists)
Ankle injuries are extremely common on the trail. Remember, ankle stretching can be executed in:
Caterpillar Pose
Hero Pose
Ankle Rolls
In a sitting position, cross one leg on top of the other and roll the ankle in one direction and then the other. I like to hold my leg while doing ankle rolls. Once again, this is simply a preference.
Wrist Stretch


My wrists gave me a bit of trouble starting out on the trail from learning to use trekking poles. Stretch your arm out in front of you. Use your other hand to pull the extended arm’s hand toward the body. Switch from palm facing inward and palm facing outward.
Yoga incorporates movements and flows with the breath. Yoga is complimented by meditation practices as well. If I know my Appalachian Trials book, which I do, Zach mentions meditation on the trail. You should probably check it out and read the rest of the book while you’re at it.
If you are really into yoga, there is a way to bring a sticky mat on your travels by purchasing Yoga-Paws. I have no experience with these but I can value the concept.
No need to remember every pose and when to do them. Most of these poses are recognizable and memorable. Just try the best you can do, honor your body, and hike your own hike.
Namaste

This website contains affiliate links, which means The Trek may receive a percentage of any product or service you purchase using the links in the articles or advertisements. The buyer pays the same price as they would otherwise, and your purchase helps to support The Trek's ongoing goal to serve you quality backpacking advice and information. Thanks for your support!
To learn more, please visit the About This Site page.

Comments 3