 ">
">
Taut Tent Tips
Or: Keeping Your Non-Free Standing Tent From Free-Falling
I’ve been camping for more than 30 years and have always owned a free-standing tent. My husband and my first tent was the classic Eureka! A-frame Timberline model. After our daughter was born, we graduated to a 3-person freestanding dome—which is more or less the shape of the next two tents owned in various sizes from then on. So it is not without a little trepidation that I’ve ditched a rain fly, traded shock-corded poles for trekking sticks and must rely on stakes for my newest lightweight single walled tent.
I purchased my solo TarpTent Notch two seasons ago and have used it now on five shakedown trips. This model requires four stakes and my trekking poles in order for it to stand. Nothing very freestanding about that.
On the tent’s maiden overnight trial, it tested well during an unexpected thunderstorm. I was thrilled that the supplied Easton Nano ultra light stakes held and I stayed relatively dry. The tent did sag a bit into the bug netting (see photo above), but I now know that was due to the trekking poles not being as extended as tall as they could have been. And maybe because the rain was intense.
I did a twenty-two mile hike on the Ice Age trail in mid-summer. My designated campsite’s tenting area was nothing but hardpan. As I used a rock to pound the aluminum stake into the compacted dirt that second night—like the Neathanderthal I was channeling—I was thinking just how very stone-like that ground was feeling—and maybe that is why it broke. Perhaps I actually was driving that stake into a subterranean boulder. Still. Not good. And yes, this proved that stakes may not even be feasible in all campsites. Instead of using the rock for pounding, I ended up using it in place of the broken stake—looping the guyline around it.
The next outing also beheld a campsite with almost impermeable ground. When I went to reposition a deeply set stake, the force of pulling it out by the cord made the drilled head cap separate from the body. Still not good, but also not a huge deal: I could push the head back on. This time. However, it was more than a little disconcerting. The stake(s) can’t fail this soon. They need to last for months, not days or even weeks.
This past summer, I had another opportunity to again test the tent in rain and high winds. In my haste to get the tent pitched, I inadvertently chose a slight incline and then spent the night worming myself back in to the sleeping bag, the sleeping bag back onto the ThermoRest and the ThermoRest centered back on the silicon tent floor. Slip, slide, slither, repeat.
By the time my last trip came around in September, I had made a number of improvements and adjustments I wanted to test out. You may want to consider these tips yourself before hitting the trail—and not just for a solo tent that uses hiking poles.
In addition to wisely pitching your tent lengthwise and not broadside to the wind and assuming you have seam sealed all the stitching and then some…
- Tie and knot all stakes to the supplied guylines.
- You can set up the tent quicker—especially important in threatening weather.
- You don’t have to mess with finding (or losing) loose stakes housed separately from the tent.
- Superglue/GorillaGlue the Easton Nano stake heads to the stake body or consider replacing them with a single piece stake such as an MSR Groundhog.
- Add guylines and keep them attached to the tent.
- Adding extra guylines (parachute cord or “paracord”) increase the tent’s structural stability. The more the tent is staked and guyed equates to a still-standing tent during high wind, storms and snow loads.
- When not needed, you can keep “butterfly” bundles of the extra guylines neatly coiled, yet still attached to the tent. (See instructions below on how to easily wind a butterfly skein of paracord.)
- Choose reflective paracord to help avoid nocturnal trippings.
- To create taut ridgelines, extend your trekking poles up. And up. And up. You should also know how to readjust the tension on your guylines as they loosen. There are little gizmos you can buy, but knowing how to tie a Tautline (Midshipmans) Hitch (or the fancy Farrimond Friction Hitch or Trucker’s Hitch) is more useful and will bedazzle your friends. You can learn all about knots at this cool site.
- Add a small clothesline inside the tent by tying a short piece of paracord to available loops at the corners of the ridgeline. Even within the narrow width of my solo tent, the line is long enough to suspend the damp socks and bra.
- Consider carrying extra stakes, at least one or two and/or keep extras in a bounce box. If you break or lose them, you might find yourself unexpectedly jockeying for space in crowded lean-tos. Extra stakes are also necessary for securing your added guylines.
- To prevent slip sliding away, paint stripes of seam sealer on the tent’s interior floor. Several people commented about doing this after I complained about the Notch’s slippery silicon material. The power of my newly applied skid shield appears to have done the trick —my ThermoRest is staying put. The only downside is that the tacky seam sealer also collect bits of forest floor debris. I expect I may need to refresh that shield’s protective force field in the future.
Because the TarpTent Notch includes two points where guylines can be attached above the trekking poles, I’ve added 10′ of paracord. Butterfly skeins keep the guylines organized and out of the way, but ready to be put to use when needed. If 10′ proves to be unnecessary, the excess can be cut off and/or used in place of the stakes when the ground actually is, or is like, cement.
Winding and Using Butterfly Skeins
As a weaver, I learned how to use butterfly skeins for tapestry and other handwoven processes. It is equally useful and an easy skill to learn as part of your outdoor living arsenal. My 8′ x 12′ canoeing tarp has little butterfly skeins of paracord hanging from all four sides ready to be put into action (or not) as needed.
Here’s how you too can master winding butterflies:

After securing the guyline to your tent, thread the loose end behind your dominant hand’s thumb and across your palm. Leave about a 4″ tail.
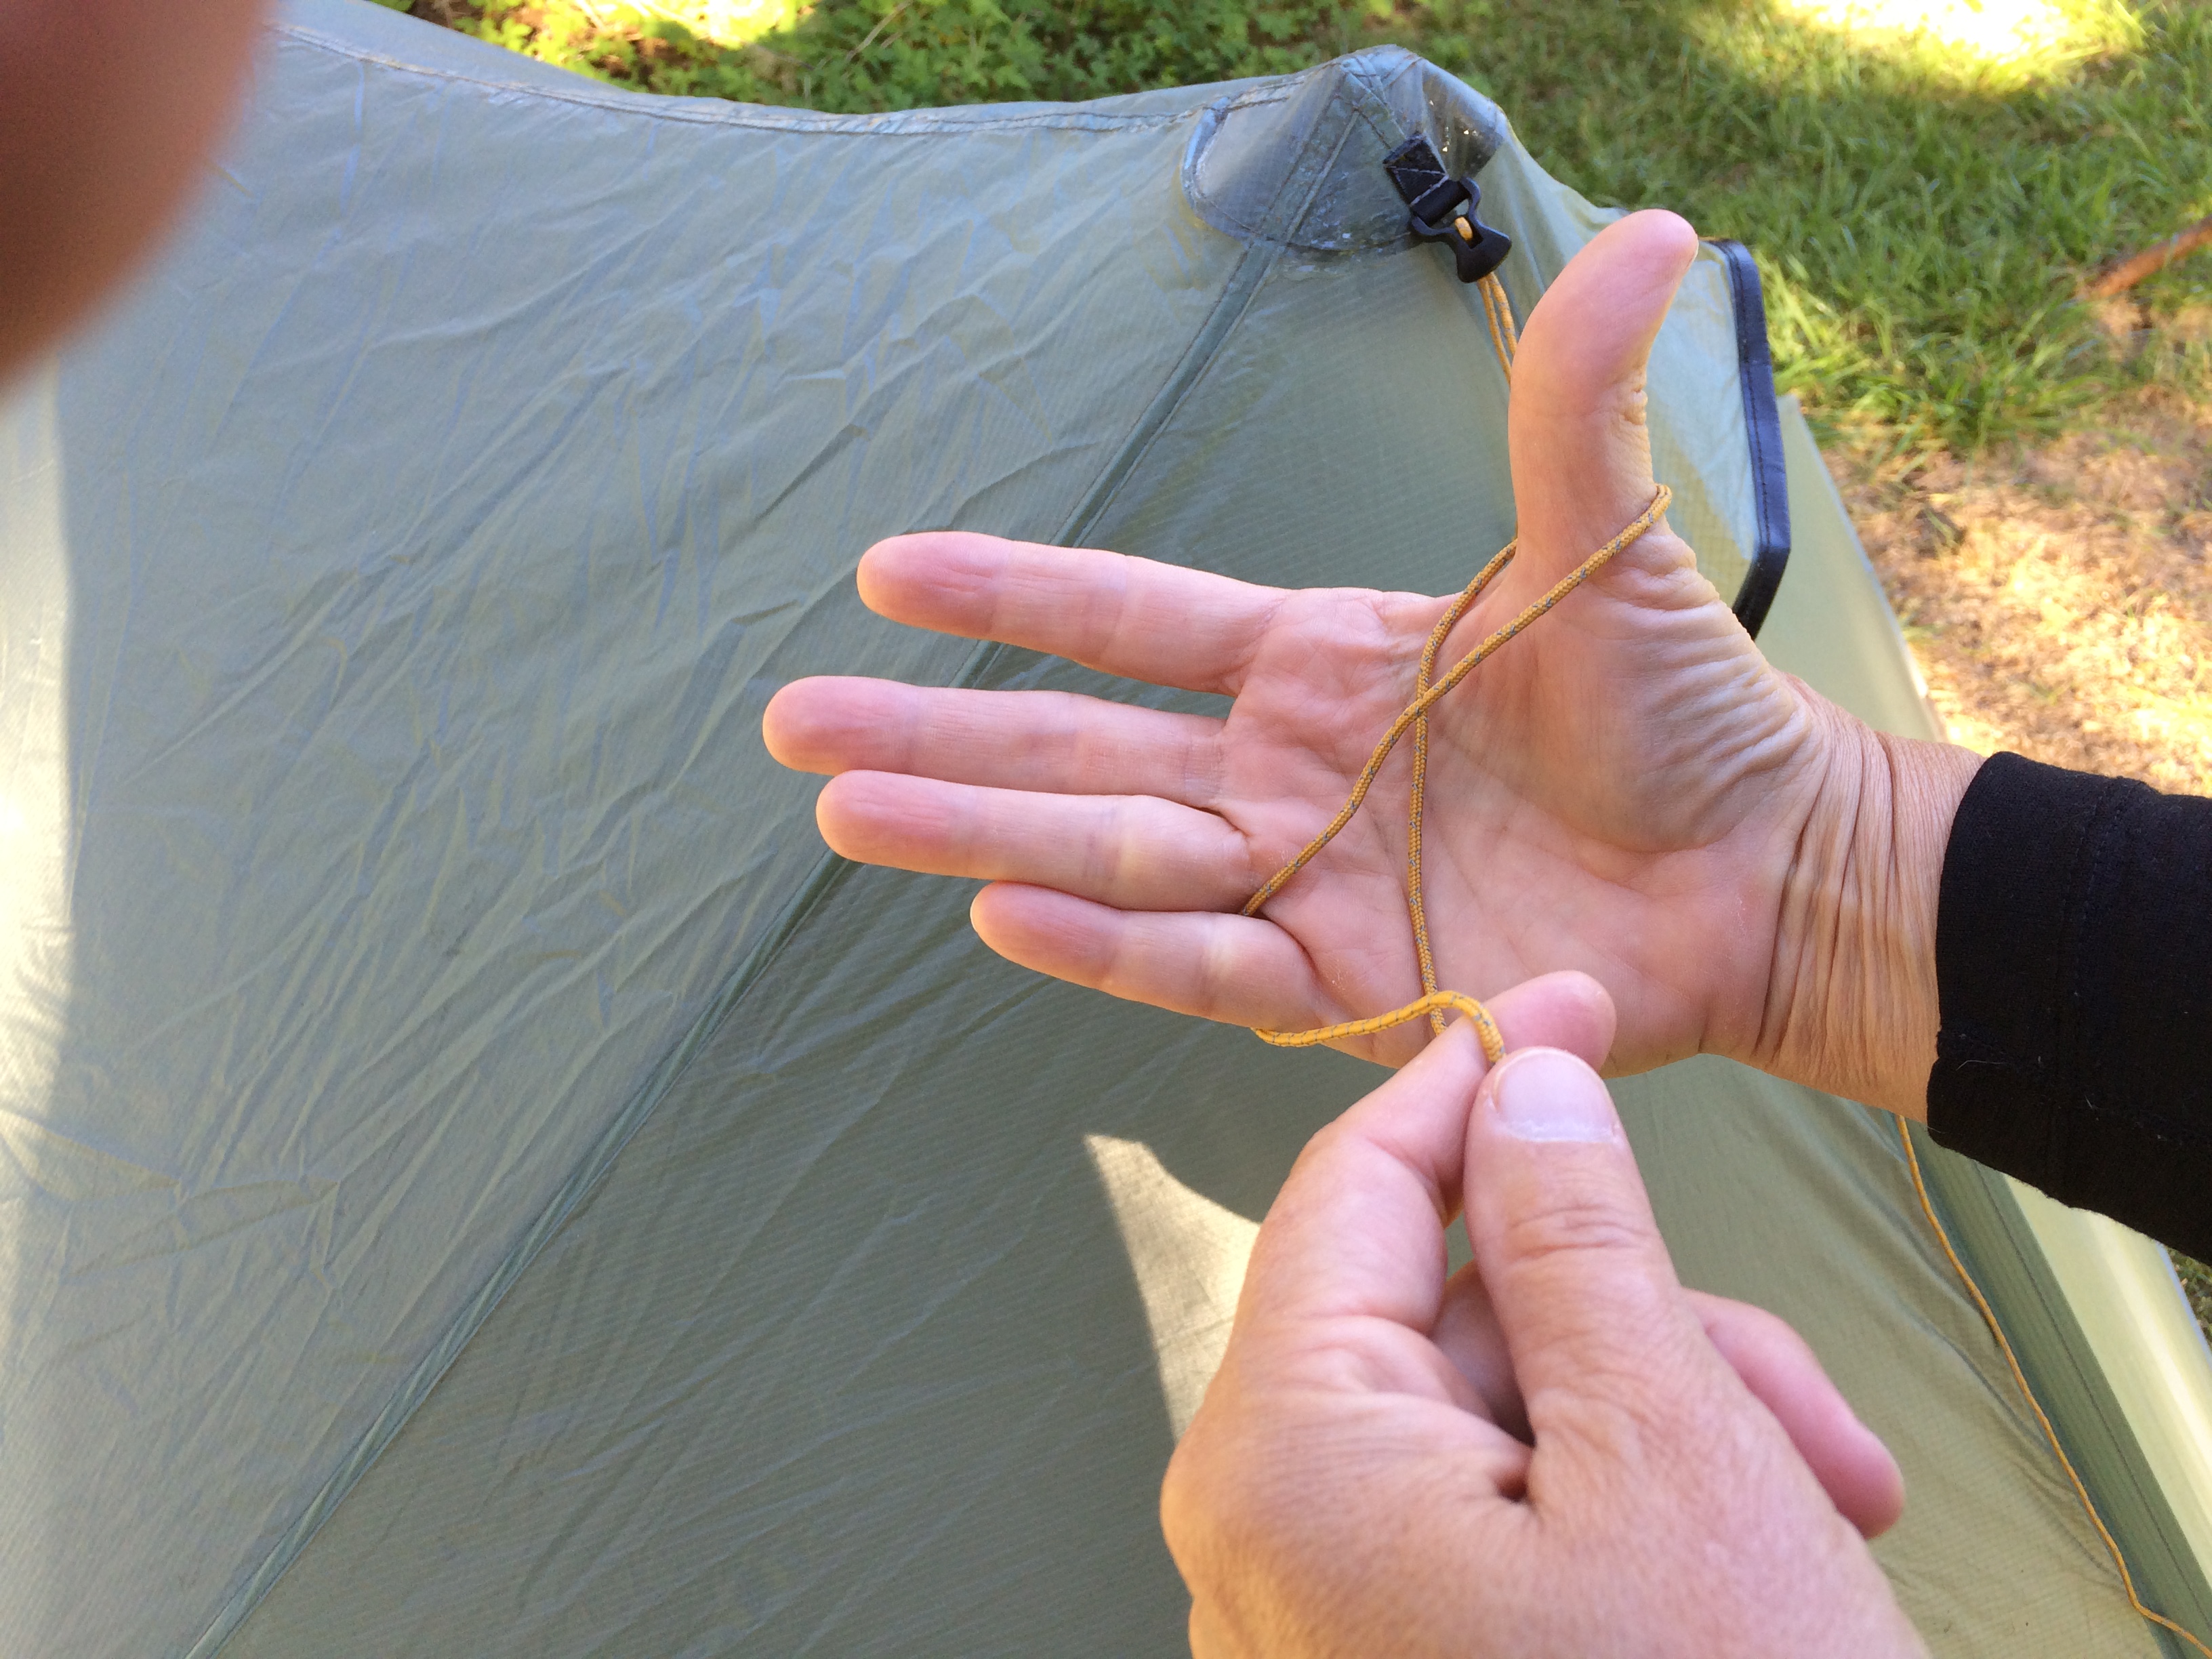
Next, wrap the cord around your little pinky finger, then back around your thumb, forming a figure eight.

Continue to wind back and forth between thumb and pinky. As you wind the cord, the figure eight will create a “cross” in the middle.

Wind back and forth until you are about five inches from the tied end. Hold onto the cross while slipping your thumb and pinky out of the loops.

Wrap the remaining length a few times around the center cross, rolling it upwards toward the tied end.

Now take the tail (the loose end) and use it to tie secure the attached end using half hitch/quick-release knots. You need the skein to stay locked in place, but not knotted so tightly that it can’t come undone when you need it.

The secured guyline hanging as a butterfly skein and all set to go.
Another advantage of this rope tying technique is that when you go to use the guyline, you should be able to extract the entire cord without tangling. Once the tail has been untied, the guyline should slip neatly out from the center of the skein by gently pulling on the tail.
While I still hold some reservations about completely relying on a staked tent for six months—especially if I find myself camped out on hard-packed, heavy-use areas—with the extra insurance of additional guylines and secured stakes, I do feel just a wee bit more prepared.
Any other tips seasoned soloists care to add?

This website contains affiliate links, which means The Trek may receive a percentage of any product or service you purchase using the links in the articles or advertisements. The buyer pays the same price as they would otherwise, and your purchase helps to support The Trek's ongoing goal to serve you quality backpacking advice and information. Thanks for your support!
To learn more, please visit the About This Site page.

Comments 4
I have the same tent. Another tip I learned late to keep the fabric taut is to first tighten the side guylines before the end lines. This lets you get away with shortening poles if you want to have the increased stability and rainwater prevention that allows.